メインコンテンツにスキップ
リペアコミュニティに参加 - アカウントの作成

Casio Exilim EX Z55 Lens Replacement

必要な工具と部品

  1. Casio Exilim EX Z55 Lens Replacement, Front Case: 手順 1、 3の画像 1 Casio Exilim EX Z55 Lens Replacement, Front Case: 手順 1、 3の画像 2 Casio Exilim EX Z55 Lens Replacement, Front Case: 手順 1、 3の画像 3
    • Remove eight 1.8 mm screws from the left and right sides of the camera using a Phillips #00 screwdriver

    FixBotに聞いてみる

    コメントを追加

  2. Casio Exilim EX Z55 Lens Replacement: 手順 2、 1の画像 1
    • Remove the four 3.7 mm screws from the bottom of the camera using a Phillips #00 screwdriver.

    FixBotに聞いてみる

    コメントを追加

  3. Casio Exilim EX Z55 Lens Replacement: 手順 3、 1の画像 1
    • Separate the front case from the body of the camera.

    FixBotに聞いてみる

    コメントを追加

  4. Casio Exilim EX Z55 Lens Replacement, Back Case: 手順 4、 1の画像 1
    • Separate the back case from the body of the camera.

    FixBotに聞いてみる

    コメントを追加

  5. Casio Exilim EX Z55 Lens Replacement, LCD Screen: 手順 5、 3の画像 1 Casio Exilim EX Z55 Lens Replacement, LCD Screen: 手順 5、 3の画像 2 Casio Exilim EX Z55 Lens Replacement, LCD Screen: 手順 5、 3の画像 3
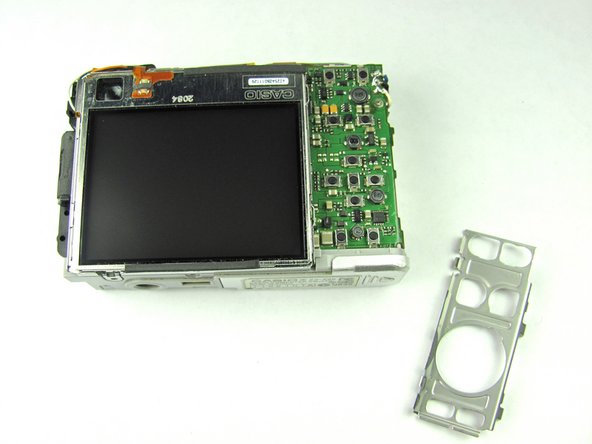
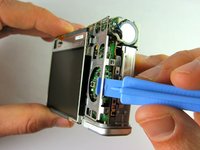
    • Remove the metal grating located to the right of the LCD screen by inserting the plastic opening tool under the grating and pulling up.

    FixBotに聞いてみる

    コメントを追加

  6. Casio Exilim EX Z55 Lens Replacement: 手順 6、 1の画像 1
    • Before removing the side metal bracket, first remove the attached strap knob by twisting it off.

    • Then, remove the side metal bracket by inserting the plastic opening tool under the bracket and pulling up.

    FixBotに聞いてみる

    コメントを追加

  7. Casio Exilim EX Z55 Lens Replacement: 手順 7、 1の画像 1
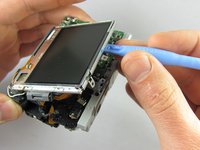
    • Using the plastic opening tool, pry up the LCD screen starting at one of the corners. Insert the tool under one of the corners and lift up.

    FixBotに聞いてみる

    コメントを追加

  8. Casio Exilim EX Z55 Lens Replacement: 手順 8、 2の画像 1 Casio Exilim EX Z55 Lens Replacement: 手順 8、 2の画像 2
    • Continue to lift the LCD screen all the way up.

    • Be careful not to rip any wires connecting the LCD screen to the top of the camera.

    FixBotに聞いてみる

    コメントを追加

  9. Casio Exilim EX Z55 Lens Replacement, Lens: 手順 9、 2の画像 1 Casio Exilim EX Z55 Lens Replacement, Lens: 手順 9、 2の画像 2
    • Remove the orange ribbon cable by grabbing the white tab and pulling back.

    FixBotに聞いてみる

    コメントを追加

  10. Casio Exilim EX Z55 Lens Replacement: 手順 10、 2の画像 1 Casio Exilim EX Z55 Lens Replacement: 手順 10、 2の画像 2
    • Remove the two 1.66mm screws on both the bottom and top metal plates, using a #00 Phillips screwdriver.

    FixBotに聞いてみる

    コメントを追加

  11. Casio Exilim EX Z55 Lens Replacement: 手順 11、 1の画像 1
    • Using the plastic opening tool, pry the battery case clamps (located on front of the camera) so that the bottom portion of the camera will come loose.

    FixBotに聞いてみる

    コメントを追加

  12. Casio Exilim EX Z55 Lens Replacement: 手順 12、 1の画像 1
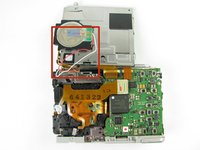
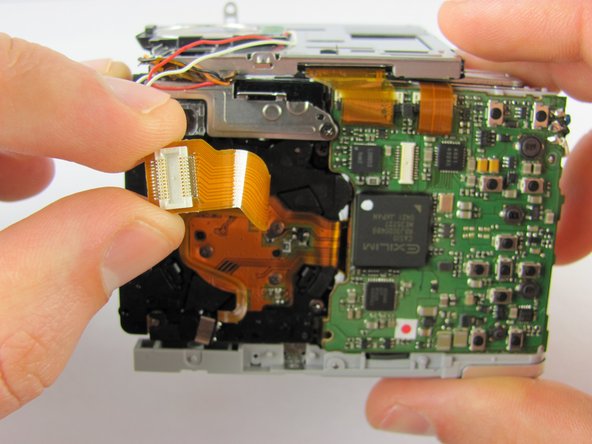
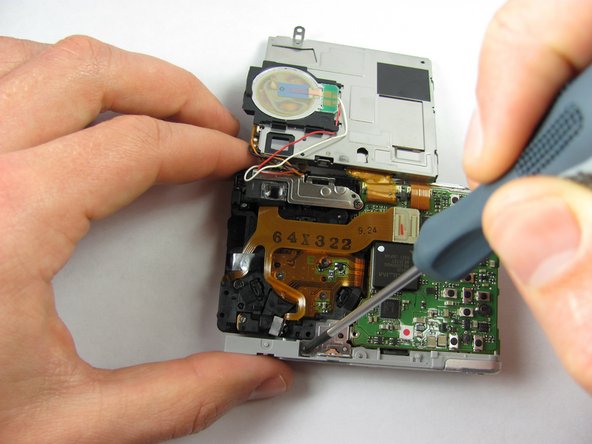
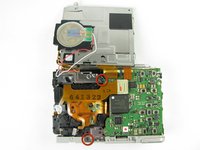
    • Once the bottom portion of the camera is removed, stand the camera upright, bottom portion facing up, then detach the inner orange strip from the motherboard to the lens by inserting the plastic opening tool under the tab and lifting up.

    FixBotに聞いてみる

    コメントを追加

  13. Casio Exilim EX Z55 Lens Replacement: 手順 13、 1の画像 1
    • Fully remove the lens from the motherboard.

    • It will still be attached by wires and a different orange ribbon cable.

    • You can now proceed to repair the existing lens or replace it with a new lens.

    FixBotに聞いてみる

    コメントを追加

終わりに

To reassemble your device, follow these instructions in reverse order.

キャンセル: このガイドを終了できませんでした。

ある他の人がこのガイドを完成しました。

作成者

6人の作成者と共同で作成されました。

Greg Bucher

メンバー登録日: 04/19/12

14 ポイント

1ガイドが承認済み

チーム

Cal Poly, Team 9-45, Regan Spring 2012 Cal Poly, Team 9-45, Regan Spring 2012人のメンバー

CPSU-REGAN-S12S9G45

7 メンバー

14のガイドは作成済み

0件のガイドコメント

コメントを追加

統計データ:

過去 24時間: 2

過去 7 日: 20

過去 30 日: 66

今までの合計 2,287