メインコンテンツにスキップ

Canon PowerShot S230 Camera Casing Replacement

必要な工具と部品

  1. Canon PowerShot S230 Camera Casing Replacement, Battery: 手順 1、 1の画像 1
    • On the bottom of the camera, use your thumb to press the rubber battery cover towards the side of the camera with the strap base. The cover will shift to extend beyond the rest of the camera.

  2. Canon PowerShot S230 Camera Casing Replacement: 手順 2、 1の画像 1
    • Hold the end of the battery cover that extends beyond the camera and lift it up.

  3. Canon PowerShot S230 Camera Casing Replacement: 手順 3、 1の画像 1
    • Locate the orange tab next to the battery. Next roll the tab back in order for the battery to come out.

  4. Canon PowerShot S230 Camera Casing Replacement: 手順 4、 1の画像 1
    • Pull the battery out.

  5. Canon PowerShot S230 Camera Casing Replacement, Memory Card: 手順 5、 3の画像 1 Canon PowerShot S230 Camera Casing Replacement, Memory Card: 手順 5、 3の画像 2 Canon PowerShot S230 Camera Casing Replacement, Memory Card: 手順 5、 3の画像 3
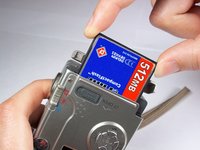
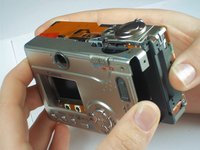
    • Locate the sliding button labeled "CF open" on the back of the camera.

    • Press and slide down the button labeled "CF open". The memory card cover will pop open.

  6. Canon PowerShot S230 Camera Casing Replacement: 手順 6、 3の画像 1 Canon PowerShot S230 Camera Casing Replacement: 手順 6、 3の画像 2 Canon PowerShot S230 Camera Casing Replacement: 手順 6、 3の画像 3
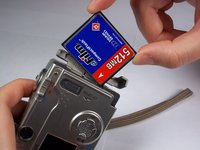
    • Push down on the black square button next to the memory card slot. This will release the memory card from the slot.

  7. Canon PowerShot S230 Camera Casing Replacement: 手順 7、 2の画像 1 Canon PowerShot S230 Camera Casing Replacement: 手順 7、 2の画像 2
    • Pull the memory card out of the memory card slot.

  8. Canon PowerShot S230 Camera Casing Replacement, Camera Casing: 手順 8、 1の画像 1
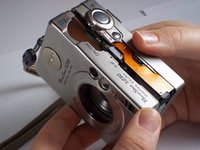
    • Remove two 2.4mm Phillips screws from the right side of the camera.

  9. Canon PowerShot S230 Camera Casing Replacement: 手順 9、 1の画像 1
    • Remove two 2.4mm Phillips screws above the label on the bottom of the camera.

    • Remove two 2.8mm Phillips screws next to the tripod hole.

  10. Canon PowerShot S230 Camera Casing Replacement: 手順 10、 1の画像 1
    • Remove the two 3.2mm Phillips screws that are closer to the top and bottom edges of the camera.

    • Remove the two 3.8mm Phillips screws on either side of the strap base.

  11. Canon PowerShot S230 Camera Casing Replacement: 手順 11、 1の画像 1
    • Remove one 1.6mm Phillips screw from the above the CF open button on back of the camera.

  12. Canon PowerShot S230 Camera Casing Replacement: 手順 12、 3の画像 1 Canon PowerShot S230 Camera Casing Replacement: 手順 12、 3の画像 2 Canon PowerShot S230 Camera Casing Replacement: 手順 12、 3の画像 3
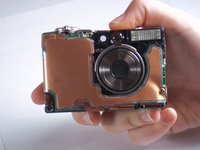
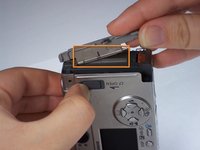
    • Gently pull the front casing from the camera.

    • The following items will either fall off or will be loose: the strap base, the gray rubber cover labeled "Digital A/V Out", and the black rubber piece over the view finder.

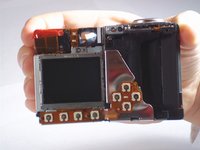
    • Remove the memory card cover by sliding down the CF open button and moving the pin.

  13. Canon PowerShot S230 Camera Casing Replacement: 手順 13、 2の画像 1 Canon PowerShot S230 Camera Casing Replacement: 手順 13、 2の画像 2
    • Gently pull the back casing from the camera.

終わりに

To reassemble your device, follow these instructions in reverse order.

作成者

7人の作成者と共同で作成されました。

Tanya Malalang

メンバー登録日: 01/12/11

325 ポイント

3のガイドは作成済み

チーム

Cal Poly, Team 13-1, Forte Winter 2011 Cal Poly, Team 13-1, Forte Winter 2011人のメンバー

CPSU-FORTE-W11S13G1

4 メンバー

5のガイドは作成済み

0 件のコメント

コメントを追加

統計データ:

過去 24時間: 0

過去 7 日: 2

過去 30 日: 4

今までの合計 1,723