メインコンテンツにスキップ
リペアコミュニティに参加 - アカウントの作成

Canon PowerShot G11 Rear Dial Replacement

必要な工具と部品

  1. Canon PowerShot G11 Rear Dial Replacement, Rear Cover: 手順 1、 1の画像 1
    • Remove the three screws on the bottom of the camera using the 00 sized phillips head screw driver.

    FixBotに聞いてみる
  2. Canon PowerShot G11 Rear Dial Replacement: 手順 2、 1の画像 1
    • Remove the four screws on the left side of the camera.

    FixBotに聞いてみる
  3. Canon PowerShot G11 Rear Dial Replacement: 手順 3、 1の画像 1
    • Remove the screw on the right side of the camera.

    FixBotに聞いてみる
  4. Canon PowerShot G11 Rear Dial Replacement: 手順 4、 1の画像 1
    • Open up the HDMI port on the right side of the camera. Then remove the screw in the HDMI port.

    FixBotに聞いてみる
  5. Canon PowerShot G11 Rear Dial Replacement: 手順 5、 1の画像 1
    • Remove the screw to the right of the view finder on the rear of the camera.

    FixBotに聞いてみる
  6. Canon PowerShot G11 Rear Dial Replacement: 手順 6、 1の画像 1
    • Use the spudger to crack open the case.

    FixBotに聞いてみる
  7. Canon PowerShot G11 Rear Dial Replacement: 手順 7、 1の画像 1
    この手順で使用する道具:
    Tweezers
    $4.99
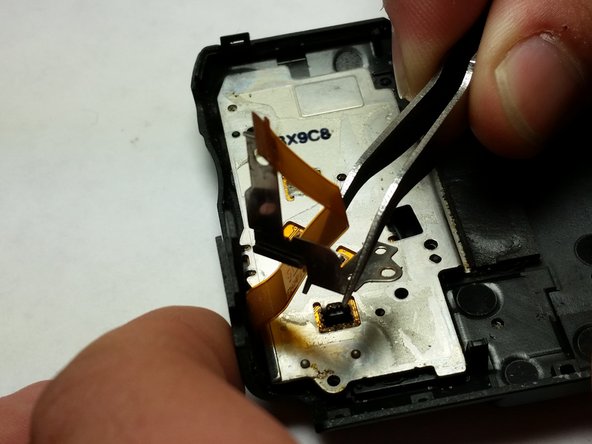
    • The rear case is still attached to the camera with a ribbon cable. The socket has a flip up lid that must be flipped up before the cable can be removed. Use the tweezers to flip the cable attachment up.

    FixBotに聞いてみる
  8. Canon PowerShot G11 Rear Dial Replacement: 手順 8、 1の画像 1
    • The rear cover is now unattached from the camera.

    FixBotに聞いてみる
  9. Canon PowerShot G11 Rear Dial Replacement, Rear Dial: 手順 9、 1の画像 1
    • Remove the plastic covering of the left side of the rear case interior.

    FixBotに聞いてみる
  10. Canon PowerShot G11 Rear Dial Replacement: 手順 10、 1の画像 1
    • Remove the four screws that are now accessible with the removal of the plastic covering them.

    FixBotに聞いてみる
  11. Canon PowerShot G11 Rear Dial Replacement: 手順 11、 2の画像 1 Canon PowerShot G11 Rear Dial Replacement: 手順 11、 2の画像 2
    • After the screws are removed, pull the metal bracket out of the camera.

    FixBotに聞いてみる
  12. Canon PowerShot G11 Rear Dial Replacement: 手順 12、 1の画像 1
    • Push the dial out from the other side of the cover.

    FixBotに聞いてみる
  13. Canon PowerShot G11 Rear Dial Replacement: 手順 13、 1の画像 1
    • Remove the dial from the case completely.

    FixBotに聞いてみる
終わりに

To reassemble your device, follow these instructions in reverse order.

3 の人々がこのガイドを完成させました。

作成者

1人の作成者と共同作成されました。

Dustin Brinegar

メンバー登録日: 01/21/15

715 ポイント

4のガイドは作成済み

チーム

USF Tampa, Team 5-6, Brown Winter 2015 USF Tampa, Team 5-6, Brown Winter 2015人のメンバー

USFT-BROWN-W15S5G6

3 メンバー

6のガイドは作成済み

0件のガイドコメント

コメントを追加

統計データ:

過去 24時間: 0

過去 7 日: 5

過去 30 日: 50

今までの合計 2,629