メインコンテンツにスキップ
リペアコミュニティに参加 - アカウントの作成

Bicycle Rear Shifting Cable Replacement

必要な工具と部品

  1. Bicycle Rear Shifting Cable Replacement, Rear Shifting Cable: 手順 1、 2の画像 1 Bicycle Rear Shifting Cable Replacement, Rear Shifting Cable: 手順 1、 2の画像 2
    • Adjust the friction shifter so that it is in the position of the hardest gear.

    • The cable should have the least tension in this position.

    FixBotに聞いてみる

    コメントを追加

  2. Bicycle Rear Shifting Cable Replacement: 手順 2、 2の画像 1 Bicycle Rear Shifting Cable Replacement: 手順 2、 2の画像 2
    • Using the pair of dykes, cut the old cable end off of the old cable.

    • Use caution, the dykes are sharp!

    FixBotに聞いてみる

    コメントを追加

  3. Bicycle Rear Shifting Cable Replacement: 手順 3、 3の画像 1 Bicycle Rear Shifting Cable Replacement: 手順 3、 3の画像 2 Bicycle Rear Shifting Cable Replacement: 手順 3、 3の画像 3
    • Make note of how the cable is secured by the cable securing bolt on the derailleur.

    • Using the 9mm wrench, loosen the cable securing bolt on the rear derailleur.

    • The bolt does not need to be removed entirely, only loosened enough to remove the cable.

    FixBotに聞いてみる

    コメントを追加

  4. Bicycle Rear Shifting Cable Replacement: 手順 4、 3の画像 1 Bicycle Rear Shifting Cable Replacement: 手順 4、 3の画像 2 Bicycle Rear Shifting Cable Replacement: 手順 4、 3の画像 3
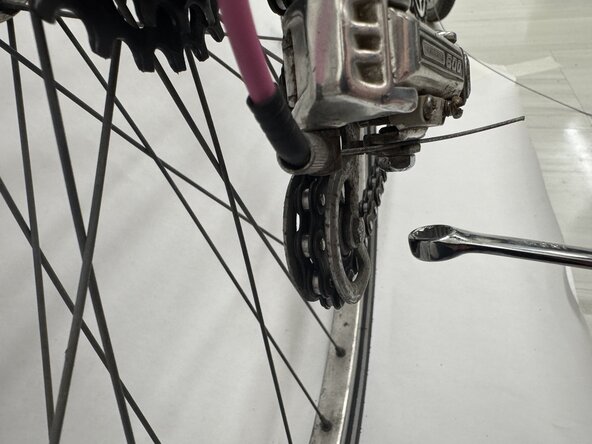
    • Remove the cable from the securing bolt.

    • Make note of how the cable is routed through the bike.

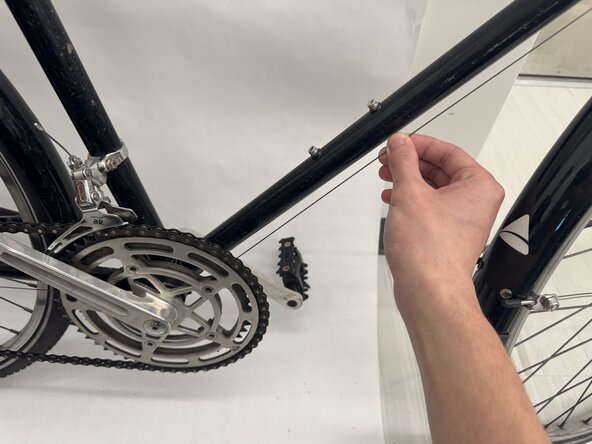
    • Remove the old cable from the bike by pulling the cable away from the rear derailleur (toward the front wheel).

    FixBotに聞いてみる

    コメントを追加

  5. Bicycle Rear Shifting Cable Replacement: 手順 5、 3の画像 1 Bicycle Rear Shifting Cable Replacement: 手順 5、 3の画像 2 Bicycle Rear Shifting Cable Replacement: 手順 5、 3の画像 3
    • Remove the old cable from the shifter cable eye by pushing the cable up from below.

    • Pull the old cable up until it is completely removed from the shifter.

    FixBotに聞いてみる

    コメントを追加

  6. Bicycle Rear Shifting Cable Replacement: 手順 6、 3の画像 1 Bicycle Rear Shifting Cable Replacement: 手順 6、 3の画像 2 Bicycle Rear Shifting Cable Replacement: 手順 6、 3の画像 3
    • Install the new cable into the shifter by threading it into the shifter cable eye.

    • Pull the new cable completely through until the cable end is resting in the shifter's cable eye.

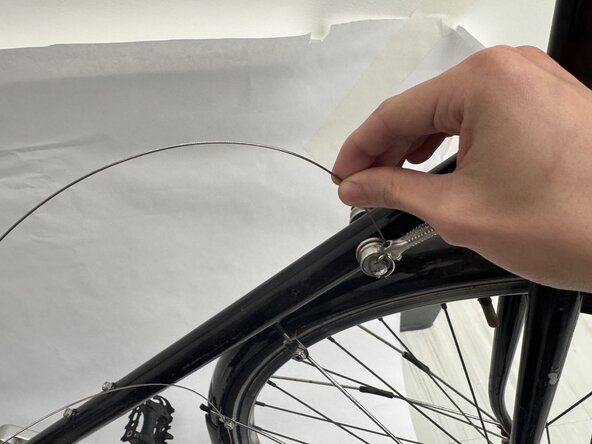
    • Route the new cable back through the bicycle the same way the old cable was routed.

    FixBotに聞いてみる

    コメントを追加

  7. Bicycle Rear Shifting Cable Replacement: 手順 7、 1の画像 1
    • Route the new cable through the rear derailleur cable housing.

    FixBotに聞いてみる

    コメントを追加

  8. Bicycle Rear Shifting Cable Replacement: 手順 8、 3の画像 1 Bicycle Rear Shifting Cable Replacement: 手順 8、 3の画像 2 Bicycle Rear Shifting Cable Replacement: 手順 8、 3の画像 3
    • The new cable may get stuck in the cable housing. If this occurs, remove the housing from its guides, straighten it and push the new cable through.

    FixBotに聞いてみる

    コメントを追加

  9. Bicycle Rear Shifting Cable Replacement: 手順 9、 2の画像 1 Bicycle Rear Shifting Cable Replacement: 手順 9、 2の画像 2
    • Reinstall the cable housing in its guides if necessary and guide the cable through the rear derailleur cable eye.

    • Pull the cable through completely.

    • Ensure the cable is installed correctly underneath the cable securing bolt on the derailleur. It should be in the same place the old cable was secured.

    FixBotに聞いてみる

    コメントを追加

  10. Bicycle Rear Shifting Cable Replacement: 手順 10、 2の画像 1 Bicycle Rear Shifting Cable Replacement: 手順 10、 2の画像 2
    • Ensure the shifting lever is still in the position of the hardest gear, where the cable has the least tension.

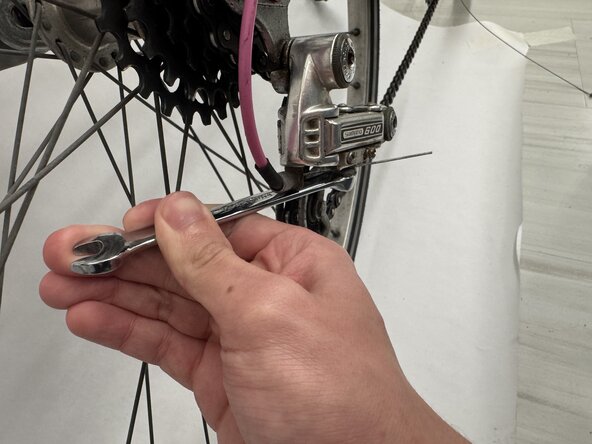
    • Pulling the cable taut, use the 9mm wrench to tighten the cable securing bolt to hand tightness.

    FixBotに聞いてみる

    コメントを追加

  11. Bicycle Rear Shifting Cable Replacement: 手順 11、 3の画像 1 Bicycle Rear Shifting Cable Replacement: 手順 11、 3の画像 2 Bicycle Rear Shifting Cable Replacement: 手順 11、 3の画像 3
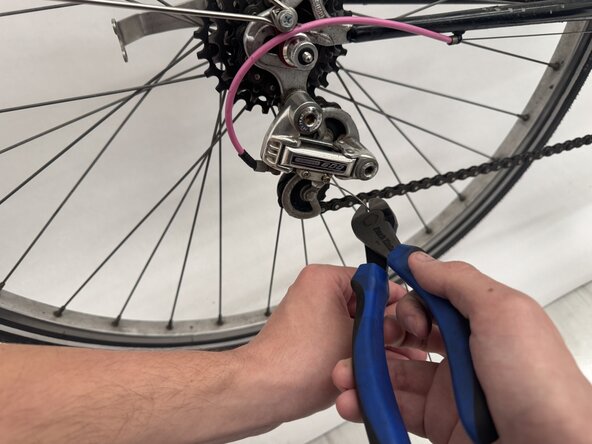
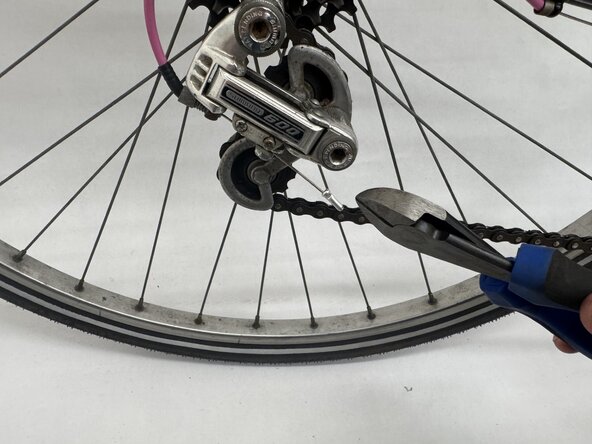
    • Use the pair of dykes to cut the new cable, leaving about an inch and a half of extra cable beyond the cable securing bolt.

    • Use caution when using the dykes, they are sharp!

    FixBotに聞いてみる

    コメントを追加

  12. Bicycle Rear Shifting Cable Replacement: 手順 12、 2の画像 1 Bicycle Rear Shifting Cable Replacement: 手順 12、 2の画像 2
    • Install the cable crimp onto the end of the new cable.

    FixBotに聞いてみる

    コメントを追加

  13. Bicycle Rear Shifting Cable Replacement: 手順 13、 2の画像 1 Bicycle Rear Shifting Cable Replacement: 手順 13、 2の画像 2
    • Using the dykes, crimp the cable crimp.

    • Do not use too much pressure when crimping with dykes, the crimp will be cut in half!

    • Use caution when using the dykes, they are sharp!

    FixBotに聞いてみる

    コメントを追加

終わりに

All that's left is to test the repair. Go for a ride and shift gears to see if the repair was successful. If tension in the cable is too loose, the friction shifter in step 1 can be pulled towards the rear wheel to increase tension.

キャンセル: このガイドを終了できませんでした。

ある他の人がこのガイドを完成しました。

作成者

3人の作成者と共同で作成されました。

Amanda

メンバー登録日: 01/20/26

217 ポイント

1ガイドが承認済み

チーム

UC Davis, Team 1-5, Morris Winter 2026 UC Davis, Team 1-5, Morris Winter 2026人のメンバー

UCD-MORRIS-W26S1G5

3 メンバー

2のガイドは作成済み

0件のガイドコメント

コメントを追加

統計データ:

過去 24時間: 3

過去 7 日: 109

過去 30 日: 152

今までの合計 234