メインコンテンツにスキップ

Asus ZenBook UX303U Back Panel Replacement

必要な工具と部品

  1. Asus ZenBook UX303U Back Panel Replacement, Back Panel: 手順 1、 1の画像 1
    • Remove the two round rubber feet at the hinge-edge of the laptop.

  2. Asus ZenBook UX303U Back Panel Replacement: 手順 2、 1の画像 1
    • Remove the eleven 4 mm Phillips #00 screws from the back panel.

  3. Asus ZenBook UX303U Back Panel Replacement: 手順 3、 2の画像 1 Asus ZenBook UX303U Back Panel Replacement: 手順 3、 2の画像 2
    • Using a plastic opening tool pry the back panel off of the laptop.

終わりに

To reassemble your device, follow these instructions in reverse order.

2 の人々がこのガイドを完成させました。

作成者

6人の作成者と共同で作成されました。

Luis Perez

メンバー登録日: 02/14/18

598 ポイント

2のガイドは作成済み

チーム

USF Tampa, Team S3-G5, Nance Spring 2018 USF Tampa, Team S3-G5, Nance Spring 2018人のメンバー

USFT-NANCE-S18S3G5

3 メンバー

9のガイドは作成済み

コメント 1 件

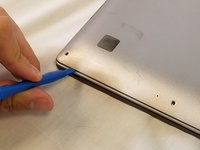
Some models may utilize Phillips #00 screws, but mine (and many others based on what I’ve now read) utilize Torx T5 screws around the edges of the panel.

Nick Brennan - 返信

コメントを追加

統計データ:

過去 24時間: 1

過去 7 日: 7

過去 30 日: 17

今までの合計 5,244