メインコンテンツにスキップ
リペアコミュニティに参加 - アカウントの作成

Apple PowerBook G3 400 Sound Card Replacement

必要な工具と部品

  1. Apple PowerBook G3 400 Sound Card Replacement, Keyboard: 手順 1、 1の画像 1
    • Pull the keyboard tabs toward you while lifting up on the keyboard until it releases from it's hold.

    • To lift the keyboard out pull it up and away from you. Then place the keyboard on the track pad.

    FixBotに聞いてみる

    コメントを追加

  2. Apple PowerBook G3 400 Sound Card Replacement: 手順 2、 1の画像 1
    • Pull the keyboard ribbon vertically from the logic board to release connection.

    • The connector may be tight and difficult to remove. If stuck try rocking the connector back and forth while pulling up until it releases. This same process can be used for many of the connectors on this device.

    • Remove battery and CD/DVD drives before proceeding any further.

    FixBotに聞いてみる

    コメントを追加

  3. Apple PowerBook G3 400 Sound Card Replacement: 手順 3、 1の画像 1
    • Your computer should look approximately like this.

    FixBotに聞いてみる

    コメントを追加

  4. Apple PowerBook G3 400 Sound Card Replacement, RAM: 手順 4、 1の画像 1
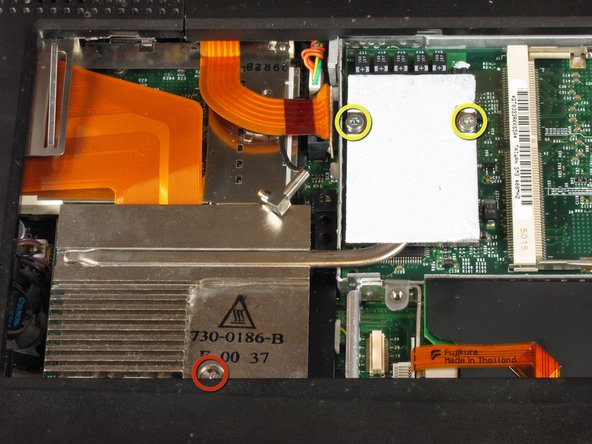
    • Remove the two silver Phillips #1 screws that attach the heat shield to the metal framework.

    • Lift the heat shield up and toward you.

    FixBotに聞いてみる

    コメントを追加

  5. Apple PowerBook G3 400 Sound Card Replacement: 手順 5、 1の画像 1
    • Pull the PRAM battery cable vertically upward to disconnect it.

    • Remove the battery by pulling up and to the left.

    FixBotに聞いてみる

    コメントを追加

  6. Apple PowerBook G3 400 Sound Card Replacement: 手順 6、 1の画像 1
    • Remove the two T8 Torx screws that attach the heat sink to the processor.

    • Remove the long silver Phillips #1 screw from the heat sink.

    FixBotに聞いてみる

    コメントを追加

  7. Apple PowerBook G3 400 Sound Card Replacement: 手順 7、 1の画像 1
    • Lift up the heat sink unit from the left side and remove.

    FixBotに聞いてみる

    コメントを追加

  8. Apple PowerBook G3 400 Sound Card Replacement: 手順 8、 1の画像 1
    • Lift the processor on the right side and pull directly up.

    • The RAM chips should be in the slots on the processor.

    FixBotに聞いてみる

    コメントを追加

  9. Apple PowerBook G3 400 Sound Card Replacement: 手順 9、 1の画像 1
    • After removing the RAM, your laptop should now look like this.

    FixBotに聞いてみる

    コメントを追加

  10. Apple PowerBook G3 400 Sound Card Replacement, Hard Drive: 手順 10、 1の画像 1
    • Locate the orange tab, which should be just left of the hard-drive.

    • You must disconnect this orange tab from the logic board to enable the next step.

    • It is better to do this by grabbing the plastic connection point, not the relatively flexible cable.

    FixBotに聞いてみる

    コメントを追加

  11. Apple PowerBook G3 400 Sound Card Replacement: 手順 11、 1の画像 1
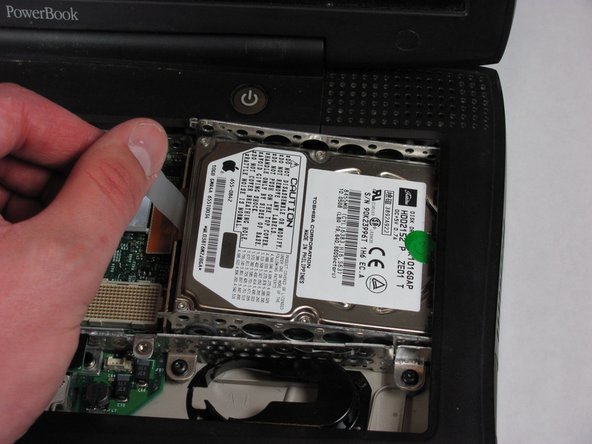
    • Grab the plastic strip shown here and gently remove, pulling up and left.

    • Pull left to avoid the hard drive catching the casing.

    FixBotに聞いてみる

    コメントを追加

  12. Apple PowerBook G3 400 Sound Card Replacement: 手順 12、 1の画像 1
    • Once you have removed the hard-drive, your laptop should like this.

    FixBotに聞いてみる

    コメントを追加

  13. Apple PowerBook G3 400 Sound Card Replacement, Modem: 手順 13、 1の画像 1
    • Remove the single black Torx screw from the modem.

    • Remove the black rectangle that is being held on by the one Torx screw.

    FixBotに聞いてみる

    コメントを追加

  14. Apple PowerBook G3 400 Sound Card Replacement: 手順 14、 1の画像 1
    • Using your fingers, lift the modem from the socket it is plugged into.

    FixBotに聞いてみる

    コメントを追加

  15. Apple PowerBook G3 400 Sound Card Replacement: 手順 15、 1の画像 1
    • Disconnect the cable that is attached to the end of the modem to remove the modem.

    FixBotに聞いてみる

    コメントを追加

  16. Apple PowerBook G3 400 Sound Card Replacement, Display: 手順 16、 1の画像 1
    • Your computer will look approximately like this.

    FixBotに聞いてみる

    コメントを追加

  17. Apple PowerBook G3 400 Sound Card Replacement: 手順 17、 1の画像 1
    • Push the display back.

    • Put your index finger under the power button and gently pull the clutch cover back.

    • Repeat for the left side.

    FixBotに聞いてみる

    コメントを追加

  18. Apple PowerBook G3 400 Sound Card Replacement: 手順 18、 1の画像 1
    • Lift the clutch cover up and off. Pull it towards yourself.

    FixBotに聞いてみる

    コメントを追加

  19. Apple PowerBook G3 400 Sound Card Replacement: 手順 19、 1の画像 1
    • Disconnect the display cable from the logic board.

    FixBotに聞いてみる

    コメントを追加

  20. Apple PowerBook G3 400 Sound Card Replacement: 手順 20、 1の画像 1
    • Remove the Torx screw that holds the display cable.

    • Pull out thick display inverter board by pulling it up and out. Two tabs will be holding it in place, you need to get pass these to pull the board free.

    FixBotに聞いてみる

    コメントを追加

  21. Apple PowerBook G3 400 Sound Card Replacement: 手順 21、 1の画像 1
    • Disconnect the white inverter cable. Pull it towards the left.

    FixBotに聞いてみる

    コメントを追加

  22. Apple PowerBook G3 400 Sound Card Replacement: 手順 22、 1の画像 1
    • Disconnect the inverter plug by pulling it up from the logib board.

    FixBotに聞いてみる

    コメントを追加

  23. Apple PowerBook G3 400 Sound Card Replacement: 手順 23、 1の画像 1
    • Turn the laptop around.

    • Open the port door.

    • Remove the four Torx screws.

    FixBotに聞いてみる

    コメントを追加

  24. Apple PowerBook G3 400 Sound Card Replacement: 手順 24、 1の画像 1
    • Turn the laptop so the front faces you.

    • Pull the black Airport antenna up.

    FixBotに聞いてみる

    コメントを追加

  25. Apple PowerBook G3 400 Sound Card Replacement: 手順 25、 1の画像 1
    • Pull the display up as you hold it firmly with both hands.

    FixBotに聞いてみる

    コメントを追加

  26. Apple PowerBook G3 400 Sound Card Replacement, Sound Card: 手順 26、 1の画像 1
    • Your laptop should look something like this.

    FixBotに聞いてみる

    コメントを追加

  27. Apple PowerBook G3 400 Sound Card Replacement: 手順 27、 1の画像 1
    • Disconnect the large orange wire that is shown.

    FixBotに聞いてみる

    コメントを追加

  28. Apple PowerBook G3 400 Sound Card Replacement: 手順 28、 1の画像 1
    • Take out the one short black and three long silver Torx screws from casing.

    FixBotに聞いてみる

    コメントを追加

  29. Apple PowerBook G3 400 Sound Card Replacement: 手順 29、 1の画像 1
    • Slide the black plastic shield away from you and out from under the hard plastic casing.

    • Disconnect the orange cable from the logic board.

    • Take out the two long silver Torx screws.

    FixBotに聞いてみる

    コメントを追加

  30. Apple PowerBook G3 400 Sound Card Replacement: 手順 30、 1の画像 1
    • Turn your laptop over.

    • Take out the five small Torx screws from casing.

    • Remove the two long Torx screws and make sure these are put back in the right place when reassembling your device.

    FixBotに聞いてみる

    コメントを追加

  31. Apple PowerBook G3 400 Sound Card Replacement: 手順 31、 1の画像 1
    • Turn your laptop back over.

    • Remove the three small black Torx screws from the frame.

    • Remove the small Torx screw that holds the logic board to the casing on the left.

    FixBotに聞いてみる

    コメントを追加

  32. Apple PowerBook G3 400 Sound Card Replacement: 手順 32、 1の画像 1
    • Hold the upper casing in the place shown and pull it back to release the lock. When the lock has released, pull up just enough to keep the case from locking again.

    FixBotに聞いてみる

    コメントを追加

  33. Apple PowerBook G3 400 Sound Card Replacement: 手順 33、 1の画像 1
    • The eject button on the left side of the laptop keeps the upper casing from lifting up. To get around this, you must push the button in to the point that the upper casing can pass by the button and continue lifting up.

    FixBotに聞いてみる

    コメントを追加

  34. Apple PowerBook G3 400 Sound Card Replacement: 手順 34、 1の画像 1
    • Lift up the left side of the upper case just enough so that the two audio cables connected to the sound card can be disconnected.

    • Do not lift the upper casing too far without disconnecting the audio cables otherwise there is a possibility of damaging the sound card.

    • After disconnecting the audio cables remove the upper casing.

    FixBotに聞いてみる

    コメントを追加

  35. Apple PowerBook G3 400 Sound Card Replacement: 手順 35、 1の画像 1
    • Your laptop should look something like this.

    FixBotに聞いてみる

    コメントを追加

  36. Apple PowerBook G3 400 Sound Card Replacement: 手順 36、 1の画像 1
    • Take out the two long silver Torx screws from the power card.

    • Hold the power card near the black plastic shielding and lift up to remove power card.

    FixBotに聞いてみる

    コメントを追加

  37. Apple PowerBook G3 400 Sound Card Replacement: 手順 37、 1の画像 1
    • Lightly hold the metal shield on the left side of it and slowly pull up and toward the front of the laptop.

    • These clips will bend very easily and need to be handled with care when taking it out of the laptop.

    FixBotに聞いてみる

    コメントを追加

  38. Apple PowerBook G3 400 Sound Card Replacement: 手順 38、 1の画像 1
    • Remove the black Torx screw from the metal frame that it is holding it to the bottom casing.

    • Using a 5mm wrench or needle-nose pliers remove the small nut from the bolt.

    FixBotに聞いてみる

    コメントを追加

  39. Apple PowerBook G3 400 Sound Card Replacement: 手順 39、 1の画像 1
    • Disconnect the fan power cable on the left side of the laptop.

    FixBotに聞いてみる

    コメントを追加

  40. Apple PowerBook G3 400 Sound Card Replacement: 手順 40、 1の画像 1
    • Rotate the laptop 180 degrees so that the back is facing you.

    • Lift up the left side of the metal frame and remove the one black Torx screw.

    FixBotに聞いてみる

    コメントを追加

  41. Apple PowerBook G3 400 Sound Card Replacement: 手順 41、 1の画像 1
    • Hold the filter by the black end and rotate the filter toward the front of the laptop. Then pull it up and above the frame.

    • Take out the metal frame.

    FixBotに聞いてみる

    コメントを追加

  42. Apple PowerBook G3 400 Sound Card Replacement: 手順 42、 1の画像 1
    • Your laptop should look something like this.

    FixBotに聞いてみる

    コメントを追加

  43. Apple PowerBook G3 400 Sound Card Replacement: 手順 43、 1の画像 1
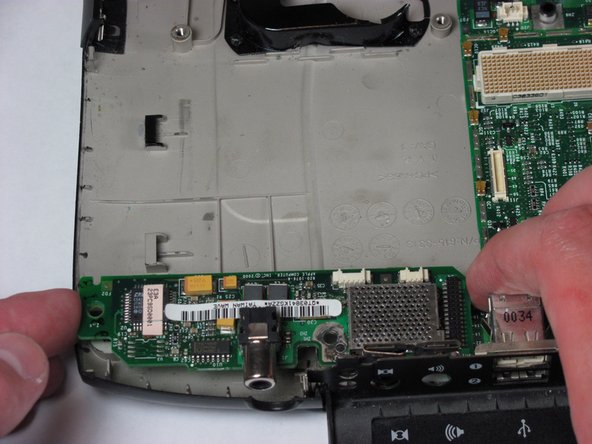
    • Lift up on the sound card from both the left and the right sides and remove.

    FixBotに聞いてみる

    コメントを追加

終わりに

To reassemble your device, follow these instructions in reverse order.

キャンセル: このガイドを終了できませんでした。

作成者

4人の作成者と共同で作成されました。

Kevin Keegan

メンバー登録日: 04/19/11

75 ポイント

2のガイドは作成済み

チーム

Cal Poly, Team 4-2, Regan Spring 2011 Cal Poly, Team 4-2, Regan Spring 2011人のメンバー

CPSU-REGAN-S11S4G2

4 メンバー

6のガイドは作成済み

0件のガイドコメント

コメントを追加

統計データ:

過去 24時間: 1

過去 7 日: 5

過去 30 日: 32

今までの合計 2,135