メインコンテンツにスキップ
リペアコミュニティに参加 - アカウントの作成

Anker Soundcore Select Pro A 3126 Button Panel Replacement

必要な工具と部品

    1. Anker Soundcore Select Pro A 3126 Button Panel Replacement, Button Panel: 手順 1、 2の画像 1 Anker Soundcore Select Pro A 3126 Button Panel Replacement, Button Panel: 手順 1、 2の画像 2
      • Use a spudger to remove each side speaker cover by inserting it in the crevice and using moderate force to pry them off.

      FixBotに聞いてみる

      コメントを追加

    2. Anker Soundcore Select Pro A 3126 Button Panel Replacement: 手順 2、 2の画像 1 Anker Soundcore Select Pro A 3126 Button Panel Replacement: 手順 2、 2の画像 2
      • Insert a spudger into the space between the grille and speaker frame to pry the mesh grille covering the front speakers.

      FixBotに聞いてみる

      コメントを追加

    3. Anker Soundcore Select Pro A 3126 Button Panel Replacement: 手順 3、 1の画像 1
      • Use a Phillips #1 screwdriver to remove the eight 12.7 mm screws securing the front cover.

      FixBotに聞いてみる

      コメントを追加

    4. Anker Soundcore Select Pro A 3126 Button Panel Replacement: 手順 4、 1の画像 1
      • Using a Phillips #1 screwdriver, remove the eight 8.75 mm screws around the corners of each speaker.

      FixBotに聞いてみる

      コメントを追加

    5. Anker Soundcore Select Pro A 3126 Button Panel Replacement: 手順 5、 1の画像 1
      • Flip the speaker so you have access to the bottom of the device.

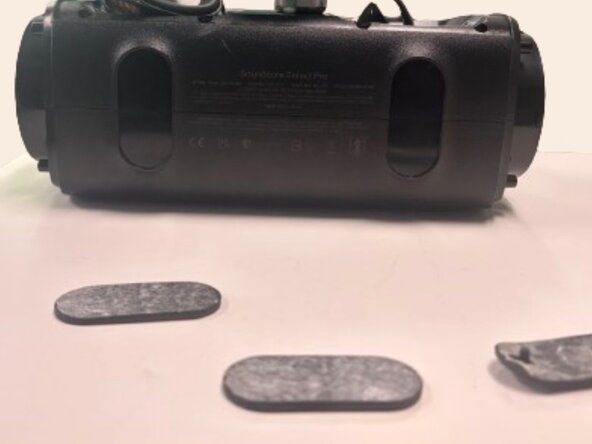
      • Use a spudger to remove both rubber pads that protect the bottom of the device.

      FixBotに聞いてみる

      コメントを追加

    6. Anker Soundcore Select Pro A 3126 Button Panel Replacement: 手順 6、 1の画像 1
      • Using a spudger remove the rubber pad on the top handle to expose 3 screws underneath.

      • Using a Phillips #1 screwdriver, remove the three 6.75 mm screws.

      FixBotに聞いてみる

      コメントを追加

    7. Anker Soundcore Select Pro A 3126 Button Panel Replacement: 手順 7、 3の画像 1 Anker Soundcore Select Pro A 3126 Button Panel Replacement: 手順 7、 3の画像 2 Anker Soundcore Select Pro A 3126 Button Panel Replacement: 手順 7、 3の画像 3
      • Using a spudger, pry open the front half of the speaker.

      • The front and back halves of the speaker are connected by several cables. Open the speaker slowly and avoid pulling on the cables, as they can be damaged easily.

      FixBotに聞いてみる

      コメントを追加

    8. Anker Soundcore Select Pro A 3126 Button Panel Replacement: 手順 8、 1の画像 1
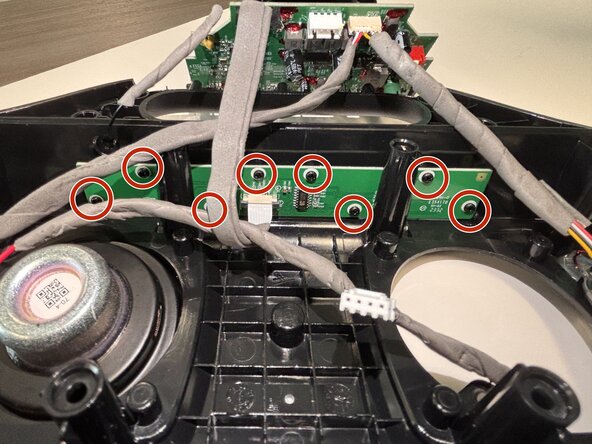
      • Use a Phillips #1 screwdriver to remove the eight 6.5 mm screws securing the button board.

      FixBotに聞いてみる

      コメントを追加

    9. Anker Soundcore Select Pro A 3126 Button Panel Replacement: 手順 9、 2の画像 1 Anker Soundcore Select Pro A 3126 Button Panel Replacement: 手順 9、 2の画像 2
      • Use the tip of the spudger to push the black plastic locking tab away from the socket.

      • Pull the ribbon cable straight out of the socket.

      • Remove the old button board.

      FixBotに聞いてみる

      コメントを追加

終わりに

To reassemble your device, follow these instructions in reverse order.

キャンセル: このガイドを終了できませんでした。

作成者

3人の作成者と共同で作成されました。

Matthew Garza

メンバー登録日: 02/24/26

387 ポイント

2のガイドは作成済み

チーム

Austin Community College, Team 49-1, Cox Spring 2026 Austin Community College, Team 49-1, Cox Spring 2026人のメンバー

AUSTINCC-COX-S26S49G1

3 メンバー

6のガイドは作成済み

0件のガイドコメント

コメントを追加

統計データ:

過去 24時間: 6

過去 7 日: 15

過去 30 日: 41

今までの合計 95