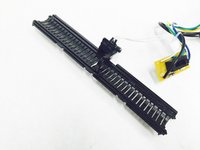
メインコンテンツにスキップ

AmazonBasics B0050BPWBQ Activation Sensor Replacement

必要な工具と部品

  1. AmazonBasics B0050BPWBQ Activation Sensor Replacement, Front and Back Panel Disassembly: 手順 1、 2の画像 1 AmazonBasics B0050BPWBQ Activation Sensor Replacement, Front and Back Panel Disassembly: 手順 1、 2の画像 2
    • The unit head needs to be switched to the off position and unplugged before any disassembly.

    • When removing screws in the following steps, make sure the unit is resting on a flat surface because pieces will easily come apart.

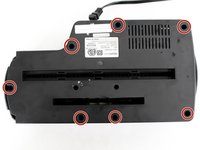
    • Remove seven 11 mm Phillips #1 screws from the underside of the head unit.

  2. AmazonBasics B0050BPWBQ Activation Sensor Replacement: 手順 2、 2の画像 1 AmazonBasics B0050BPWBQ Activation Sensor Replacement: 手順 2、 2の画像 2
    • Upon removal of the next screws, the front panel and the shredding component attached to it will fall apart from the back panel so have the unit resting on a flat surface.

    • Remove two 50 mm Phillips #1 screws from the middle of the underside of the head unit.

  3. AmazonBasics B0050BPWBQ Activation Sensor Replacement: 手順 3、 1の画像 1
    • Lay the back panel away from the front panel on a flat surface.

    • The back panel will be light because it is only the plastic, while the front panel will be heavy with the shredding component attached to it.

  4. AmazonBasics B0050BPWBQ Activation Sensor Replacement: 手順 4、 2の画像 1 AmazonBasics B0050BPWBQ Activation Sensor Replacement: 手順 4、 2の画像 2
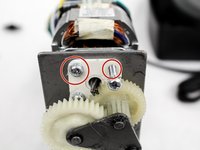
    • Find the green control board that is located next to the shredding motor.

    • Remove two 11 mm Phillips #1 screws located on opposite sides of the control board.

    • You may need to move wires over to find the screws.

  5. AmazonBasics B0050BPWBQ Activation Sensor Replacement, Shredding Gears: 手順 5、 2の画像 1 AmazonBasics B0050BPWBQ Activation Sensor Replacement, Shredding Gears: 手順 5、 2の画像 2
    • Unit may be greasy so you may want to grab paper towels/rag when completing these next steps.

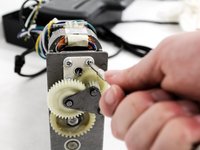
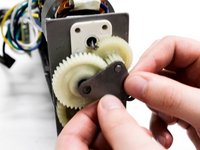
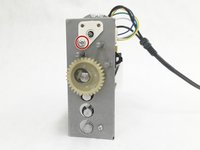
    • Locate the large white gears on the side of the shredding unit.

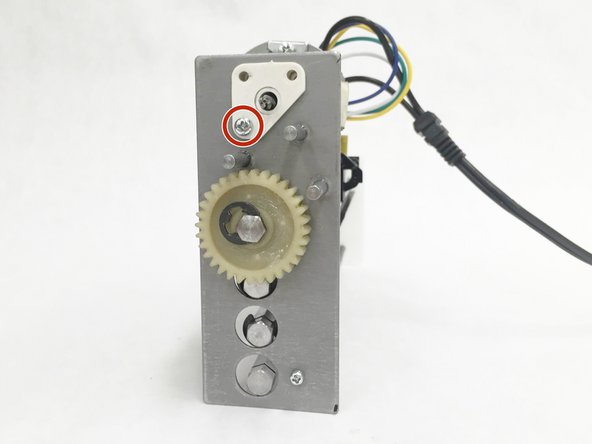
    • Remove two 15 mm Phillips #1 screws that hold the motor in place.

  6. AmazonBasics B0050BPWBQ Activation Sensor Replacement: 手順 6、 3の画像 1 AmazonBasics B0050BPWBQ Activation Sensor Replacement: 手順 6、 3の画像 2 AmazonBasics B0050BPWBQ Activation Sensor Replacement: 手順 6、 3の画像 3
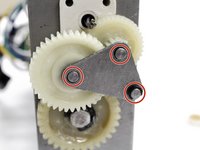
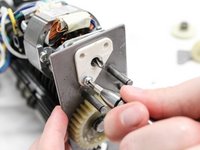
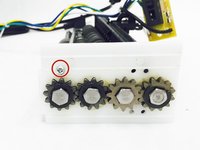
    • Locate the three washers on the metal triangle piece.

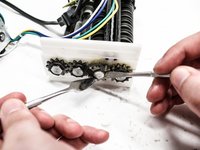
    • Remove the three washers using two metal spudgers. To do this, place one spudger on each of the open ends of the washer. Push down with both spudgers at the same time to pop the washer off the gear.

    • Pull the metal triangle away from the gears.

  7. AmazonBasics B0050BPWBQ Activation Sensor Replacement: 手順 7、 2の画像 1 AmazonBasics B0050BPWBQ Activation Sensor Replacement: 手順 7、 2の画像 2
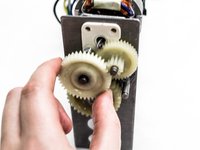
    • Remove the middle gear from the shredding unit.

    • Remove the top gear that was located under the middle gear.

  8. AmazonBasics B0050BPWBQ Activation Sensor Replacement: 手順 8、 2の画像 1 AmazonBasics B0050BPWBQ Activation Sensor Replacement: 手順 8、 2の画像 2
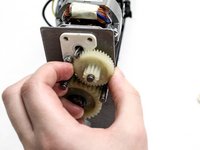
    • Remove the washer on the last gear using two metal spudgers. Again, place one spudger on each of the open ends of the washer. Push down with both spudgers at the same time to pop the washer off the gear.

    • Pull the last gear away from the metal shredding unit.

  9. AmazonBasics B0050BPWBQ Activation Sensor Replacement, Activation Sensor: 手順 9、 2の画像 1 AmazonBasics B0050BPWBQ Activation Sensor Replacement, Activation Sensor: 手順 9、 2の画像 2
    • Remove the last 15 mm Phillips #1 screw from the plastic triangle piece on the side of the shredding unit.

    • Upon removal of last screw, the motor will become detached.

  10. AmazonBasics B0050BPWBQ Activation Sensor Replacement: 手順 10、 1の画像 1
    • Remove the 15 mm Phillips #1 screw located on the metal side plate of the shredding unit.

  11. AmazonBasics B0050BPWBQ Activation Sensor Replacement: 手順 11、 2の画像 1 AmazonBasics B0050BPWBQ Activation Sensor Replacement: 手順 11、 2の画像 2
    • Remove the 15 mm Phillips #1 screw located on the plastic side plate of the shredding unit.

    • Upon removal of this screw, the thin metal bar will become detached from the shredding unit.

  12. AmazonBasics B0050BPWBQ Activation Sensor Replacement: 手順 12、 1の画像 1
    • Remove the metal side piece from the shredding unit.

  13. AmazonBasics B0050BPWBQ Activation Sensor Replacement: 手順 13、 2の画像 1 AmazonBasics B0050BPWBQ Activation Sensor Replacement: 手順 13、 2の画像 2
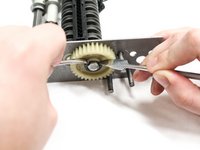
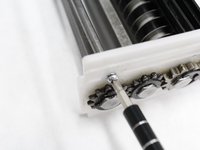
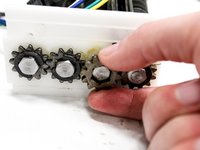
    • Remove the washer from the gear second from the right using two metal spudgers. Place one spudger on each of the open ends of the washer. Push down with both spudgers at the same time to pop the washer off the gear.

    • Make sure the gear you are removing is what is attaching the activation sensor to the blades.

    • Pull the gear away from plastic side piece of the shredding unit.

  14. AmazonBasics B0050BPWBQ Activation Sensor Replacement: 手順 14、 1の画像 1
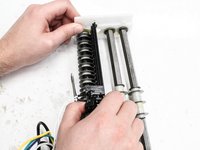
    • Remove the middle blade from the plastic side piece by pulling it away from the sensor. The blade will fall away from the other attached parts of the unit.

  15. AmazonBasics B0050BPWBQ Activation Sensor Replacement: 手順 15、 2の画像 1 AmazonBasics B0050BPWBQ Activation Sensor Replacement: 手順 15、 2の画像 2
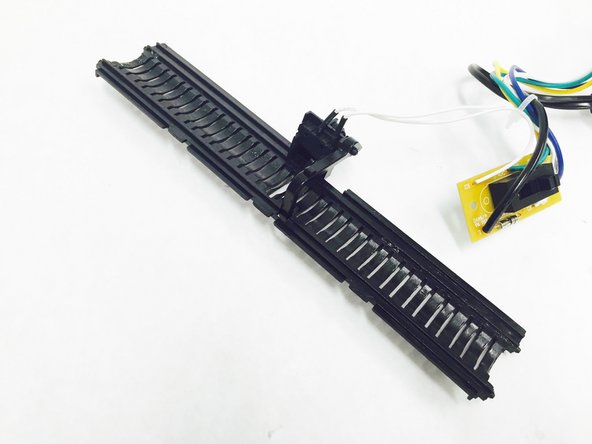
    • Unhinge the sensor clamp from the blade by pushing with your thumb and pull the sensor away from the plastic side piece with the other hand to detach the activation sensor from the entire shredding unit.

終わりに

To reassemble your device, follow these instructions in reverse order.

ある他の人がこのガイドを完成しました。

作成者

1人の作成者と共同作成されました。

Natalie Meert

メンバー登録日: 02/11/16

678 ポイント

4のガイドは作成済み

チーム

IUPUI, Team 2-4, Baechle Spring 2016 IUPUI, Team 2-4, Baechle Spring 2016人のメンバー

IUPUI-BAECHLE-S16S2G4

4 メンバー

8のガイドは作成済み

コメント 1 件

Excellent directions. Where can I purchase a new sensor?

Robert J Johnson - 返信

コメントを追加

統計データ:

過去 24時間: 0

過去 7 日: 7

過去 30 日: 64

今までの合計 11,051