この翻訳は機械によって生成されたものであり、まだ人間による校正は行われていません。 日本語を話せますか? レビューはこちらから。
はじめに
ハードドライブの交換は比較的簡単であり、技術的な専門知識はほとんど必要ありません。
ケース内部に特殊なネジは使用されていないため、一般的なプラスドライバーだけで作業可能です。
さらに、小型のマイナスドライバーと、ケースを分離するためのクレジットカードサイズのプラスチックカードがあると便利です。
ケーブルを外す際は、回路基板を損傷させないよう注意してください。
必要な工具と部品
-
-
-
メモリコンパートメントの位置を確認し、ネジを緩める。注:ネジはコンパートメントの蓋から取り外すことはできません。
-
ネジ側から蓋をこじ開けてネットブックから取り外す。蓋は側面のクリップで固定されています。蓋が外れたら、脇に置く。
-
(画像は回転済み)メモリコンパートメントの右下にあるネジを緩めて取り外す。注:ハードドライブを交換する際にメモリを取り外す必要はありません。
-
-
-
-
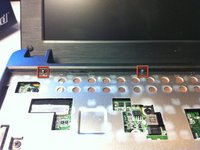
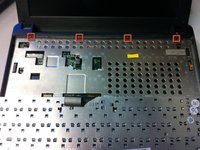
ネットブックを裏返します。キーボードを取り外すには、押し戻す必要のある4つの金属製のタブがあります。これには小型のマイナスドライバーが便利です。キーボードやケースを傷つけないよう注意してください。これらのクリップは、ネットブックの底面、バッテリーがある背面側から操作することも可能です。
-
中央の2つのクリップから始めるのが便利です。金属の自然なバネの力で、クリップが元の位置に戻るのを防ぐことができます。
-
キーボードはケースの前面側から持ち上がるはずです。キーボードはリボンケーブルでメインボードに接続されています。次の手順でキーボードを解放します。
-
-
-
リボンケーブルを固定しているクリップが2つあります。クリップをキーボード方向に押し出し、解放してください。これでリボンケーブルが抵抗なく引き抜けるはずです。
-
この段階でタッチパッドを切り離します。ケーブルは左側(オレンジ色でハイライトされています)にあります。
-
タッチパッドを切り離すには、黒いバーを持ち上げます。「MB」とラベルが貼られた透明なプルタブが付いています。これを使ってケーブルを基板から引き抜いてください。この際も、抵抗はないはずです。
-
-
この手順で使用する道具:Plastic Cards$2.99
-
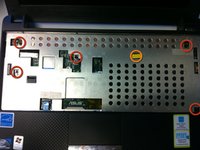
ケースを分離するため、6本のネジを外します。オレンジ色で示されたネジは保証ラベルの下にあります。ここを外すと保証が無効になります。
-
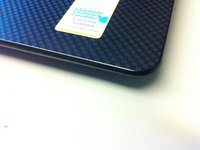
ネジを外したら、ケースをこじ開けます。ケースを傷つけないよう、プラスチックカードを使用して、背面から順に周囲を外していくのが効果的です。タッチパッド下のクリップが最も外しにくくなっています。
-
-
-
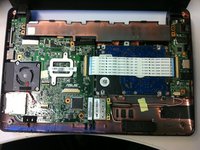
ケースを持ち上げてメインボードを露出させます。ハードドライブは右側にあります。
-
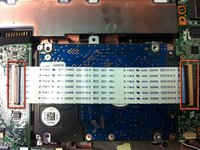
ハードドライブの上には、2枚のメインボードを接続するケーブルが通っています。タッチパッドと同様に、黒い保持具を2つ持ち上げ、ケーブルをスライドさせて取り外します。
-
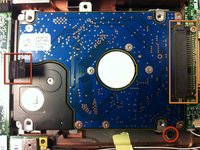
ハードドライブキャディの右下にある残りのネジを取り外します。
-
左側にある黒いタブを使ってハードドライブをゆっくり持ち上げ、左にスライドさせて右側のコネクタから解放します。これでハードドライブを取り外せます。
-
-
-
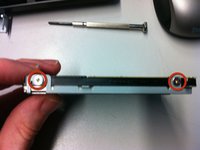
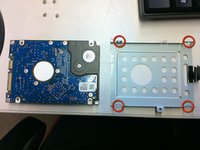
ドライブキャディからネジを取り外す前に、ドライブがどの向きでキャディに収まっているかを確認します。この向きを覚えておけば、交換用ドライブを取り付ける際に正しい向きで装着できます。
-
四隅に1つずつ、計4本のネジがあります。これらのネジを取り外し、ドライブをキャディから分離します。
-
これでドライブを交換できます。組み立てる際は、手順を逆に行ってください。ケースとキーボードは比較的簡単に噛み合います。
-
最後に、組み立てる際にタッチパッドとキーボードを忘れずに再接続してください。
-


 FixBotに聞いてみる








デバイスを再組み立てするには、これらのインストラクションを逆の順番に従って作業を進めてください。
55 の人々がこのガイドを完成させました。

12件のガイドコメント
Great chance to use your store loyalty cards so you don't mung up a credit card or your case while pulling the keyboard.
**
Lifting the pivoting latch for the touchpad cable was sort of unintuitive since I'd never seen one before. If this is your first time with one of these connectors, read it twice or thrice to be sure you've got it. Keep yourself from trying to refit the little bugger. . . Like me.
**
One more stupid mistake I made was leaving a kink in the touchpad cable. Had to pull the KB again to tuck it down. Didn't hurt anything, just left an unsightly bulge in the keyboard.
**
Excellent guide, THANKS!
Upon completion, The unit will not display. WHAT could I have done wrong?
Rich Johnson - 返信 共有
Great !!! You saved my life.. well, actually the life of my best friend whose PC's HDD died yesterday...
The most difficult part was with removing the cables fixed with two black retainers... I have been pulling on those like crazy... Fortunately nothing broken and the PC is now booting (Useful also: find a good paper on how to install windows from a usb key! )
Tank you very much to this tuto.
Paulo Aguiar - 返信 共有
Tank you about this tuto, very very good.
Paulo Aguiar - 返信 共有
