
Where can I get the black party of a connector
画像の内容を見る:


この質問は役に立ちましたか?
スコア
0

評価: 1
![]() 1
1
画像の内容を見る:
この質問は役に立ちましたか?

評価: 57.4千
![]() 124
124
![]() 44
44
![]() 90
90
This is a tricky one since we don't have a lot to go on.
Assuming I'm reading this all correctly, the problem is the black latch that's supposed to secure the ribbon cable inside the connector is broken and now missing.
There are about three main ways to deal with this. In order of preference and ease of repair, they are:
So as requested by @oldturkey03, I've started looking into sourcing a replacement connector. One question I have right now has to do with the orientation of the connectors. When you're plugging the ribbon cable into the connector, are the exposed electrical connectors on the bottom side of the cable, the side that's next to the circuit board, or are they on the top side of the cable? And just to confirm, those pins only appear on one side of the cable, not both right? There should be a plastic reinforcement/pull tab on the other side.
In the meantime, I'm looking and will let you know if I find anything interesting with regard to a replacement connector.
And one final question; when disengaging the latch, does it slide out flat, away from the connector, or does it lift up on a hinge and flip from a horizontal to a vertical position?
4/19/2023 Update
Here's the closest connector I can find.
Flexible Flat Cable Ffc Fpc 0.5mm Pitch 16pin

このアンサーは役に立ちましたか?
@dadibrokeit i didn't notice any exposed pins, also the pins are only on the bottom and on the top there is a Blu piece of plastic, when i get home i will double check on the pins
@dadibrokeit i got the depth and other stuff that you needed
@dadibrokeit any updates?
@mohamedshehata The closest I can come is this connector, available from AliExpress. It fits the dimensions and visually appears to be the same.
@dadibrokeit is mine 40 or 50 pins ?

評価: 479.4千
![]() 35
35
![]() 329
329
![]() 971
971
There are electric part houses which should be able to supply you the connector.
But you first need to get some better info on the connector as this image doesn’t offer it. Get a good metric ruler to measure the sides of the connector (all three dimensions) so you have a start point. You also need to count the number of pins and the layout take a picture head on so you can see them as well as measure the spacing between as well. Now post these pics here so we can aim you to the connector.
Do be careful as the length of the cable as well as it’s construction will effect the image quality. As you don’t say why you need to replace the connector I’m guessing you want to modify the projector in some manor.
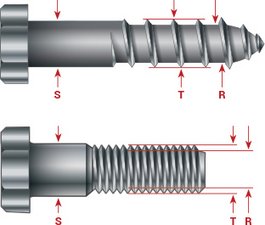
So for reference how to measure a bolt or screw
Here’s a connector
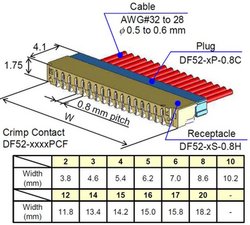
Here’s one source Ribbon Cable Connectors but without the measurements it’s guess work.
このアンサーは役に立ちましたか?
No i was actually was cleaning it and it broke and now it doesn't display anymore
@mohamedshehata - Still need to see things what broke?
The black part that hold the cable
@mohamedshehata - Pictures please and measures otherwise you’ll need to find someone local to help you.
@danj how do I send photos?
過去 24時間: 0
過去 7 日: 0
過去 30 日: 0
今までの合計 190
5 件のコメント
@oldturkey03 the black part of the connector that clamp down the cable when you plug it in
Mohamed Shehata さんによる
@oldturkey03 - Maybe you’ll have better luck. I have no knowledge on this projector. I was hoping we could aim Mohamed to a replacement.
See what you can do as you have more knowledge in these devices than me.
Dan さんによる
@mohamedshehata without the maker of the connector or a schematic it'll be like looking for a needle in a haystack. I would check sites like Mouser.com or Digikey.com and check for TE, Amphenol and Molex Zif ribbon connectors
Best of luck to you.
oldturkey03 さんによる
@oldturkey03 on the site that you sent how do I choose the sizes?
Mohamed Shehata さんによる
@mohamedshehata you'd be looking for a 40 position and probably 0.5mm pitch (measure your solder connections, distance from 1 to the next is your pitch). @dadibrokeit is the expert in knowing where to find connectors etc. Hopefully he'll pick your question up and get you to where you need to be.
oldturkey03 さんによる