メインコンテンツにスキップ

MacBook Pro 15" Unibody Early 2011のハードドライブ/赤外線センサケーブル

注意:あなたは必要条件ガイドを編集しています。あなたが行なう変更は、この手順を含む全ての2個のガイドに反映されます。

英語
日本語

手順 4を翻訳中

手順4
MacBook Pro 15" Unibody Early 2011 Hard Drive/IR Sensor Cable Replacement: 手順 0、 3の画像 1 MacBook Pro 15" Unibody Early 2011 Hard Drive/IR Sensor Cable Replacement: 手順 0、 3の画像 2 MacBook Pro 15" Unibody Early 2011 Hard Drive/IR Sensor Cable Replacement: 手順 0、 3の画像 3
  • Your replacement part may or may not come with the front (sensor) bracket. If it does not, you'll need to transfer it to your new cable.

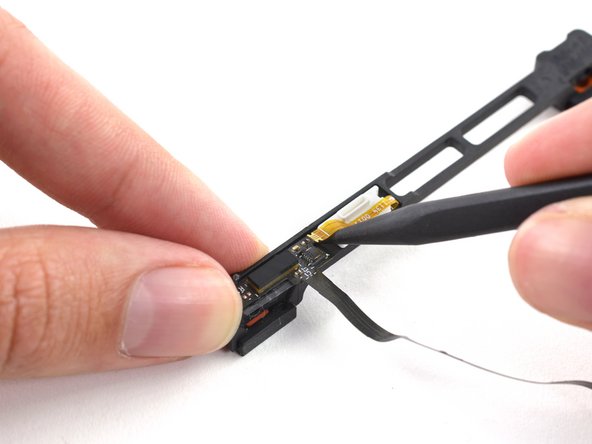
  • Use the tip of a spudger to flip the ZIF connector on the hard drive cable.

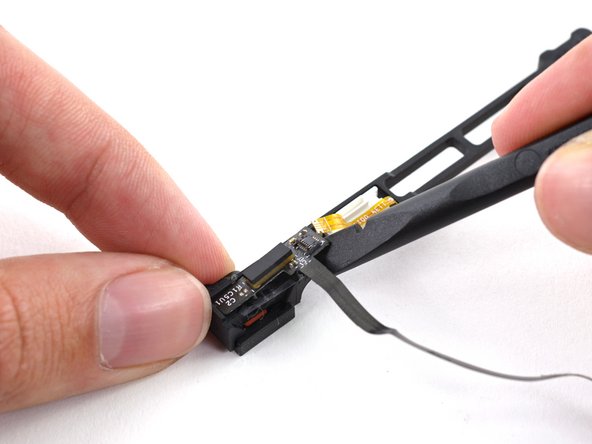
  • Gently pull the sensor bracket cable out of the ZIF connector.

  • Use the flat end of a spudger to pry the hard drive cable up off the sensor bracket.

  • Remove the adhesive backing from your new hard drive cable, stick it onto the sensor bracket, and connect the sensor bracket cable.

交換用パーツにフロント(センサ)ブラケットが付いている/付いていない場合があります。もし付いていない場合は、交換用ケーブルに移してください。

スパッジャーの先端を使って、ハードドライブケーブル上のZIFコネクタを裏返します。

ZIFコネクタからセンサーブラケットのケーブルをゆっくりと裏返します。

スパッジャーの平面側先端を使って、センサブラケットからハードドライブケーブルを外します。

新しい交換用のハードドライブケーブルから接着剤シールを剥がしてください。これをセンサブラケットに付着します。そしてセンサブラケットのケーブルに取り付けます。

クリエイティブコモンズのオープンソース著作権のもと、あなたの投稿は著作権の対象となります