メインコンテンツにスキップ

MacBook Pro (13 Zoll, Anfang 2011, Unibody) Logic Board Austausch

注意:あなたは必要条件ガイドを編集しています。あなたが行なう変更は、この手順を含む全ての19個のガイドに反映されます。

英語
ドイツ語

手順 4を翻訳中

手順4
MacBook Pro 13" Unibody Early 2011 Logic Board Replacement: 手順 0、 3の画像 1 MacBook Pro 13" Unibody Early 2011 Logic Board Replacement: 手順 0、 3の画像 2 MacBook Pro 13" Unibody Early 2011 Logic Board Replacement: 手順 0、 3の画像 3
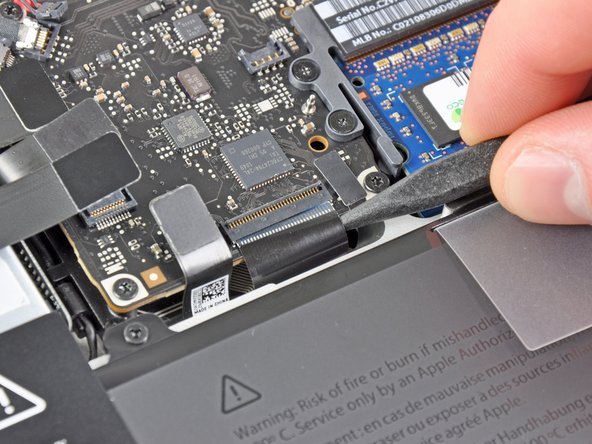
  • Use your fingernail to flip up the retaining flap on the keyboard ribbon cable ZIF socket.

  • Be sure you are prying up on the hinged retaining flap, not the socket itself.

  • Use the tip of a spudger to pull the keyboard ribbon cable out of its socket.

  • The cable may be difficult to insert. If you are having trouble, temporarily attach a piece of tape to the cable to help you guide the cable into the socket.

Klappe den Sicherungsbügel am Sockel des ZIF Verbinders des Tastaturflachbandkabels mit dem Fingernagel oder dem Spudger nach oben.

Passe auf, dass du wirklich nur den scharnierartigen Sicherungsbügel selbst bewegst, nicht den Sockel.

Ziehe das Flachbandkabel mit der Spudgerspitze aus dem Sockel.

Das Kabel lässt sich eventuell nicht wieder leicht einstecken. Wenn es schwer geht, kannst du zeitweise ein Stückchen Klebeband am Kabel anbringen, welches dir beim Einführen des Kabels hilft.

クリエイティブコモンズのオープンソース著作権のもと、あなたの投稿は著作権の対象となります