メインコンテンツにスキップ

Logitech MX Keys 배터리 교체

英語
韓国語

手順 8を翻訳中

手順8
Logitech MX Keys Battery Replacement: 手順 0、 3の画像 1 Logitech MX Keys Battery Replacement: 手順 0、 3の画像 2 Logitech MX Keys Battery Replacement: 手順 0、 3の画像 3
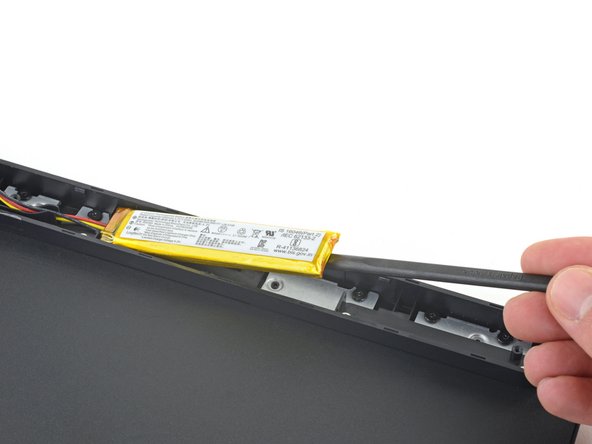
  • Insert the flat end of a spudger underneath the right edge of the battery, opposite the cables.

  • Slide the spudger underneath the battery and gently lift to separate the adhesive securing it to the keyboard.

  • Make sure you push the spudger underneath the battery and not into it. Don't bend or deform the battery.

  • If the battery isn't separating, apply a few drops of isopropyl alcohol (>90%) to its edge and slightly tilt the keyboard. Wait one minute for the alcohol to soften the adhesive and try again.

  • Remove the battery.

스퍼저의 납작한 끝을 배터리 오른쪽 가장자리 아래, 케이블 반대편에 끼우세요.

스퍼저를 배터리 아래로 밀어 넣고 살살 들어 올려 키보드에 고정된 접착제를 분리하세요.

스퍼저를 배터리 이 아닌 배터리 아래로 밀어 넣는지 확인하세요. 배터리를 구부리거나 변형시키지 마세요.

배터리가 분리되지 않으면 이소프로필 알코올(90% 이상)을 가장자리에 몇 방울 떨어뜨린 후 키보드를 살짝 기울이세요. 알코올이 접착제를 부드럽게 할 때까지 1분 정도 기다렸다가 다시 시도하세요.

배터리를 분리하세요.

クリエイティブコモンズのオープンソース著作権のもと、あなたの投稿は著作権の対象となります