メインコンテンツにスキップ

Logitech MX Keys Akku tauschen

英語
ドイツ語

手順 8を翻訳中

手順8
Logitech MX Keys Battery Replacement: 手順 0、 3の画像 1 Logitech MX Keys Battery Replacement: 手順 0、 3の画像 2 Logitech MX Keys Battery Replacement: 手順 0、 3の画像 3
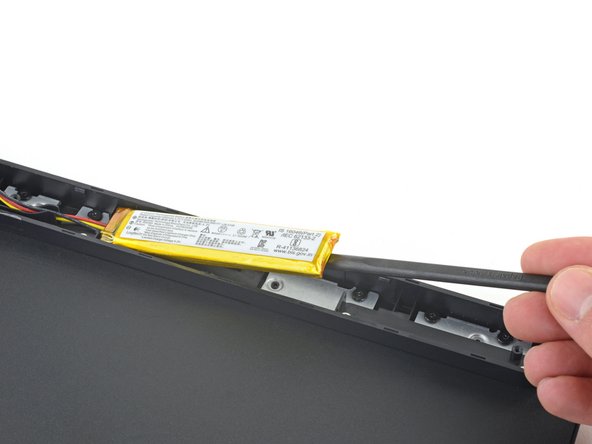
  • Insert the flat end of a spudger underneath the right edge of the battery, opposite the cables.

  • Slide the spudger underneath the battery and gently lift to separate the adhesive securing it to the keyboard.

  • Make sure you push the spudger underneath the battery and not into it. Don't bend or deform the battery.

  • If the battery isn't separating, apply a few drops of isopropyl alcohol (>90%) to its edge and slightly tilt the keyboard. Wait one minute for the alcohol to soften the adhesive and try again.

  • Remove the battery.

Stecke das flache Ende eines Spudgers unter die rechte Kante des Akkus gegenüber den Kabeln.

Schiebe den Spudger unter den Akku, um ihn vom Kleber zu lösen, mit dem er an der Tastatur befestigt ist.

Achte darauf, unter dem Akku zu drücken und nicht hinein. Verbiege oder verforme den Akku nicht.

Wenn sich der Akku nicht leicht entfernen lässt, gib ein paar Tropfen hochprozentigen (≥90%) Isopropylalkohol an seine Kante und halte die Tastatur schräg. Lasse den Alkohol eine Minute lang einwirken, um den Kleber aufzuweichen. Versuche es dann nochmals

Entferne den Akku.

クリエイティブコモンズのオープンソース著作権のもと、あなたの投稿は著作権の対象となります