メインコンテンツにスキップ

Öffnungsvorgang

注意:あなたは必要条件ガイドを編集しています。あなたが行なう変更は、この手順を含む全ての5個のガイドに反映されます。

英語
ドイツ語

手順 6を翻訳中

手順6
Opening Procedure: 手順 0、 3の画像 1 Opening Procedure: 手順 0、 3の画像 2 Opening Procedure: 手順 0、 3の画像 3
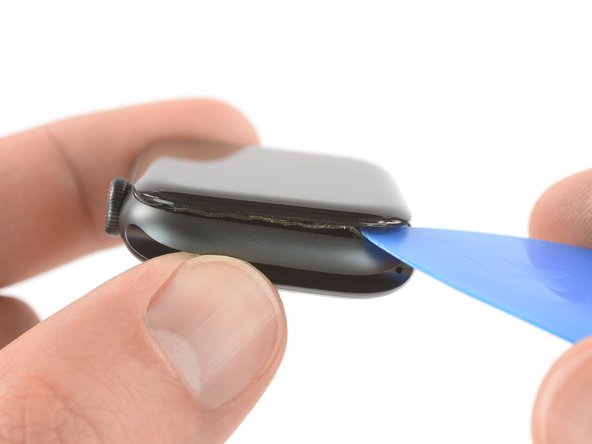
  • It's likely that the Force Touch sensor will stick to the display frame instead to the watch's body. In this case, insert an opening pick under the display and carefully separate the Force Touch gasket from the display.

  • To preserve the Force Touch gasket, pry carefully under the edge of the display. If the Force Touch gasket splits when lifting the display, or if you separate the gasket layers, you'll also need to replace the Force Touch gasket itself.

  • Slide the pick around the display to separate the adhesive between the Force Touch gasket and the display.

  • Don't insert the opening pick deeper than 1/16th of an inch (~2 mm) to avoid damaging other components.

Wahrscheinlich bleibt der Force Touch Sensor eher am Display als an der restlichen Uhr hängen. Setze in diesem Fall ein Plektrum unter das Display und löse die Force Touch Dichtung vorsichtig vom Display ab.

Um die Force Touch Dichtung nicht zu beschädigen, heble vorsichtig unter der Kante des Displays. Falls die Force Touch Dichtung reißt, wenn du das Display anhebst, oder wenn du die einzelnen Schichten der Dichtung voneinander löst, musst du auch die Force Touch Dichtung selbst ersetzen.

Schiebe das Plektrum um das Display herum und trenne den Kleber zwischen Force Touch Dichtung und Display auf.

Setze das Plektrum nicht tiefer als 2 mm ein, um zu vermeiden, dass andere Komponenten beschädigt werden.

クリエイティブコモンズのオープンソース著作権のもと、あなたの投稿は著作権の対象となります