メインコンテンツにスキップ

このバージョンは誤った内容を含んでいる可能性があります。最新の承認済みスナップショットに切り替えてください。

必要な工具と部品

  1. この手順は未翻訳です。 翻訳を手伝う。

    , リアパネル: 手順 1、 1の画像 1
    • Before you begin, discharge your iPhone battery below 25%. A charged lithium-ion battery can catch fire and/or explode if accidentally punctured.

    • Power off your iPhone before beginning disassembly.

    • Your phone's rear cover may have two #000 Phillips screws or Apple's 5-Point "Pentalobe" screws. Check which screws you have, and ensure you also have the correct screwdriver in order to remove them.

    • Remove the two 3.6 mm Pentalobe or Phillips #000 screws next to the dock connector.

  2. この手順は未翻訳です。 翻訳を手伝う。

    : 手順 2、 2の画像 1 : 手順 2、 2の画像 2
    • Push the rear panel toward the top edge of the iPhone.

    • The panel will move about 2 mm.

  3. この手順は未翻訳です。 翻訳を手伝う。

    : 手順 3、 1の画像 1
    • Pinch the rear panel with your fingers, and lift it away from the iPhone. Alternatively, use a Small Suction Cup .

    • Be careful not to damage the plastic clips attached to the rear panel.

  4. この手順は未翻訳です。 翻訳を手伝う。

    : 手順 4、 1の画像 1
    • Remove the single 1.5 mm Phillips screw securing the battery connector to the logic board (if present).

  5. この手順は未翻訳です。 翻訳を手伝う。

    : 手順 5、 1の画像 1
    • Use the edge of a plastic opening tool to gently pry the battery connector up from its socket on the logic board.

    • Be very careful to only pry up on the battery connector and not the socket on the logic board. If you pry up on the logic board socket, you may break it entirely.

    • Remove the metal clip covering the antenna connector.

  6. この手順は未翻訳です。 翻訳を手伝う。

    : 手順 6、 2の画像 1 : 手順 6、 2の画像 2
    • Pull up on the exposed clear plastic tab to peel the battery off the adhesive securing it to the iPhone.

    • If the tab breaks before the battery is freed, apply a few drops of high concentration (over 90%) isopropyl alcohol under the edge of the battery. Wait about one minute for the alcohol solution to weaken the adhesive. Carefully slide a spudger under the battery tab to release the adhesive.

    • Prying in other places may cause damage. Don't try to forcefully lever the battery out. If needed, apply a few more drops of alcohol to further weaken the adhesive. Never deform or puncture the battery with your pry tool.

    • If there's any alcohol solution remaining in the phone, carefully wipe it off or allow it to air dry before installing your new battery.

    • Remove the battery.

    • If your replacement battery came in a plastic sleeve, remove it before installation by pulling it away from the the ribbon cable.

    • Before reassembly, clean metal-to-metal contact points with a de-greaser such as windex. The oils from your fingers have the potential to cause wireless interference issues.

    • Perform a hard reset after reassembly. This can prevent several issues and simplify troubleshooting.

  7. この手順は未翻訳です。 翻訳を手伝う。

    : 手順 7、 2の画像 1 : 手順 7、 2の画像 2
    • Remove the two 1.8 mm Phillips screws securing the dock connector cable to the logic board.

    • Remove the thin metal dock connector cable cover.

  8. この手順は未翻訳です。 翻訳を手伝う。

    : 手順 8、 1の画像 1
    • Use the edge of a plastic opening tool to pry the dock cable up from its socket on the logic board.

  9. この手順は未翻訳です。 翻訳を手伝う。

    : 手順 9、 1の画像 1
    • Peel the dock connector cable off the adhesive securing it to the logic board and the side of the speaker enclosure.

  10. この手順は未翻訳です。 翻訳を手伝う。

    : 手順 10、 2の画像 1 : 手順 10、 2の画像 2
    • Remove the 1.6 mm Phillips screw securing the pressure contact to the logic board near the vibrator.

    • Remove the pressure contact.

  11. この手順は未翻訳です。 翻訳を手伝う。

    : 手順 11、 2の画像 1 : 手順 11、 2の画像 2
    • Use the edge of a plastic opening tool to pry the cellular antenna cable up from its socket on the logic board.

    • De-route the cellular antenna cable out from under the metal fingers attached to the logic board.

    • When reconnecting the antenna wire be VERY certain that the round connector at the end of the wire is centered on its mating half on the motherboard before applying pressure. Failure to do so will likely destroy both halves of the connector.

  12. : 手順 12、 1の画像 1
    • 次の5本のネジを外します:

    • 1.3mmプラスネジ 3本

    • 1.5mmプラスネジ 1本

    • 2.4mmプラスネジ 1本

  13. この手順は未翻訳です。 翻訳を手伝う。

    : 手順 13、 2の画像 1 : 手順 13、 2の画像 2
    • Lift the cable cover from its edge nearest the top of the iPhone.

    • Pull the cable cover tabs out of their slots cut into the EMI shield on the logic board and remove it from the iPhone.

  14. この手順は未翻訳です。 翻訳を手伝う。

    : 手順 14、 2の画像 1 : 手順 14、 2の画像 2
    • Use the edge of a plastic opening tool to pry the rear camera connector up from its socket on the logic board.

    • Be careful not to break any components off the surrounding area on the logic board as you pry upwards.

    • Remove the rear camera from the iPhone.

    • Be careful not to scratch the back of the display assembly after the removal of the rear facing camera.

  15. この手順は未翻訳です。 翻訳を手伝う。

    , ロジックボード: 手順 15、 1の画像 1
    • Disconnect the five cables near the top of the logic board in the following order:

    • Headphone jack/volume button cable
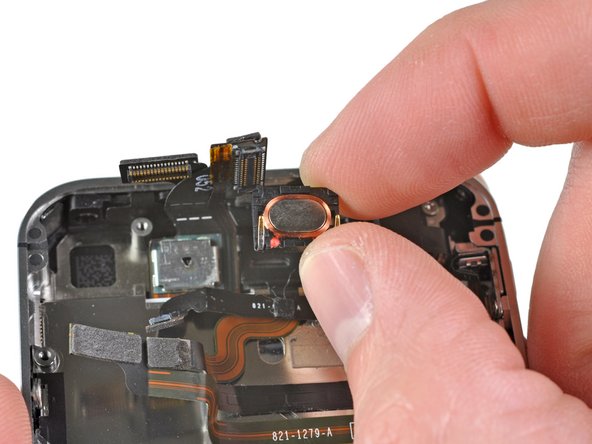
    • Power button cable

    • Front facing camera cable

    • Digitizer cable

    • Display data cable

    • To disconnect the cables, use the edge of a plastic opening tool to gently lift their connectors up and out of the sockets on the logic board.

    • Be careful not to break any of the small and delicate surface mount components as you disconnect the cables.

  16. : 手順 16、 1の画像 1
    • ヘッドホンジャック付近に留められた1.5mm #000プラスネジを外します。

  17. この手順は未翻訳です。 翻訳を手伝う。

    : 手順 17、 1の画像 1
    • Lift the small grounding clip up off the logic board and remove it from the iPhone.

  18. この手順は未翻訳です。 翻訳を手伝う。

    : 手順 18、 1の画像 1
    • Use the edge of a plastic opening tool to disconnect the Wi-Fi antenna cable connector from the logic board.

    • When reconnecting the wifi ribbon connector to the mother board be VERY certain that the round connector at the end of the ribbon cable is centered on its mating half on the motherboard before applying pressure. Failure to do so will likely destroy both halves of the connection.

  19. : 手順 19、 2の画像 1 : 手順 19、 2の画像 2
    • 電源ボタン付近に留められたプラスネジを覆っているテープがあれば剥がします。

  20. この手順は未翻訳です。 翻訳を手伝う。

    : 手順 20、 1の画像 1
    この手順で使用する道具:
    Standoff Screwdriver for iPhones
    $5.49
    購入する
    • Remove the 2.5 mm Phillips #000 screw securing the logic board near the power button.

    • Remove the 4.8 mm standoff screw near the headphone jack.

    • Standoff screws are best removed using a standoff screwdriver or bit.

    • In a pinch, a small flathead screwdriver will do the job—but use extra caution to ensure it doesn't slip and damage surrounding components.

  21. この手順は未翻訳です。 翻訳を手伝う。

    : 手順 21、 1の画像 1
    • Remove the 3.4 mm Phillips screw near the vibrator motor.

    • Remove the two 3.6 mm standoff screws along the side of the logic board nearest the battery opening.

  22. この手順は未翻訳です。 翻訳を手伝う。

    : 手順 22、 1の画像 1
    • Carefully lift the logic board from the end closest to the speaker enclosure and slide it away from the top edge of the iPhone.

    • Remove the logic board.

    • Before reassembly, be sure to clean all metal-to-metal contact points on the logic board (not the mating halves of connectors) with a de-greaser such as windex or isopropyl alcohol. The oils on your fingers have the potential to cause grounding issues.

    • There's a small rectangular rubber pad at the top of the logic board that prevents the display cables from chafing against the edge of the board. If it comes loose during your repair, make sure to position it correctly when reinstalling your logic board.

  23. この手順は未翻訳です。 翻訳を手伝う。

    : 手順 23、 1の画像 1
    • Be sure not to lose the small grounding finger for the rear facing camera near the power button.

  24. この手順は未翻訳です。 翻訳を手伝う。

    : 手順 24、 2の画像 1 : 手順 24、 2の画像 2
    • Use the edge of a plastic opening tool to peel the earpiece speaker off the foam adhesive securing it to the iPhone.

    • If you wish to reuse the earpiece speaker, try not to tear the foam adhesive that secures it to the iPhone's case.

    • Remove the earpiece speaker.

    • The speaker may be glued to a ribbon cable. Use a second opening tool to hold the cable down.

  25. この手順は未翻訳です。 翻訳を手伝う。

    : 手順 25、 3の画像 1 : 手順 25、 3の画像 2 : 手順 25、 3の画像 3
    • Remove the two 2.0 mm Phillips screws securing the power button bracket to the outer case.

    • Slightly pull the power button cable bracket away from the outer case.

    • If the power button happens to accidentally fall out, take note of the correct orientation. The metal loop should be facing downwards and the outward edges should be on top.

  26. この手順は未翻訳です。 翻訳を手伝う。

    : 手順 26、 1の画像 1
    • Use the edge of a plastic opening tool to gently pry up the bracket above the void where the earpiece speaker was installed.

    • This bracket is captive to the outer case. It is not necessary to try to remove it.

  27. この手順は未翻訳です。 翻訳を手伝う。

    : 手順 27、 2の画像 1 : 手順 27、 2の画像 2
    • Use a plastic opening tool to gently peel up the power button cable from the outer case.

    • Remove the power button cable from the iPhone.

  28. この手順は未翻訳です。 翻訳を手伝う。

    : 手順 28、 1の画像 1
    • Use a plastic opening tool to remove the metal power button bracket from the power button switch.

    • Transfer this bracket to your new power button cable.

ゴール

84 の人々がこのガイドを完成させました。

作成者

7人の作成者と共同で作成されました。

Andrew Bookholt

586,444 ポイント

619のガイドは作成済み

3 件のコメント

This one was a bit difficult with the routing of the cable, but overall easy for a first timer.

ltspenny - 返信

My power button quit working. I bought the cable assembly and replaced it per these instructions. Everything seemed to work at first but later I noticed my phone kept trying to shut itself off. Any ideas what is causing this? It only seems to occur after I use the power button. It is almost as if it is getting stuck down.

rick - 返信

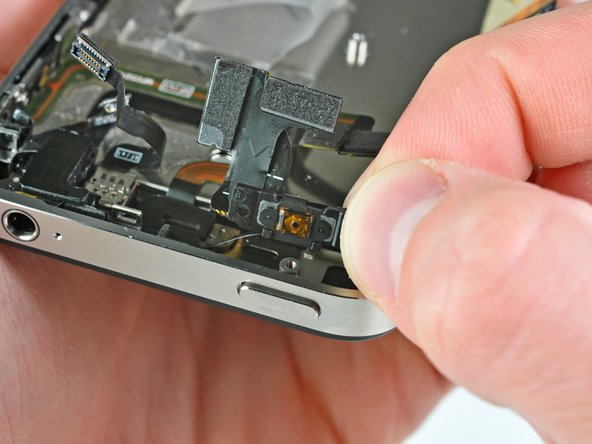
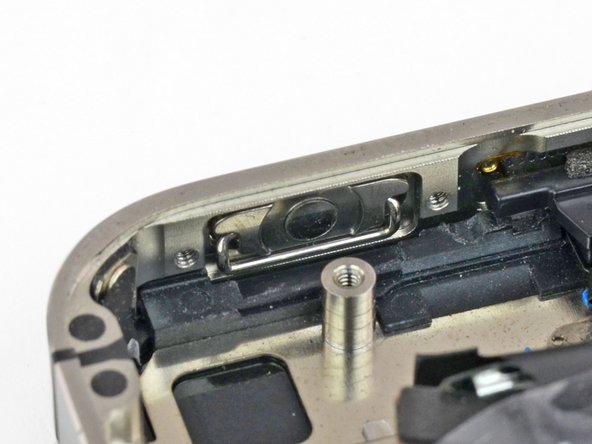
Please remove your screen first, before replacing power button or sensor cable. I advise you to not dare attempt to remove those Step 25 screws (power button cable bracket ) while screen is mounted.

It is too risky! Display's ribbon cable interferes with driver access to these screws. While driving these screws, I unknowingly broke my display cable. It is actually a delicate circuit, not just a simple flexible ribbon. If I knew just how delicate is display cable, then I would not have ventured to perform this replacement. (In my case, only proximity sensor was not working; power and and ambient light sensor were both functioning. In my case, it was not worth breaking a pricy screen for sake of a cheap sensor.)

With a broken screen cable, iPhone endlessly repeats a diagnostic sound or vibration.

iPhone endlessly repeats the "power supply accepted" sound or vibration

unsubstantiated - 返信

コメントを追加

統計データ:

過去 24時間: 1

過去 7 日: 13

過去 30 日: 22

今までの合計 39,749