このバージョンは誤った内容を含んでいる可能性があります。最新の承認済みスナップショットに切り替えてください。
必要な工具と部品
-
-
鍋を十分な量のお湯で満たして、iOpener を完全に沈めます。
-
お湯を沸かして熱くなったら火を止めます。
-
iOpenerを熱湯の中に約2−3分間沈めます。iOpener全体が完全に浸かっているか確認してください。
-
トングなどを浸かって、温まったiOpenerをお湯から取り出します。
-
タオルでiOpener全体を拭き取ります。
-
iOpenerの準備は整いました。iOpenerを再度温める必要がある場合は、お湯を沸騰させて、火を止めてからiOpenerを2-3分間浸してください。
-
-
-
液晶画面に割れがある場合、画面がさらに割れるのと破片によって怪我するのを防ぐため、画面にテープなどを貼って保護してください。
-
iPadの液晶画面全体に透明なテープを端を重ねるようにして貼ります。
-
この修理ガイドの記述通りに作業を進められるようベストを尽くしてください。しかしガラスが壊れてしまった場合、作業を続けるに従ってひび割れは広がっていきます。ガラスを取り出すために、メタル製のこじ開け用ツールを使用してください。
-
-
-
この手順は未翻訳です。 翻訳を手伝う。
-
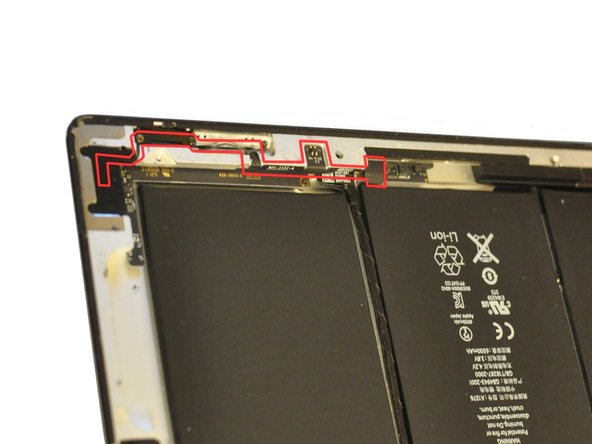
Once the LCD panel and rear camera are removed, you can begin removing the Power, Mute, Volume cable (hereafter called the PMV cable for short).
-
The PMV cable starts near the end of the control board cable that runs between two of the battery units, and runs in a complicated path along the side and corner of the iPad. (see photos 1 and 2)
-
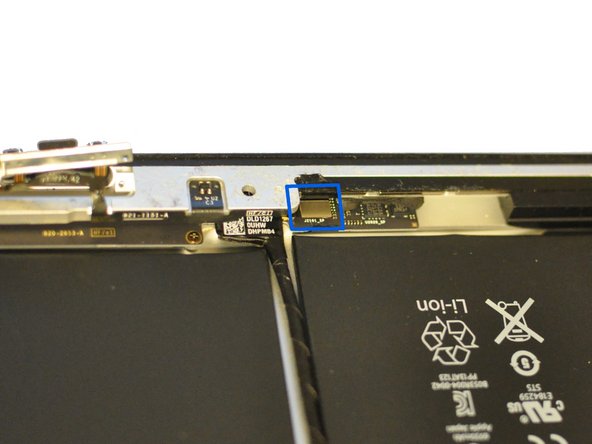
The end of the PMV cable is wrapped in tape. Begin by removing this tape to expose the silver rectangular connector on the end of the cable. (see photo 3)
-
Use a plastic opening tool or small screwdriver to lift free the rectangular connector.
-
-
この手順は未翻訳です。 翻訳を手伝う。
-
Remove the two 2.5 mm Phillips screws from the back of the power switch mechanism.
-
You can then push in on the power switch (on the exterior of the iPad) to push the mechanism's internal metal plate loose.
-
You can then peel the PMV cable free from the iPad's case, working backwards from the power switch towards the mute switch.
-
Lift free the small metal frame piece supporting the mute and volume switches.
-
Note: The photo shows the mute and volume switch frame being removed before the rear camera and power switch; this is possible but it's probably best to start with the power switch first.
-
-
この手順は未翻訳です。 翻訳を手伝う。
-
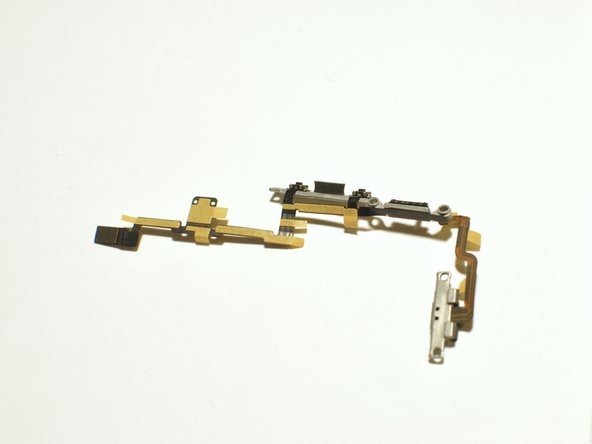
The PMV cable itself is a complicated piece with three integrated buttons and a switch slider.
-
You will need to carefully peel off the old cable free from the ipad frame and the two metal supports (one for the power switch, one for the mute and volume switches).
-
Note that each button is held in place with a tiny bit of adhesive. Use a plastic opening tool or small screwdriver to lift them free.
-
-
この手順は未翻訳です。 翻訳を手伝う。
-
Now assemble the replacement PMV cable to the two metal brackets.
-
Each button has on its underside two tiny black plastic pegs which fit into holes in the metal frames, to ensure the proper fit. Make sure to line these up properly when attaching the cable to the metal frames. The reassembled cable should look as shown in the figures.
-
Install the new cable working from the power switch back towards the mute and volume switches and then to the cable connector, snaking the PMV cable along its complicated path.
-
The replacement part should have adhesive patches to hold the cable in place.
-
Attaching the rectangular cable connector is tricky as there is little clearance from the edge of the iPad case. It may be helpful to use a plastic opening tool to push it gently until it snaps into place.
-


114 の人々がこのガイドを完成させました。
6 件のコメント
Hi, we have an iPad 2 in for repair and needs a new power button assembly. Thing is the ribbon is different from a standard iPad 2. There are subtle differences in the inside too. It is definitely a genuine iPad, and has same model numbers. Anyone come across this before?
Chris, I have the same problem with power ribbon cable it's not the one everyone is selling, did you manage to find a source who sold the correct part?
David -
Completed this guide thank you. Just want to point out that there are two cables for the iPad 2, making sure that you have the right one is very important. Be very careful around the camera area of the iPad too this is very tricky and there are no pictures of this part, wish I had done some now to upload for others, but I'm sure that I'll have another to do before to long and I will then. One main tip... Don't stick anything down till you've got everything secure as removing the the tape is very tricky once stuck and you don't want to be replacing this again...
Beware of fake versions of this cable 821-1151-A from many suppliers. The Hall Effect magnetic switch will then not work because the printed circuit traces on the cable are incorrect. The fake cable can be identified by an ohmmeter showing the two contacts for the Hall chip farthest from the cable edge to be shorted together.