メインコンテンツにスキップ

iMac G5 20" Model A1076 Hard Drive Replacement

必要な工具と部品

  1. iMac G5 20" Model A1076 Hard Drive Replacement, Rear Panel: 手順 1、 1の画像 1
    • Lay the iMac display-side down on a flat surface.

    • Loosen the three Phillips screws securing the rear panel to the iMac.

    • These screws are captive in the iMac. The center screw will stop turning after about 3.5 turns and the outer screws will stop turning after about 5.5 turns. Do not try to remove these screws from your iMac.

  2. iMac G5 20" Model A1076 Hard Drive Replacement: 手順 2、 2の画像 1 iMac G5 20" Model A1076 Hard Drive Replacement: 手順 2、 2の画像 2
    • Lift the rear panel slightly near the bottom of the iMac.

    • Pull the rear panel toward yourself and remove it from the iMac.

  3. iMac G5 20" Model A1076 Hard Drive Replacement, Hard Drive: 手順 3、 1の画像 1
    • Remove the following three screws:

    • One shouldered 12.4 mm Phillips.

    • Two 7 mm T10 Torx.

  4. iMac G5 20" Model A1076 Hard Drive Replacement: 手順 4、 1の画像 1
    • The following action is optional. If you skip this step, be very careful not to strain the thermal sensor cable as you disconnect the hard drive cables and transfer this bracket to your new hard drive.

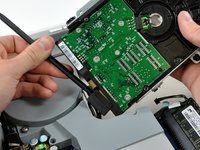
    • Lift the hard drive slightly and disconnect the hard drive thermal sensor connector.

  5. iMac G5 20" Model A1076 Hard Drive Replacement: 手順 5、 2の画像 1 iMac G5 20" Model A1076 Hard Drive Replacement: 手順 5、 2の画像 2
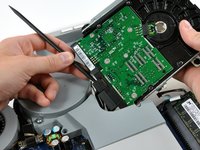
    • Insert the flat end of a spudger into the gap between the SATA data connector and the hard drive.

    • Twist the spudger to separate the SATA data connector from the hard drive, then disconnect it from the hard drive.

    • Repeat this process for the SATA power connector.

  6. iMac G5 20" Model A1076 Hard Drive Replacement: 手順 6、 1の画像 1
    • Lift the hard drive out of the iMac.

    • If you are installing a new hard drive, we have an OS X install guide to get you up and running.

  7. iMac G5 20" Model A1076 Hard Drive Replacement, Hard Drive: 手順 7、 1の画像 1
    • Remove the two 15 mm shouldered T10 Torx screws from the hard drive and remove the bracket.

  8. iMac G5 20" Model A1076 Hard Drive Replacement: 手順 8、 1の画像 1
    • Remove the two 6 mm T10 Torx screws from the hard drive and remove the hard drive bracket.

    • The hard drive bracket with the thermal sensor board is attached to the SATA connector side of the hard drive.

    • If you are installing a new hard drive, we have an OS X install guide to get you up and running.

終わりに

To reassemble your device, follow these instructions in reverse order.

149 の人々がこのガイドを完成させました。

作成者

10人の作成者と共同で作成されました。

Walter Galan

694,561 ポイント

1,203のガイドは作成済み

コメント 1 件

Very helpful and easy guide. Thanks!

Bojan A - 返信

コメントを追加

統計データ:

過去 24時間: 2

過去 7 日: 22

過去 30 日: 74

今までの合計 74,744