メインコンテンツにスキップ

Xbox Series S Plastic Case Replacement

必要な工具と部品

  1. Xbox Series S Plastic Case Replacement, Peel off the sticker coverings: 手順 1、 3の画像 1 Xbox Series S Plastic Case Replacement, Peel off the sticker coverings: 手順 1、 3の画像 2 Xbox Series S Plastic Case Replacement, Peel off the sticker coverings: 手順 1、 3の画像 3
    この手順で使用する道具:
    Tweezers
    $4.99
    • Before you start this guide, turn off the Xbox and unplug any cables from it.

    • Use tweezers to peel off the two white screw covers located on the bottom corners of the back panel.

  2. Xbox Series S Plastic Case Replacement, Remove the back panel screws: 手順 2、 1の画像 1
    この手順で使用する道具:
    Magnetic Project Mat
    $19.95
    • Use a T8 Torx driver to remove the two 10 mm-long screws securing the back panel to the bottom panel.

    • Throughout this repair, keep track of each screw and make sure it goes back exactly where it came from.

  3. Xbox Series S Plastic Case Replacement, Remove the bottom panel: 手順 3、 3の画像 1 Xbox Series S Plastic Case Replacement, Remove the bottom panel: 手順 3、 3の画像 2 Xbox Series S Plastic Case Replacement, Remove the bottom panel: 手順 3、 3の画像 3
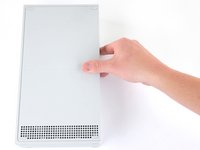
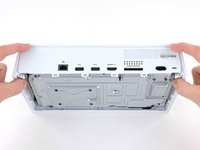
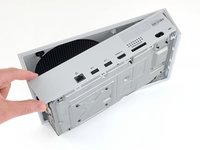
    • Slide the bottom panel horizontally toward the back of the console until it comes to a stop.

    • This slides the clips out of the slots on the plastic case.

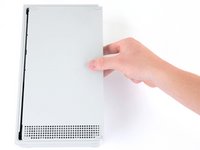
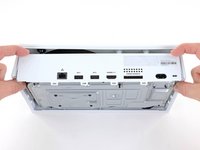
    • Lift straight up and remove the bottom panel from the plastic case.

  4. Xbox Series S Plastic Case Replacement, Remove the plastic case screws: 手順 4、 1の画像 1
    • Use a T10 Torx driver to remove the seven 51 mm-long screws securing the chassis to the plastic case.

  5. Xbox Series S Plastic Case Replacement, Remove the plastic case: 手順 5、 3の画像 1 Xbox Series S Plastic Case Replacement, Remove the plastic case: 手順 5、 3の画像 2 Xbox Series S Plastic Case Replacement, Remove the plastic case: 手順 5、 3の画像 3
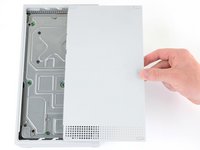
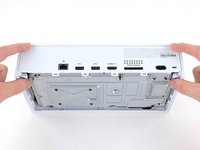
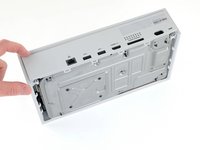
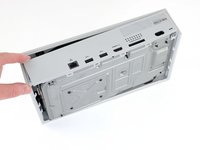
    • With the bottom of the Xbox facing you, pull the two bottom-rear corners of the plastic case away from each other.

    • As you pull the corners apart, slide the back panel towards the bottom of the device. This releases the back panel from the plastic case.

    • The back panel should now settle on top of the clips on the back of the plastic case.

    • The back panel is permanently attached to the aluminum chassis.

    • Do not attempt to fully remove the chassis from the plastic case with this technique. You may risk breaking your case.

  6. Xbox Series S Plastic Case Replacement: 手順 6、 3の画像 1 Xbox Series S Plastic Case Replacement: 手順 6、 3の画像 2 Xbox Series S Plastic Case Replacement: 手順 6、 3の画像 3
    • Pull the bottom-left corner away from the chassis while swinging the chassis away from the plastic case.

    • You may need to lift the chassis to free it from the clips on the bottom-front of the plastic case during this process.

    • Remove the plastic case from the chassis.

終わりに

To reassemble your device, follow these instructions in reverse order.

Take your e-waste to an R2 or e-Stewards certified recycler.

Repair didn’t go as planned? Try some basic troubleshooting, or ask our Answers community for help.

8 の人々がこのガイドを完成させました。

作成者

2人の作成者と共同で作成されました。

Robert Boyd

メンバー登録日: 02/01/21

29,250 ポイント

94のガイドは作成済み

3 件のコメント

Where can i find custom case for the xbox series s?

Joe - 返信

What about the back plate?

Legitti - 返信

it says you cant remove it

Pavement Creator - 返信

コメントを追加

統計データ:

過去 24時間: 46

過去 7 日: 311

過去 30 日: 1,061

今までの合計 38,906