メインコンテンツにスキップ

Wall Outlet (Type F) Replacement

必要な工具と部品

  1. Wall Outlet (Type F) Replacement, Turn off power: 手順 1、 3の画像 1 Wall Outlet (Type F) Replacement, Turn off power: 手順 1、 3の画像 2 Wall Outlet (Type F) Replacement, Turn off power: 手順 1、 3の画像 3
    • Find your Breaker Panel.

    • Identify the breaker to turn off.

    • There'll typically be a table listing the circuits corresponding to breakers.

    • Turn off the breaker.

  2. Wall Outlet (Type F) Replacement, Determine voltage absence: 手順 2、 2の画像 1 Wall Outlet (Type F) Replacement, Determine voltage absence: 手順 2、 2の画像 2
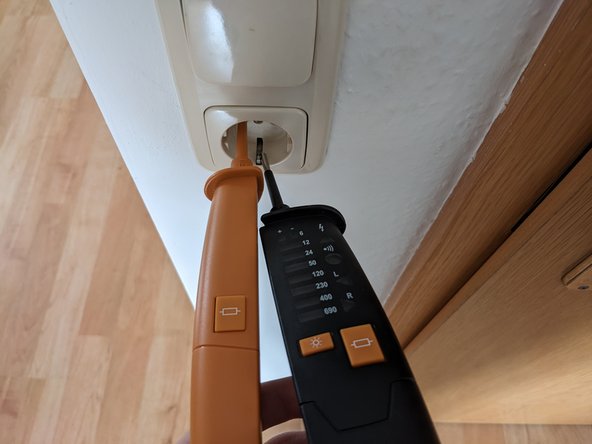
    • Use a Duspol or any other Voltmeter to test if there is voltage at the contacts.

    • You can also use a single pole phase tester, but that's not the proper way to do it.

    • Do not work on live circuits if you are not an experienced professional.

  3. Wall Outlet (Type F) Replacement, Remove the old outlet cover: 手順 3、 3の画像 1 Wall Outlet (Type F) Replacement, Remove the old outlet cover: 手順 3、 3の画像 2 Wall Outlet (Type F) Replacement, Remove the old outlet cover: 手順 3、 3の画像 3
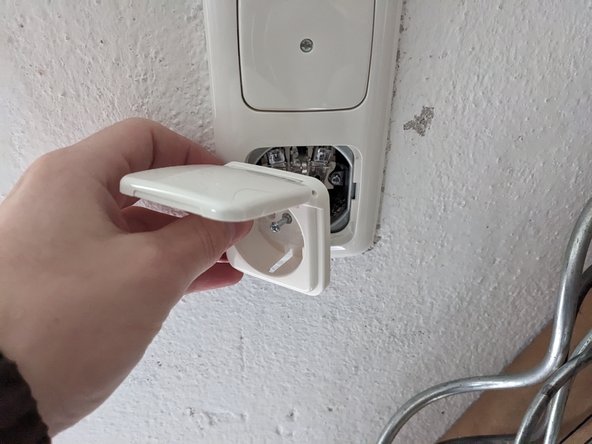
    • Remove the outlet cover by unscrewing the middle captive screw with flat head screwdriver.

    • Remove the frame.

    • If you can't remove the frame because there's a switch on the same frame, take a look at this guide, on how to remove the cover of a switch.

  4. Wall Outlet (Type F) Replacement, Remove the wall outlet: 手順 4、 1の画像 1
    • Loosen the holding claws by turning the two screws.

    • If your outlet is mounted inside a cavity wall box you can remove it by loosening the two screws around the perimeter and turning the switch until the two keyholes line up.

  5. Wall Outlet (Type F) Replacement, Disconnect the wires: 手順 5、 1の画像 1
    • Disconnect the wires form the old outlet.

    • If the old outlet has Push-In contacts, you can unlock the terminals by pushing down on the clear plastic levers.

    • If you short Earth to Neutral you'll trigger your GFCI/RCD even if the power is off.

    • Connect the wires to the new outlet.

    • There is no rule on where to connect the Phase Conductor, but it's usually considered best practice to connect it on the right side, as it makes it easier for electricians to test the outlet with a Duspol.

  6. Wall Outlet (Type F) Replacement, Mount the outlet: 手順 7、 3の画像 1 Wall Outlet (Type F) Replacement, Mount the outlet: 手順 7、 3の画像 2 Wall Outlet (Type F) Replacement, Mount the outlet: 手順 7、 3の画像 3
    • Mount the outlet by following the previous steps in reverse.

  7. Wall Outlet (Type F) Replacement, Turn the power back on: 手順 8、 1の画像 1
    • Turn the power back on.

  8. Wall Outlet (Type F) Replacement, Test the new outlet (with a single-phase tester): 手順 9、 1の画像 1
    • Use a single pole phase tester to test your outlet.

    • Tip: To increase visibility of the phase tester's indicator, touch PE or a grounded object with your hand. This should cause the tester's indicator to shine more brightly or become more noticeable.

  9. Wall Outlet (Type F) Replacement, Test the new outlet (with a Duspol): 手順 10、 3の画像 1 Wall Outlet (Type F) Replacement, Test the new outlet (with a Duspol): 手順 10、 3の画像 2 Wall Outlet (Type F) Replacement, Test the new outlet (with a Duspol): 手順 10、 3の画像 3
    • Measure across Hot and Neutral.

    • You want 230V

    • Measure across Hot and Ground.

    • You want 230V

    • Measure across Ground and Neutral.

    • You want 0V

    • Apply load between Hot and Neutral by pressing the two large buttons.

    • If this trips your GFCI, you either swapped Ground and Neutral, or your Neutral belongs to a different GFCI than your Phase Conductor.

終わりに

To reassemble your device, follow these instructions in reverse order.

ある他の人がこのガイドを完成しました。

作成者

1人の作成者と共同作成されました。

Sebastian

メンバー登録日: 08/19/18

21,116 ポイント

60のガイドは作成済み

チーム

German Translators German Translators人のメンバー

Community

28 メンバー

764のガイドは作成済み

0 件のコメント

コメントを追加

統計データ:

過去 24時間: 4

過去 7 日: 18

過去 30 日: 75

今までの合計 715