メインコンテンツにスキップ

Sony Xperia XA2 Ultra Battery Replacement

必要な工具と部品

  1. Sony Xperia XA2 Ultra Battery Replacement, Rear Cover: 手順 1、 2の画像 1 Sony Xperia XA2 Ultra Battery Replacement, Rear Cover: 手順 1、 2の画像 2
    • Turn off your phone before continuing.

    • Remove the SIM card tray on the left side of the phone using a SIM card eject tool.

  2. Sony Xperia XA2 Ultra Battery Replacement: 手順 2、 1の画像 1
    • Heat the edge of the phone with the heat gun (recommended) for 30 seconds.

    • If you don't have a heat gun, a hair dryer can be used.

    • Use the hair dryer on the highest setting, constantly going around the phone to heat all of the edges.

    • The phone will become hot to the touch. Use gloves or a towel to touch the phone.

  3. Sony Xperia XA2 Ultra Battery Replacement: 手順 3、 2の画像 1 Sony Xperia XA2 Ultra Battery Replacement: 手順 3、 2の画像 2
    • Apply the suction handle near an edge of the phone and pull upwards while trying to get an opening large enough for an iFixit opening pick.

  4. Sony Xperia XA2 Ultra Battery Replacement: 手順 4、 2の画像 1 Sony Xperia XA2 Ultra Battery Replacement: 手順 4、 2の画像 2
    • Pry upwards with the pick to start pulling the rear cover off the adhesive it’s attached to.

    • Insert a second pick once there is enough room.

  5. Sony Xperia XA2 Ultra Battery Replacement: 手順 5、 2の画像 1 Sony Xperia XA2 Ultra Battery Replacement: 手順 5、 2の画像 2
    • Take one of the picks and try to slide it down the side of the phone, pulling more of the cover off the adhesive.

    • The iFixit opening tool may also be used to gain better leverage.

    • The rear cover will pop off.

  6. Sony Xperia XA2 Ultra Battery Replacement: 手順 6、 1の画像 1
    • Once the rear cover is off, use the iFixit opening tool to detach the flex cable.

  7. Sony Xperia XA2 Ultra Battery Replacement, Motherboard Bracket: 手順 7、 2の画像 1 Sony Xperia XA2 Ultra Battery Replacement, Motherboard Bracket: 手順 7、 2の画像 2
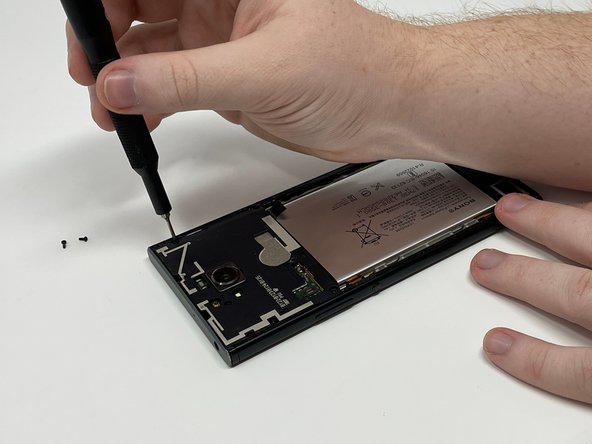
    • Remove the six 3 mm Phillips #000 screws.

  8. Sony Xperia XA2 Ultra Battery Replacement: 手順 8、 1の画像 1
    • Remove the motherboard bracket with an iFixit opening tool.

  9. Sony Xperia XA2 Ultra Battery Replacement, Speaker: 手順 9、 2の画像 1 Sony Xperia XA2 Ultra Battery Replacement, Speaker: 手順 9、 2の画像 2
    • Remove the four 3 mm screws using a Phillips #000 screwdriver.

  10. Sony Xperia XA2 Ultra Battery Replacement: 手順 10、 2の画像 1 Sony Xperia XA2 Ultra Battery Replacement: 手順 10、 2の画像 2
    • Using an iFixit opening tool, pry and remove the speaker.

  11. Sony Xperia XA2 Ultra Battery Replacement, Motherboard: 手順 11、 1の画像 1
    • Using the Jimmy, remove the two antenna flex cables.

  12. Sony Xperia XA2 Ultra Battery Replacement: 手順 12、 2の画像 1 Sony Xperia XA2 Ultra Battery Replacement: 手順 12、 2の画像 2
    • Using the iFixit opening tool, pry and remove the motherboard.

  13. Sony Xperia XA2 Ultra Battery Replacement, Cameras: 手順 13、 1の画像 1
    この手順で使用する道具:
    Tweezers
    $4.99
    購入する
    • Use a pair of tweezers to remove the rear-facing camera.

    • Use a pair of tweezers to remove the magnetic tape covering the front-facing camera.

    • Use a pair of tweezers to remove the front-facing camera.

  14. Sony Xperia XA2 Ultra Battery Replacement, Battery: 手順 14、 1の画像 1
    この手順で使用する道具:
    Tweezers
    $4.99
    購入する
    • Grab and twist the black battery tab with a pair of precision tweezers.

    • This will remove the adhesive that is attached to the battery.

    • Do this again with the black tab under the power button flex cable.

  15. Sony Xperia XA2 Ultra Battery Replacement: 手順 15、 2の画像 1 Sony Xperia XA2 Ultra Battery Replacement: 手順 15、 2の画像 2
    • With the iFixit opening tool, remove the battery.

終わりに

To reassemble your device, follow these instructions in reverse order.

作成者

4人の作成者と共同で作成されました。

Alyssa Bayles

メンバー登録日: 09/27/22

819 ポイント

8のガイドは作成済み

チーム

Utah Tech University, Team 1-1, Randazzo Fall 2023 Utah Tech University, Team 1-1, Randazzo Fall 2023人のメンバー

UTAHTECH-RANDAZZO-F23S1G1

1 メンバー

8のガイドは作成済み

0 件のコメント

コメントを追加

統計データ:

過去 24時間: 0

過去 7 日: 9

過去 30 日: 36

今までの合計 674