メインコンテンツにスキップ

Sony DualSense Controller Front Case Replacement

必要な工具と部品

  1. Sony DualSense Controller Front Case Replacement, Unclip the right end of the middle trim: 手順 1、 2の画像 1 Sony DualSense Controller Front Case Replacement, Unclip the right end of the middle trim: 手順 1、 2の画像 2
    • Disconnect and power down your controller before you begin.

    • Insert an opening pick underneath the middle trim at the bottom-right corner of the controller to release the clips securing it to the case.

  2. Sony DualSense Controller Front Case Replacement, Unclip the lower-right edge of the middle trim: 手順 2、 3の画像 1 Sony DualSense Controller Front Case Replacement, Unclip the lower-right edge of the middle trim: 手順 2、 3の画像 2 Sony DualSense Controller Front Case Replacement, Unclip the lower-right edge of the middle trim: 手順 2、 3の画像 3
    • Slide the opening pick along the lower-right edge of the middle trim to release the clips securing it to the case.

  3. Sony DualSense Controller Front Case Replacement, Unclip the left end of the middle trim: 手順 3、 2の画像 1 Sony DualSense Controller Front Case Replacement, Unclip the left end of the middle trim: 手順 3、 2の画像 2
    • Insert an opening pick underneath the middle trim at the bottom-left corner of the controller to release the clips securing it to the case.

  4. Sony DualSense Controller Front Case Replacement, Unclip the lower-left edge of the middle trim: 手順 4、 3の画像 1 Sony DualSense Controller Front Case Replacement, Unclip the lower-left edge of the middle trim: 手順 4、 3の画像 2 Sony DualSense Controller Front Case Replacement, Unclip the lower-left edge of the middle trim: 手順 4、 3の画像 3
    • Slide the opening pick along the lower-left edge of the middle trim to release the clips securing it to the case.

  5. Sony DualSense Controller Front Case Replacement, Remove the middle trim: 手順 5、 3の画像 1 Sony DualSense Controller Front Case Replacement, Remove the middle trim: 手順 5、 3の画像 2 Sony DualSense Controller Front Case Replacement, Remove the middle trim: 手順 5、 3の画像 3
    • Use your fingers to lift up the bottom edge of the middle trim to release the remaining clips.

    • Lift the middle trim over the joysticks to remove it.

  6. Sony DualSense Controller Front Case Replacement, Remove the L1 button: 手順 6、 3の画像 1 Sony DualSense Controller Front Case Replacement, Remove the L1 button: 手順 6、 3の画像 2 Sony DualSense Controller Front Case Replacement, Remove the L1 button: 手順 6、 3の画像 3
    • Insert the flat end of a spudger into the gap above the L1 button.

    • Cover the button with your thumb to prevent it from ejecting across the room.

    • Pry upward to remove the L1 button.

  7. Sony DualSense Controller Front Case Replacement, Remove the R1 button: 手順 7、 3の画像 1 Sony DualSense Controller Front Case Replacement, Remove the R1 button: 手順 7、 3の画像 2 Sony DualSense Controller Front Case Replacement, Remove the R1 button: 手順 7、 3の画像 3
    • Insert the flat end of a spudger into the gap above the R1 button.

    • Cover the button with your thumb to prevent it from ejecting across the room.

    • Pry upward to remove the R1 button.

  8. Sony DualSense Controller Front Case Replacement, Remove the rear case: 手順 8、 2の画像 1 Sony DualSense Controller Front Case Replacement, Remove the rear case: 手順 8、 2の画像 2
    • Use a Phillips screwdriver to remove the two 6.4 mm screws securing the bottom corners of the lower case.

  9. Sony DualSense Controller Front Case Replacement: 手順 9、 2の画像 1 Sony DualSense Controller Front Case Replacement: 手順 9、 2の画像 2
    • Use a Phillips screwdriver to remove the two 6.4 mm screws behind the L1 and R1 buttons.

  10. Sony DualSense Controller Front Case Replacement: 手順 10、 3の画像 1 Sony DualSense Controller Front Case Replacement: 手順 10、 3の画像 2 Sony DualSense Controller Front Case Replacement: 手順 10、 3の画像 3
    • Use the pointed edge of a spudger to unclip the two clips on either side of the headset jack.

  11. Sony DualSense Controller Front Case Replacement: 手順 11、 2の画像 1 Sony DualSense Controller Front Case Replacement: 手順 11、 2の画像 2
    • Remove the rear case.

    • On some revisions, the rear case is held with two more clips next to the previously removed bumpers. If the rear case doesn't open without force, check for those clips.

  12. Sony DualSense Controller Front Case Replacement, Disconnect the battery: 手順 12、 2の画像 1 Sony DualSense Controller Front Case Replacement, Disconnect the battery: 手順 12、 2の画像 2
    この手順で使用する道具:
    Tweezers
    $4.99
    購入する
    • Use a pair of tweezers or your fingers to disconnect the battery from the motherboard.

    • Grip the connector, not the wires, when disconnecting.

  13. Sony DualSense Controller Front Case Replacement, Remove the battery: 手順 13、 2の画像 1 Sony DualSense Controller Front Case Replacement, Remove the battery: 手順 13、 2の画像 2
    • Lift the battery straight out of the battery bracket.

  14. Sony DualSense Controller Front Case Replacement, Remove the lower microphone: 手順 14、 2の画像 1 Sony DualSense Controller Front Case Replacement, Remove the lower microphone: 手順 14、 2の画像 2
    この手順で使用する道具:
    Tweezers
    $4.99
    購入する
    • Grab the lower microphone ribbon cable pull tab with your fingers or a pair of tweezers and disconnect it from the motherboard.

  15. Sony DualSense Controller Front Case Replacement, Remove the battery bracket: 手順 15、 2の画像 1 Sony DualSense Controller Front Case Replacement, Remove the battery bracket: 手順 15、 2の画像 2
    • Use a Phillips screwdriver to remove the 6.4 mm screw securing the battery bracket.

  16. Sony DualSense Controller Front Case Replacement: 手順 16、 2の画像 1 Sony DualSense Controller Front Case Replacement: 手順 16、 2の画像 2
    • Lift the battery bracket out of the motherboard.

  17. Sony DualSense Controller Front Case Replacement, Disconnect the right trigger assembly: 手順 17、 2の画像 1 Sony DualSense Controller Front Case Replacement, Disconnect the right trigger assembly: 手順 17、 2の画像 2
    • Grip the right trigger assembly ribbon cable pull tab with a pair of tweezers or your fingers and pull up to disconnect it from the motherboard.

    • Do not completely remove the ribbon cable yet.

  18. Sony DualSense Controller Front Case Replacement: 手順 18、 2の画像 1 Sony DualSense Controller Front Case Replacement: 手順 18、 2の画像 2
    • Grip the right trigger assembly ribbon cable pull tab with a pair of tweezers or your fingers, and pull up to disconnect it from the trigger assembly.

    • Remove the ribbon cable.

  19. Sony DualSense Controller Front Case Replacement, Disconnect the left trigger assembly: 手順 19、 2の画像 1 Sony DualSense Controller Front Case Replacement, Disconnect the left trigger assembly: 手順 19、 2の画像 2
    • Grip the left trigger assembly ribbon cable pull tab with a pair of tweezers or your fingers and pull up to disconnect it from the motherboard.

    • Do not completely remove the ribbon cable yet.

  20. Sony DualSense Controller Front Case Replacement: 手順 20、 2の画像 1 Sony DualSense Controller Front Case Replacement: 手順 20、 2の画像 2
    • Grip the left trigger assembly ribbon cable pull tab with a pair of tweezers or your fingers, and pull up to disconnect it from the trigger assembly.

    • Remove the ribbon cable.

  21. Sony DualSense Controller Front Case Replacement, Disconnect the upper microphone: 手順 21、 2の画像 1 Sony DualSense Controller Front Case Replacement, Disconnect the upper microphone: 手順 21、 2の画像 2
    • Use a pair of tweezers or your fingers to grip the upper microphone ribbon cable pull tab, and pull up to disconnect it from the motherboard.

  22. Sony DualSense Controller Front Case Replacement, Disconnect the touchpad: 手順 22、 2の画像 1 Sony DualSense Controller Front Case Replacement, Disconnect the touchpad: 手順 22、 2の画像 2
    • Use a pair of tweezers or your fingers to grip the touchpad ribbon cable pull tab, and pull it straight out of the motherboard connector.

  23. Sony DualSense Controller Front Case Replacement, Lift out the motherboard: 手順 23、 3の画像 1 Sony DualSense Controller Front Case Replacement, Lift out the motherboard: 手順 23、 3の画像 2 Sony DualSense Controller Front Case Replacement, Lift out the motherboard: 手順 23、 3の画像 3
    • Carefully guide the joysticks through the front case and lift the motherboard out.

    • Do not completely remove the motherboard. There are four soldered wires tethering the motherboard to the vibrator motors.

  24. Sony DualSense Controller Front Case Replacement, Remove the light guide: 手順 24、 2の画像 1 Sony DualSense Controller Front Case Replacement, Remove the light guide: 手順 24、 2の画像 2
    • Use a Phillips screwdriver to remove the two 8.5 mm screws securing the light guide.

  25. Sony DualSense Controller Front Case Replacement: 手順 25、 2の画像 1 Sony DualSense Controller Front Case Replacement: 手順 25、 2の画像 2
    この手順で使用する道具:
    Tweezers
    $4.99
    購入する
    • Use a pair of tweezers or your fingers to remove the light guide bracket.

  26. Sony DualSense Controller Front Case Replacement: 手順 26、 2の画像 1 Sony DualSense Controller Front Case Replacement: 手順 26、 2の画像 2
    • Use a pair of tweezers or your fingers to remove the light guide.

  27. Sony DualSense Controller Front Case Replacement, Remove the speaker: 手順 27、 3の画像 1 Sony DualSense Controller Front Case Replacement, Remove the speaker: 手順 27、 3の画像 2 Sony DualSense Controller Front Case Replacement, Remove the speaker: 手順 27、 3の画像 3
    この手順で使用する道具:
    Tweezers
    $4.99
    購入する
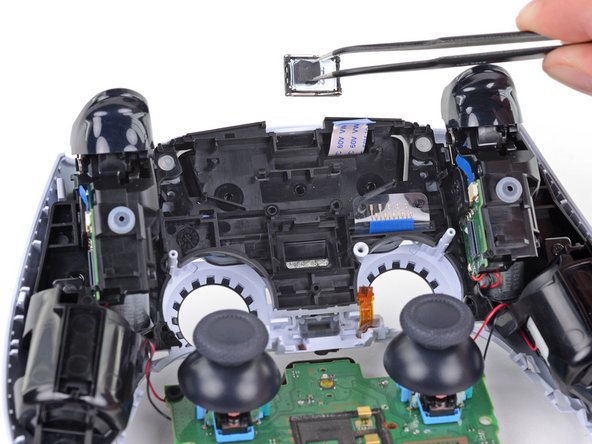
    • Use a pair of tweezers to remove the speaker from the midframe.

    • Be sure to reinstall the speaker in the correct orientation with the foam pad on the left side and the gold contact points on the right.

  28. Sony DualSense Controller Front Case Replacement, Remove the midframe: 手順 28、 2の画像 1 Sony DualSense Controller Front Case Replacement, Remove the midframe: 手順 28、 2の画像 2
    • Use a Phillips screwdriver to remove the two 6.4 mm screws securing the midframe to the front case.

  29. Sony DualSense Controller Front Case Replacement: 手順 29、 3の画像 1 Sony DualSense Controller Front Case Replacement: 手順 29、 3の画像 2 Sony DualSense Controller Front Case Replacement: 手順 29、 3の画像 3
    • Carefully lift the midframe and motherboard up and out of the front case.

    • Be careful not to strain the vibrator motor wires.

    • During reassembly, feed the touchpad's ribbon cable back through its rectangular opening in the midframe.

  30. Sony DualSense Controller Front Case Replacement, Remove the touchpad: 手順 30、 2の画像 1 Sony DualSense Controller Front Case Replacement, Remove the touchpad: 手順 30、 2の画像 2
    • Use a Phillips screwdriver to remove the two 6.4 mm screws securing the touchpad bracket to the touchpad.

  31. Sony DualSense Controller Front Case Replacement: 手順 31、 3の画像 1 Sony DualSense Controller Front Case Replacement: 手順 31、 3の画像 2 Sony DualSense Controller Front Case Replacement: 手順 31、 3の画像 3
    • Lift the touchpad bracket straight up off the front case.

    • Feed the ribbon cable back through the rectangular slot in the bracket during reassembly.

  32. Sony DualSense Controller Front Case Replacement: 手順 32、 1の画像 1
    • Lift the front case up off of the touchpad.

  33. Sony DualSense Controller Front Case Replacement, Remove the conductive silicone rubber: 手順 33、 3の画像 1 Sony DualSense Controller Front Case Replacement, Remove the conductive silicone rubber: 手順 33、 3の画像 2 Sony DualSense Controller Front Case Replacement, Remove the conductive silicone rubber: 手順 33、 3の画像 3
    この手順で使用する道具:
    Tweezers
    $4.99
    購入する
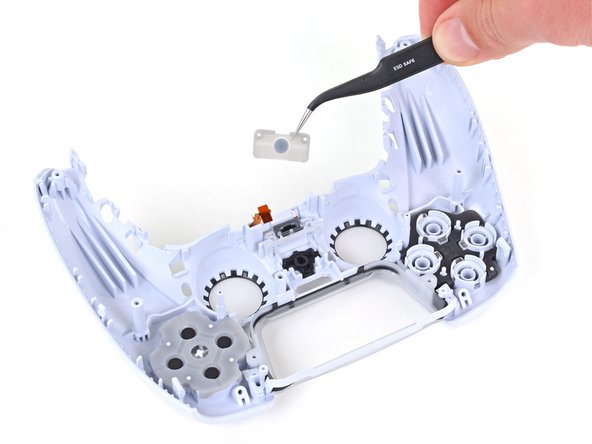
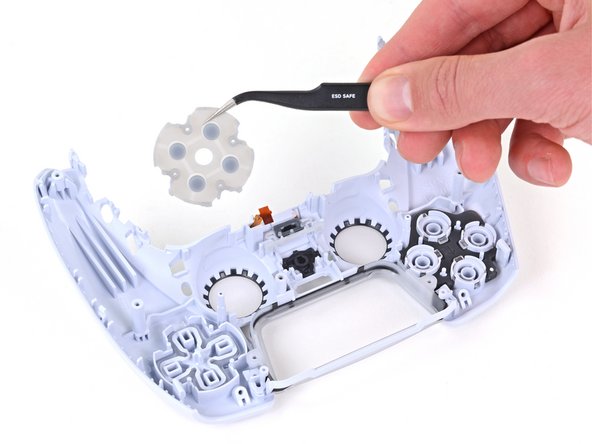
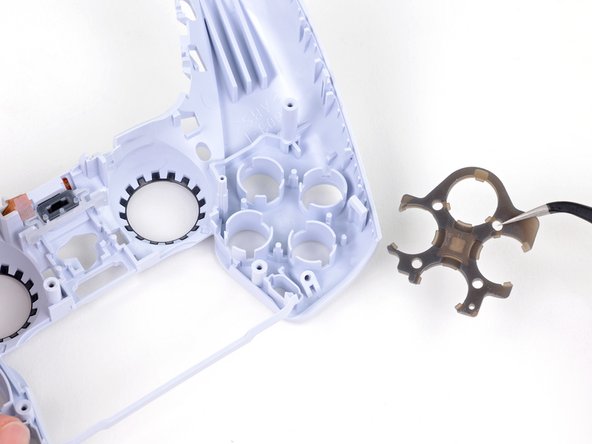
    • Use a pair of tweezers or your fingers to remove the three conductive silicone rubber pads from the inside of the front case.

    • The buttons are resting loose in the front case.

  34. Sony DualSense Controller Front Case Replacement, Remove the buttons: 手順 34、 1の画像 1
    • Hold the front case close to the surface of your table and slowly turn the front case over to let the buttons fall out.

  35. Sony DualSense Controller Front Case Replacement, Remove the touchpad bezel: 手順 35、 2の画像 1 Sony DualSense Controller Front Case Replacement, Remove the touchpad bezel: 手順 35、 2の画像 2
    • Use your fingers to remove the touchpad bezel from the front case.

  36. Sony DualSense Controller Front Case Replacement: 手順 36、 2の画像 1 Sony DualSense Controller Front Case Replacement: 手順 36、 2の画像 2
    • Use a pair of tweezers or your fingers to remove the rubber insulation pad from the front case.

  37. Sony DualSense Controller Front Case Replacement, Remove the upper microphone: 手順 37、 2の画像 1 Sony DualSense Controller Front Case Replacement, Remove the upper microphone: 手順 37、 2の画像 2
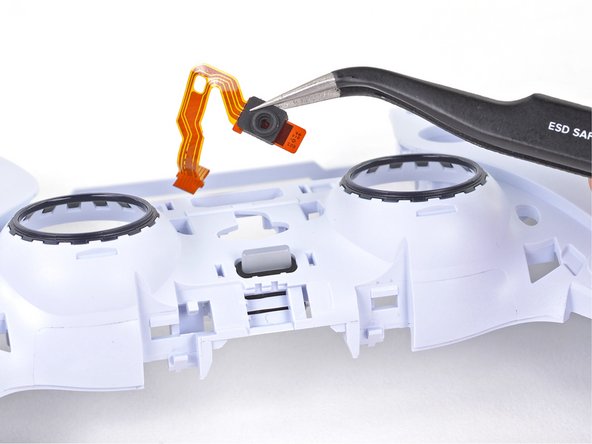
    • Use a pair of tweezers or your fingers to remove the upper microphone from the front case.

    • Feed the microphone ribbon cable out carefully—the pull tab may catch on the front case.

  38. Sony DualSense Controller Front Case Replacement, Remove the microphone mute button: 手順 38、 3の画像 1 Sony DualSense Controller Front Case Replacement, Remove the microphone mute button: 手順 38、 3の画像 2 Sony DualSense Controller Front Case Replacement, Remove the microphone mute button: 手順 38、 3の画像 3
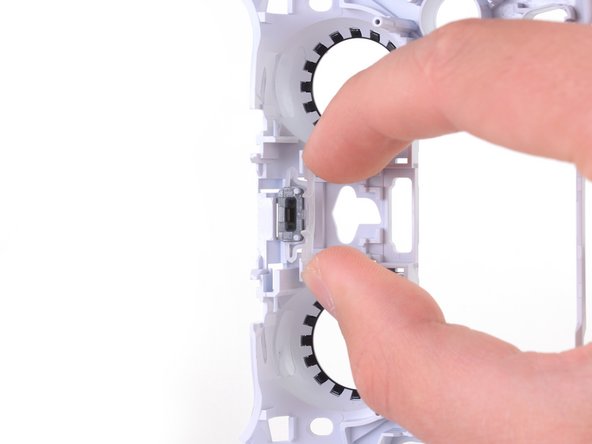
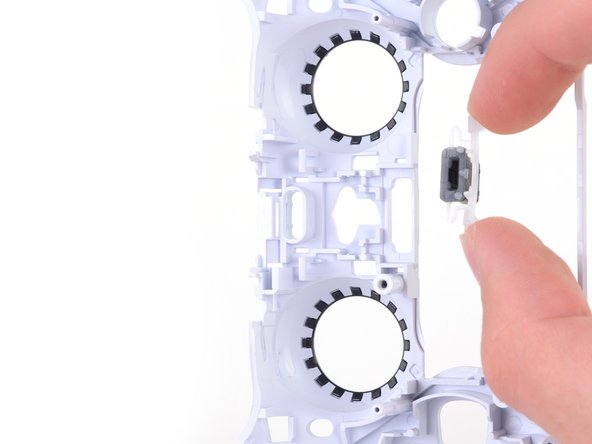
    • Use your fingers to lightly pinch the plastic clip securing the microphone mute button to the front case and remove it.

  39. Sony DualSense Controller Front Case Replacement: 手順 39、 1の画像 1
    • Only the front case remains.

終わりに

To reassemble your device, follow the above steps in reverse order.

Take your e-waste to an R2 or e-Stewards certified recycler.

Repair didn’t go as planned? Try some basic troubleshooting, or ask our Answers community for help.

13 の人々がこのガイドを完成させました。

作成者

2人の作成者と共同で作成されました。

Sam Omiotek

メンバー登録日: 02/25/19

73,369 ポイント

288のガイドは作成済み

2 件のコメント

need an update for the “a” variant (cfi-zct1w a)

this guide works for it up until a point (the touchpad), the a variant only has 1 screw instead of two and i couldn’t get the touchpad itself removed from it’s bracket (steps 30/31)

also the “a” variant is missing the light guide bracket (step 25)

name nameson - 返信

Two broken controllers became a working one. I had a small discrepancy with touchpad but figured it out. Thanks for the guide.

Dmytro Y. - 返信

コメントを追加

統計データ:

過去 24時間: 12

過去 7 日: 88

過去 30 日: 488

今までの合計 15,328