メインコンテンツにスキップ

Sony α6500 Motherboard Replacement

必要な工具と部品

  1. Sony α6500 Motherboard Replacement, Battery: 手順 1、 1の画像 1
    • Verify the camera is powered off by setting the switch to OFF.

  2. Sony α6500 Motherboard Replacement: 手順 2、 2の画像 1 Sony α6500 Motherboard Replacement: 手順 2、 2の画像 2
    • Flip the camera upside down.

    • Slide the battery compartment lock to OPEN to unlock it.

  3. Sony α6500 Motherboard Replacement: 手順 3、 2の画像 1 Sony α6500 Motherboard Replacement: 手順 3、 2の画像 2
    • Push the blue lever aside to release the battery.

  4. Sony α6500 Motherboard Replacement: 手順 4、 1の画像 1
    • Remove the released battery from the compartment.

  5. Sony α6500 Motherboard Replacement, Top Assembly: 手順 5、 2の画像 1 Sony α6500 Motherboard Replacement, Top Assembly: 手順 5、 2の画像 2
    • To access the back of the camera remove the screws attaching the LCD screen hinge to the camera body.

    • Remove four 3 mm JIS 000 screws.

    • Remove one 3 mm JIS 00 screw.

    • After dismounting the screen hinge be careful to avoid tearing the black wire ribbon connecting the screen to the camera body.

  6. Sony α6500 Motherboard Replacement: 手順 6、 2の画像 1 Sony α6500 Motherboard Replacement: 手順 6、 2の画像 2
    • Grasp the viewfinder eyecup; slide it up and off the viewfinder.

  7. Sony α6500 Motherboard Replacement: 手順 7、 3の画像 1 Sony α6500 Motherboard Replacement: 手順 7、 3の画像 2 Sony α6500 Motherboard Replacement: 手順 7、 3の画像 3
    • Press the flash popup button on the back of the camera.

    • Remove one 5 mm JIS 00 screw from inside the flash compartment.

    • Remove one 4 mm JIS 00 screw.

  8. Sony α6500 Motherboard Replacement: 手順 8、 3の画像 1 Sony α6500 Motherboard Replacement: 手順 8、 3の画像 2 Sony α6500 Motherboard Replacement: 手順 8、 3の画像 3
    • To remove the top of the camera you must remove the back first.

    • Remove the 2.5 mm JIS 00 screw from the side of the camera near the viewfinder.

    • Use the opening tool to pry off the small cover.

    • Remove two 2.5 mm JIS 00 screws from underneath the cover.

    • Remove a 5 mm JIS 00 screw from underneath the cover.

  9. Sony α6500 Motherboard Replacement: 手順 9、 2の画像 1 Sony α6500 Motherboard Replacement: 手順 9、 2の画像 2
    • Remove three 2.5 mm JIS 0 screws from the back face of the camera.

    • Remove one 4 mm JIS 00 screw from the underside of the lip that overhangs the back of the camera.

  10. Sony α6500 Motherboard Replacement: 手順 10、 1の画像 1
    • Remove four 4 mm JIS 0 screws from the bottom of the camera.

  11. Sony α6500 Motherboard Replacement: 手順 11、 2の画像 1 Sony α6500 Motherboard Replacement: 手順 11、 2の画像 2
    • Flip the battery lock switch to open and open the battery compartment.

    • Remove three 2.5 mm JIS 00 screws from the top of the battery compartment.

    • You may need a longer or thinner screwdriver to reach the screws in the battery compartment.

  12. Sony α6500 Motherboard Replacement: 手順 12、 2の画像 1 Sony α6500 Motherboard Replacement: 手順 12、 2の画像 2
    • Use the plastic opening tool to begin prying off the back of the camera from the side.

    • Continue to loosen the back until you can open it from the bottom.

  13. Sony α6500 Motherboard Replacement: 手順 13、 3の画像 1 Sony α6500 Motherboard Replacement: 手順 13、 3の画像 2 Sony α6500 Motherboard Replacement: 手順 13、 3の画像 3
    • Open the back of the camera.

    • Use tweezers to remove two ribbon connectors from underneath the back. One connects to the LCD display and the other connects to the right side behind the battery compartment.

    • Ribbon connectors can tear easily. Grasp the plastic ends (not the ribbon) when removing.

  14. Sony α6500 Motherboard Replacement: 手順 14、 3の画像 1 Sony α6500 Motherboard Replacement: 手順 14、 3の画像 2 Sony α6500 Motherboard Replacement: 手順 14、 3の画像 3
    • Use the plastic opening tool to peel down the rubber grip around the handle at least 1 cm.

    • The adhesive holding the rubber grip down should be strong enough to reattach when you are done. If not, you may need an adhesive to reglue it.

    • Remove one 3 mm JIS 000 screw from underneath the rubber grip on the right side.

    • Remove one 4 mm JIS 000 screw from the left side.

  15. Sony α6500 Motherboard Replacement: 手順 15、 2の画像 1 Sony α6500 Motherboard Replacement: 手順 15、 2の画像 2
    • The last screws holding the top on can be accessed once the back of the camera is removed.

    • Remove one 2.5 mm JIS 00 screw from the top next to the flash mount.

  16. Sony α6500 Motherboard Replacement: 手順 16、 3の画像 1 Sony α6500 Motherboard Replacement: 手順 16、 3の画像 2 Sony α6500 Motherboard Replacement: 手順 16、 3の画像 3
    • Insert a long, thin JIS 00 screwdriver through the two holes and into the battery compartment; remove the two 5mm JIS 00 screws inside it.

  17. Sony α6500 Motherboard Replacement: 手順 17、 2の画像 1 Sony α6500 Motherboard Replacement: 手順 17、 2の画像 2
    • Use the long, thin, screwdriver to remove one 5 mm JIS 00 screw inside the camera accessible below the dials from the back.

  18. Sony α6500 Motherboard Replacement: 手順 18、 3の画像 1 Sony α6500 Motherboard Replacement: 手順 18、 3の画像 2 Sony α6500 Motherboard Replacement: 手順 18、 3の画像 3
    • Use the plastic opening tool to gently lift up the shutter button assembly.

    • Grasp the front grip from the top and bottom and pull it off. It should come off easily with the shutter button out of the way.

    • The shutter button will still be attached by one ribbon cable once the front grip is removed.

  19. Sony α6500 Motherboard Replacement: 手順 19、 3の画像 1 Sony α6500 Motherboard Replacement: 手順 19、 3の画像 2 Sony α6500 Motherboard Replacement: 手順 19、 3の画像 3
    • Remove one 2.5 mm JIS 00 screw from where the shutter button assembly used to be.

    • Remove one 3 mm JIS 00 screw from the side of the camera.

  20. Sony α6500 Motherboard Replacement: 手順 20、 2の画像 1 Sony α6500 Motherboard Replacement: 手順 20、 2の画像 2
    • Carefully unplug the two ribbon connectors attaching the top assembly to the rest of the camera.

  21. Sony α6500 Motherboard Replacement, Viewfinder Glass: 手順 21、 3の画像 1 Sony α6500 Motherboard Replacement, Viewfinder Glass: 手順 21、 3の画像 2 Sony α6500 Motherboard Replacement, Viewfinder Glass: 手順 21、 3の画像 3
    • From the top of the camera remove one 4mm JIS 00 screw.

    • Remove one 5mm JIS 00 screw and the plastic bushing around it.

    • Remove the viewfinder's protective cover.

  22. Sony α6500 Motherboard Replacement: 手順 22、 2の画像 1 Sony α6500 Motherboard Replacement: 手順 22、 2の画像 2
    • Use the spudger to pry the light sensor off the side of the viewfinder.

    • When prying off the sensor, bend it out from the bottom.

    • Remove one 2.5mm JIS 000 screw on the side of the viewfinder to release it.

  23. Sony α6500 Motherboard Replacement: 手順 23、 2の画像 1 Sony α6500 Motherboard Replacement: 手順 23、 2の画像 2
    • Lift the viewfinder out and flip up the tab to release the wire ribbon where it is connected to the motherboard.

  24. Sony α6500 Motherboard Replacement, Motherboard: 手順 24、 3の画像 1 Sony α6500 Motherboard Replacement, Motherboard: 手順 24、 3の画像 2 Sony α6500 Motherboard Replacement, Motherboard: 手順 24、 3の画像 3
    • Remove two 2.5mm JIS 00 screws from the left side and bottom of the copper shielding.

    • Remove two 2mm JIS 000 screws from the right side of the copper shielding.

    • Pull the entire copper shielding piece off.

    • When replacing the shielding, make sure to position the wire ribbon slot under the tabs designed to hold it down.

  25. Sony α6500 Motherboard Replacement: 手順 25、 2の画像 1 Sony α6500 Motherboard Replacement: 手順 25、 2の画像 2
    • You have now accessed the motherboard. The next step is to remove all the wire ribbons attached to it.

    • Remove one 4mm JIS 00 screw holding down a plastic spacer on the bottom left of the motherboard.

  26. Sony α6500 Motherboard Replacement: 手順 26、 3の画像 1 Sony α6500 Motherboard Replacement: 手順 26、 3の画像 2 Sony α6500 Motherboard Replacement: 手順 26、 3の画像 3
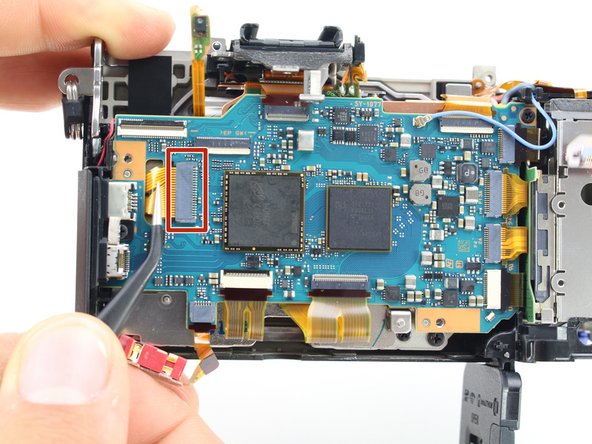
    • Use tweezers to carefully pull out the first wire ribbon on the left side of the motherboard.

    • Use the spudger to flip up the tab locking in the wire ribbons at the bottom of the motherboard, then pull them out with tweezers.

  27. Sony α6500 Motherboard Replacement: 手順 27、 3の画像 1 Sony α6500 Motherboard Replacement: 手順 27、 3の画像 2 Sony α6500 Motherboard Replacement: 手順 27、 3の画像 3
    • Carefully use tweezers to remove four wire ribbons on the right side of the motherboard.

    • Remove the last two wire ribbons on the top of the motherboard by flipping up the locking tab and pulling them out.

    • Pull the blue coaxial cable up off the board.

  28. Sony α6500 Motherboard Replacement: 手順 28、 3の画像 1 Sony α6500 Motherboard Replacement: 手順 28、 3の画像 2 Sony α6500 Motherboard Replacement: 手順 28、 3の画像 3
    • Remove one 4mm JIS 00 screw from the upper right of the motherboard and another from the far left.

    • Remove the plastic housing for the power and HDMI ports.

  29. Sony α6500 Motherboard Replacement: 手順 29、 3の画像 1 Sony α6500 Motherboard Replacement: 手順 29、 3の画像 2 Sony α6500 Motherboard Replacement: 手順 29、 3の画像 3
    • The flash capacitors connected to the yellow wire harness have dangerous amounts of stored charge. You must safely discharge them before continuing. Use a Capacitor Discharging Tool to do so.

    • Grasp the motherboard from the sides and lift it up. It is still connected by two wires on the bottom right side.

    • Pull the wire ribbon on the underside off with tweezers.

    • After you have discharged the capacitor, pull the yellow wire harness out using tweezers.

  30. Sony α6500 Motherboard Replacement: 手順 30、 1の画像 1
    • Disconnect the wire ribbon connecting the power port to the board.

終わりに

To reassemble your device, follow these instructions in reverse order.

6 の人々がこのガイドを完成させました。

作成者

4人の作成者と共同で作成されました。

Jackson Furie

メンバー登録日: 10/10/19

801 ポイント

5のガイドは作成済み

チーム

Cal Poly, Team S11-G5, Regan Fall 2019 Cal Poly, Team S11-G5, Regan Fall 2019人のメンバー

CPSU-REGAN-F19S11G5

5 メンバー

14のガイドは作成済み

コメント 1 件

コメントを追加

統計データ:

過去 24時間: 0

過去 7 日: 16

過去 30 日: 56

今までの合計 3,615