-
-
Using your fingers, pry along the groove at the top of the phone.
-
Pull back on the rear casing until it comes free from the device.
-
The casing will make a cracking sound as it is removed.
-
-
With your fingers, pry from the bottom of the battery to loosen it.
-
Lift away to remove the battery from the phone.
-
-
-
Remove the seven silver 3mm screws securing the rear panel using the Phillips #000 screwdriver.
-
Once loosened, some screws may get stuck in the casing. Use tweezers to remove them.
-
-
Pry around the rear panel with a plastic opening tool to loosen it.
-
Prying too deeply may damage delicate components inside the phone.
-
Remove the rear panel from the phone with your fingers.
-
-
-
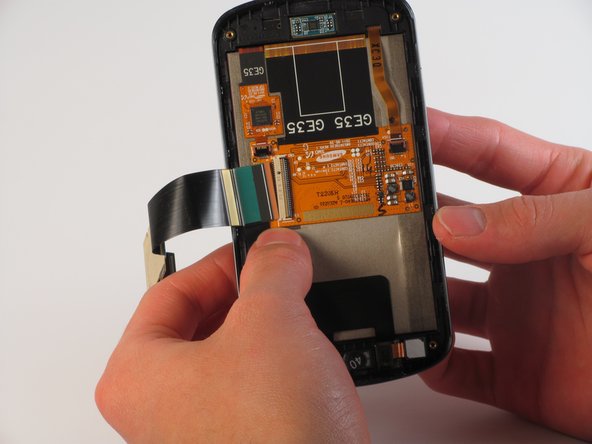
Locate the flex cable attachment at the tab with a green arrow printed on top.
-
Pry from the side the arrow is pointing with your fingers.
-
The cable will audibly snap as it is removed from its attachment.
-
Let the cable hang loosely to the side of the phone.
-
-
Pull the motherboard up from the side opposite the loose flex cable.
-
If necessary, use a plastic opening tool to separate the motherboard from the key pad underneath.
-
Lift to remove the motherboard from the device.
-
-
-
Insert a plastic opening tool into any side of the phone case to separate the keyboard from the rear panel.
-
Pry the keyboard away from the casing with the plastic opening tool.
-
The keyboard should come off with almost no force at all.
-
-
-
Use the plastic opening tool to carefully loosen the golden metal plate.
-
The golden metal plate is stuck to the rear panel with a strong adhesive, so a moderate amount of force may be needed.
-
-
Lift the gold plate with your fingers, repositioning it to slide through the keyboard casing underneath.
-
Carefully take off the keyboard casing with your fingers.
-
The golden metal plate should fit through the wide slot of the casing.
-
-
Slide the silver metal plate down and away from the to the flex cable and gold metal plate.
-
The metal plate is attached to springs that offer a small amount of resistance, so it will snap into place.
-
-
-
Insert the plastic opening tool into the groove at the top of the rear panel.
-
Firmly slide the plastic opening tool all around the rear panel. The panel will audibly snap as it comes apart.
-
These 2 pieces are attached well, so a significant amount of force is needed to separate them.
-
-
-
Use tweezers to loosen the front-facing camera from the plastic casing.
-
Pull the black rectangular piece, attached to the front facing camera, away from the rear panel.
-
-
-
Use one of the plastic opening tools to loosen the flex cable from its central housing.
-
Pull lightly on the flex cable to free it from the housing.
-
The cable may audibly snap as it is freed from its attachment.
-
-
Use tweezers to loosen the flex cable and speaker from the bottom of the phone.
-
Pull upward with the tweezers and the flex cable will come loose.
-
The flex cable will come free with the front-facing camera attached. In order to remove the front-facing camera, see our guide here.
-
-
Locate the clamp holding the gold display cable to the back of the screen.
-
Using the plastic opener tool, lightly pry the cable attachment into an upright position.
-
The clamp attachment will snap as it is pried upright.
-
Once completed, the attachment should resemble the marked section.
-
-
Using the tweezers, carefully pull the gold display cable to remove it from its attachment.
-
Be careful not to bend the display cable as this is a very sensitive part of the phone.
-
-
Pry around the screen with a plastic opening tool to loosen it from the frame.
-
Repeat this process as necessary; a lot of adhesive holds the screen to the frame.
-
Gently push forward from the back of the display to remove the screen from the frame.
このガイドを埋め込む
サイズを選択し、以下のコードをコピーして、このガイドを小さなウィジェットとしてサイト/フォーラムに埋め込みます。
プレビュー