メインコンテンツにスキップ

Samsung Gear Fit Screen Replacement

必要な工具と部品

  1. Samsung Gear Fit Screen Replacement, Watch Band: 手順 1、 2の画像 1 Samsung Gear Fit Screen Replacement, Watch Band: 手順 1、 2の画像 2
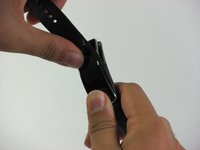
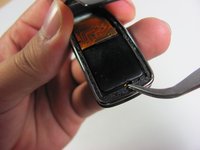
    • Place your thumbs on the ends of the screen.

    • Push the watch outward while pulling the band away from the watch.

  2. Samsung Gear Fit Screen Replacement, Screen: 手順 2、 1の画像 1
    • Heating the device with a hair dryer may warp the screen or damage the device. It it preferable to use an iOpener for this step.

    • For step-by-step instructions on using an iOpener, see the iOpenerの使用方法.

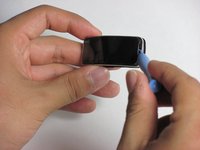
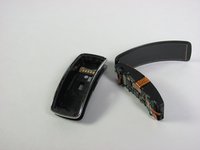
    • Use a hair dryer, heat gun, or an iOpener to heat the Gear Fit for 1-2 minutes until it is hot to the touch.
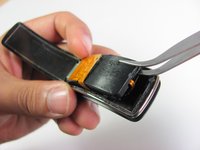
  3. Samsung Gear Fit Screen Replacement: 手順 3、 3の画像 1 Samsung Gear Fit Screen Replacement: 手順 3、 3の画像 2 Samsung Gear Fit Screen Replacement: 手順 3、 3の画像 3
    • The screen is connected to the device by a ribbon cable on the left side with the power button facing you. Do not try to completely separate the screen from the device yet, and be careful.

    • Gently pry the screen loose using a plastic opening tool.

    • If the screen doesn't easily come loose, more heating may be required

  4. Samsung Gear Fit Screen Replacement: 手順 4、 3の画像 1 Samsung Gear Fit Screen Replacement: 手順 4、 3の画像 2 Samsung Gear Fit Screen Replacement: 手順 4、 3の画像 3
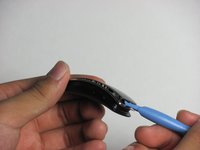
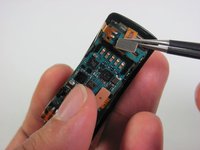
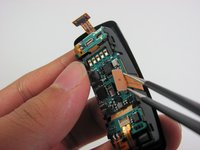
    • Using tweezers as a lever, pry the inner assembly out of the external casing.

    • This will be harder than removing the screen. Moderate force may be required.

  5. Samsung Gear Fit Screen Replacement: 手順 5、 3の画像 1 Samsung Gear Fit Screen Replacement: 手順 5、 3の画像 2 Samsung Gear Fit Screen Replacement: 手順 5、 3の画像 3
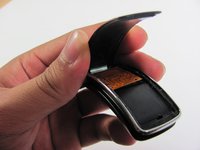
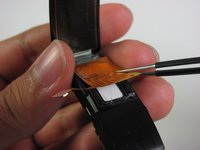
    • Disconnect the ribbon cables connecting the screen to the motherboard by lifting their metal connectors up off of the board with tweezers.

  6. Samsung Gear Fit Screen Replacement: 手順 6、 2の画像 1 Samsung Gear Fit Screen Replacement: 手順 6、 2の画像 2
    • Gently peel the screen assembly up and away from the device using tweezers.

終わりに

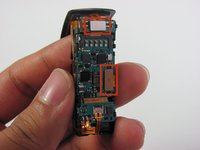
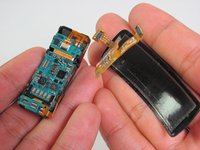
To reassemble your device, follow these instructions in reverse order.

17 の人々がこのガイドを完成させました。

作成者

4人の作成者と共同で作成されました。

Nathan Powell

メンバー登録日: 04/24/14

1,577 ポイント

3のガイドは作成済み

チーム

Cal Poly, Team 11-49, Amido Spring 2014 Cal Poly, Team 11-49, Amido Spring 2014人のメンバー

CPSU-AMIDO-S14S11G49

4 メンバー

4のガイドは作成済み

28 件のコメント

Hi!

Thank you very much for this tuto. But wher can we acquire the screen ???

Thanks a lot.

AB

aaa - 返信

Where can you buy replacement screen?

Yele Olaniyi - 返信

I'm also finding it difficult to buy a replacement screen too. Has anyone discovered some. I thought this website was selling some not too long ago. Any more coming in?

Rochelle - 返信

Hi guys,

is it possible to detach the display unit from the protective plastic cover (I think it's not glass) ?

alexxtodorov - 返信

Does anyone know where to get the replacement screen?

MrGratts - 返信

コメントを追加

統計データ:

過去 24時間: 0

過去 7 日: 1

過去 30 日: 9

今までの合計 53,427