必要な工具と部品
-
-
Power the device down completely
-
Remove the SD card from the SD card slot.
-
Remoce the sim card from the sim card slot if you have the sim card versions show in one of ghr images
-
-
-
-
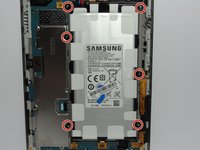
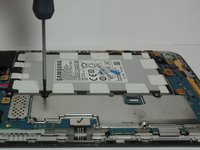
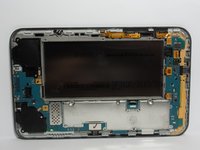
Using the Phillips precision screw driver remove the six 4 mm screws holding the battery in place.
-
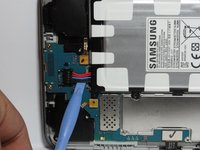
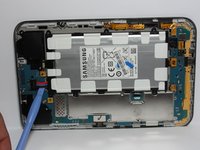
Once the battery is loose, remove as shown.
-
To reassemble your device, follow these instructions in reverse order.
To reassemble your device, follow these instructions in reverse order.
50 の人々がこのガイドを完成させました。
15 Guide Comments
thanks so much for this guide! Its easy to follow and may have just answered a question I've been asking myself for months.....
karmacroft - 返信
I have using my phone last 5 year its the Samsung galaxy tab 2. I have rooted my device and also have installed cm12 custom ROM in it. I also have install cwm recovery . but before 3 week I just tried to on my but it doesn't I looked out some videos from YouTube which says to connect your phone with your laptop I done that it start charging I felt very good I kept it for a day .next try to on that it stared but after some 'Samsung galaxy tab 2 GT p3100 ' it started my recovery I am help less now now I always try to do that it does the same thing ....... Plz help .............
wrong answer to that tablet section
My Galaxy Tab kept rebooting. We removed the battery and then reassembled everything and now it won't start at all. Ideas?
Jan Morrow - 返信
@tvljan You removed the battery, put it back together and it doesn't start? You did REPLACE the battery, right? Otherwise it's not surprising it doesn't start. The other possible issue could be that when you replaced the battery (assuming you did) that the connection clip/plug didn't make a proper connection or that something in the socket broke when you removed the old battery. It's been some months, so maybe you have figured it out, but I post that in case others have a similar problem... it's most likely a simple cause, whether or not the solution is simple.
Nice guide. :-) Before reading it, I wasn't sure the battery was replaceable (I think I remember the user guide saying it wasn't). But the tablet my wife has been using for the last few years still works fine, just the battery wasn't holding a charge at all. Hopefully the one I put in will make her feel like it's "new again".
For the benefit of others, I'll say that popping all the clips around the edge is a task which is easier said than done. I had difficulty getting some of the edge clips to release, so just opening the device took a while. It definitely helps to have a decent set of tools for the job. A thin, flexible guitar pick was the most helpful for getting the last clips free (to open the device).
The battery screws were the biggest re-assembly pain-point. Getting the battery "loops" aligned with the screw holes is tricky, to say the least. I found I had to use pry tools to push the battery one direction and another to acheive alignment and firmly push it down to allow driving the screws.
I have one problem with this initial inquiery, my tablet won't turn off. Mine can be restarted by pushing and holding it down . Once it goes through the boot up and onto the lock screen it is stuck there. It will not do, nor can I get it to do anything else but reboot again by holding the power button down. What is a solution?
Just disassemble very carefully to ensure no foreign objects make contact with the internal components.
When you disconnect the battery cable connector the tab will turn off.
Removing the battery should quit the bootloop.
How do you take the clips off? Where are they?
Pry apart the case carefully and they snap open.
I ordered one from Amazon and got it in one day!
Cómo ago para que cargue directo ya que no hay cargadores de este modelo, pero mi tablet aún funciona tiene 10 años
Thanks for the instructions! The hardest part was opening the tablet.
Paul Wicks - 返信


