メインコンテンツにスキップ

このバージョンは誤った内容を含んでいる可能性があります。最新の承認済みスナップショットに切り替えてください。

Samsung Galaxy A51 ディスプレイ交換

必要な工具と部品

  1. Samsung Galaxy A51 ディスプレイ交換, Samsung Galaxy A51 SIMトレイの取り外し: 手順 1、 3の画像 1 Samsung Galaxy A51 ディスプレイ交換, Samsung Galaxy A51 SIMトレイの取り外し: 手順 1、 3の画像 2 Samsung Galaxy A51 ディスプレイ交換, Samsung Galaxy A51 SIMトレイの取り外し: 手順 1、 3の画像 3
    • SIMカードを取り外すイジェクトツール、SIMイジェクトビット、またはまっすぐ伸ばしたクリップを、デバイス本体左側にあるSIMトレイの穴に挿入してください。

    • 強く押すと、トレイが排出されます。

    • SIMカードトレイを取り外します。

    • カードを再挿入する際は、トレイの向きを間違えないようにしてください。

  2. この手順は未翻訳です。 翻訳を手伝う。

    Samsung Galaxy A51 ディスプレイ交換: 手順 2、 1の画像 1
    • Before beginning this procedure, completely power off your phone.

    • Prepare an iOpener and apply it to the back cover to soften the adhesive.

    • The adhesive of the Samsung Galaxy A51 is very strong. You can use a hair dryer or a heat gun if you aren't able to open the device with the iOpener.

    • Be careful not to overheat the phone—the AMOLED display and internal battery are both susceptible to heat damage.

  3. この手順は未翻訳です。 翻訳を手伝う。

    Samsung Galaxy A51 ディスプレイ交換: 手順 3、 3の画像 1 Samsung Galaxy A51 ディスプレイ交換: 手順 3、 3の画像 2 Samsung Galaxy A51 ディスプレイ交換: 手順 3、 3の画像 3
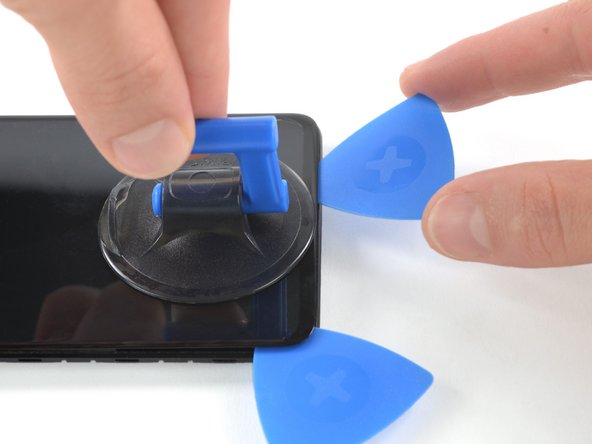
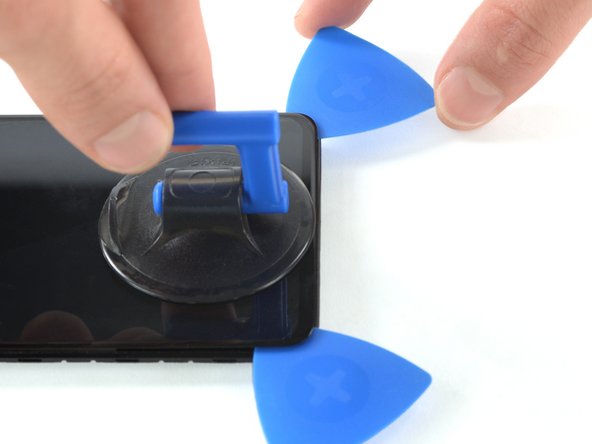
    • Insert the tip of an opening pick between the frame and the back cover at the bottom of the phone near the USB-C port.

    • If you can't get between the back cover and midframe with your opening pick, you can use a suction handle or strong tape to pull up the back cover to create a gap.

    • Slide the opening pick to the bottom right corner and leave it there.

  4. この手順は未翻訳です。 翻訳を手伝う。

    Samsung Galaxy A51 ディスプレイ交換: 手順 4、 3の画像 1 Samsung Galaxy A51 ディスプレイ交換: 手順 4、 3の画像 2 Samsung Galaxy A51 ディスプレイ交換: 手順 4、 3の画像 3
    • Insert a second opening pick and slide it from the bottom right corner to the bottom left corner to cut the adhesive.

    • Leave the opening picks in place to prevent the adhesive from resealing.

  5. この手順は未翻訳です。 翻訳を手伝う。

    Samsung Galaxy A51 ディスプレイ交換: 手順 5、 3の画像 1 Samsung Galaxy A51 ディスプレイ交換: 手順 5、 3の画像 2 Samsung Galaxy A51 ディスプレイ交換: 手順 5、 3の画像 3
    • Insert a third opening pick under the bottom left corner of the back cover.

    • If you have any trouble, apply more heat to further soften the adhesive. Follow the iOpener instructions to avoid overheating.

    • Slide the opening pick along the left edge of the phone.

    • Leave the opening pick in the top left corner to prevent the adhesive from resealing.

  6. この手順は未翻訳です。 翻訳を手伝う。

    Samsung Galaxy A51 ディスプレイ交換: 手順 6、 3の画像 1 Samsung Galaxy A51 ディスプレイ交換: 手順 6、 3の画像 2 Samsung Galaxy A51 ディスプレイ交換: 手順 6、 3の画像 3
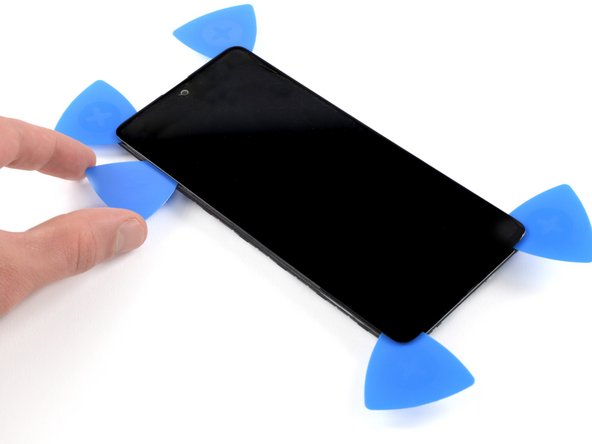
    • Insert a fourth opening pick under the top left corner of the back cover near the camera.

    • Slide the tip of the opening pick along the top edge of the phone to the right corner to cut the adhesive.

    • Leave the opening pick in the top right corner to prevent the adhesive from resealing.

  7. この手順は未翻訳です。 翻訳を手伝う。

    Samsung Galaxy A51 ディスプレイ交換: 手順 7、 3の画像 1 Samsung Galaxy A51 ディスプレイ交換: 手順 7、 3の画像 2 Samsung Galaxy A51 ディスプレイ交換: 手順 7、 3の画像 3
    • With opening picks in all four corners, insert a fifth and final opening pick under the top right corner of the back cover.

    • Slide the tip of the opening pick along the right edge of the phone to the bottom right corner to cut the remaining adhesive.

  8. この手順は未翻訳です。 翻訳を手伝う。

    Samsung Galaxy A51 ディスプレイ交換: 手順 8、 1の画像 1
    • Remove the back cover.

    • After installing the back cover, apply strong, steady pressure to your phone for several minutes to help the adhesive form a good bond—a stack of heavy books works well.

  9. この手順は未翻訳です。 翻訳を手伝う。

    Samsung Galaxy A51 ディスプレイ交換: 手順 9、 1の画像 1
    • Remove the thirteen 3 mm Phillips #00 screws securing the midframe.

  10. この手順は未翻訳です。 翻訳を手伝う。

    Samsung Galaxy A51 ディスプレイ交換: 手順 10、 3の画像 1 Samsung Galaxy A51 ディスプレイ交換: 手順 10、 3の画像 2 Samsung Galaxy A51 ディスプレイ交換: 手順 10、 3の画像 3
    • The midframe is held in place by plastic clips.

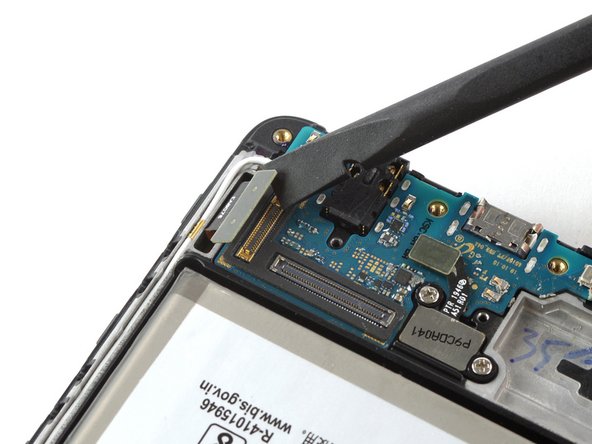
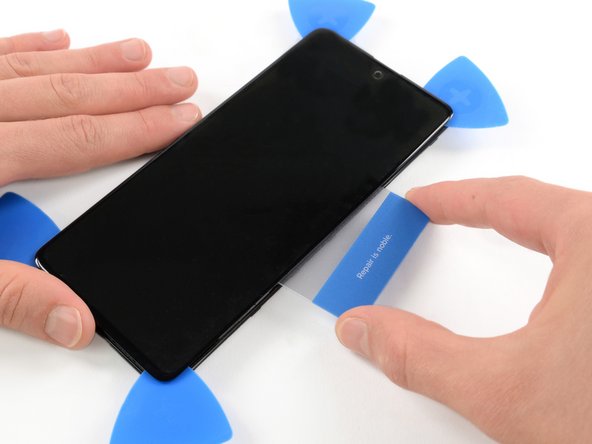
    • Insert an opening pick between the midframe and front panel assembly on the bottom of the phone near the charge port.

    • Slide the opening pick to the left bottom corner to release the plastic clips.

    • Slide the opening pick to the bottom right corner to release the rest of the bottom plastic clips.

  11. この手順は未翻訳です。 翻訳を手伝う。

    Samsung Galaxy A51 ディスプレイ交換: 手順 11、 3の画像 1 Samsung Galaxy A51 ディスプレイ交換: 手順 11、 3の画像 2 Samsung Galaxy A51 ディスプレイ交換: 手順 11、 3の画像 3
    • Continue sliding the opening pick on the right side of your phone until all plastic clips on the right side are released.

  12. この手順は未翻訳です。 翻訳を手伝う。

    Samsung Galaxy A51 ディスプレイ交換: 手順 12、 3の画像 1 Samsung Galaxy A51 ディスプレイ交換: 手順 12、 3の画像 2 Samsung Galaxy A51 ディスプレイ交換: 手順 12、 3の画像 3
    • Slide the opening pick along the top edge to release the top plastic clips.

  13. この手順は未翻訳です。 翻訳を手伝う。

    Samsung Galaxy A51 ディスプレイ交換: 手順 13、 3の画像 1 Samsung Galaxy A51 ディスプレイ交換: 手順 13、 3の画像 2 Samsung Galaxy A51 ディスプレイ交換: 手順 13、 3の画像 3
    • Slide the opening pick from the top left corner to the bottom left corner to release the left side's plastic clips.

  14. この手順は未翻訳です。 翻訳を手伝う。

    Samsung Galaxy A51 ディスプレイ交換: 手順 14、 1の画像 1
    • Remove the midframe.

  15. この手順は未翻訳です。 翻訳を手伝う。

    Samsung Galaxy A51 ディスプレイ交換: 手順 15、 2の画像 1 Samsung Galaxy A51 ディスプレイ交換: 手順 15、 2の画像 2
    • Use the flat end of a spudger to disconnect the battery by prying the connector straight up from its socket.

  16. Samsung Galaxy A51 ディスプレイ交換, ディスプレイ: 手順 16、 2の画像 1 Samsung Galaxy A51 ディスプレイ交換, ディスプレイ: 手順 16、 2の画像 2
    • スパッジャーの平面側を使って、スマートフォン底面に搭載されたディスプレイを固定しているケーブルをこじ開け、接続を外します。

  17. Samsung Galaxy A51 ディスプレイ交換: 手順 17、 1の画像 1
    • 温めたiOpenerを用意し、ディスプレイに2分以上当てて、下に留められた粘着剤を温めて柔らかくします。

    • 粘着剤を切開ためにスマートフォンを十分に温めます。iOpenerを何度かにわたって再加熱して温める必要があります。過熱を避けるため、iOpenerの説明書に従ってください。

  18. Samsung Galaxy A51 ディスプレイ交換: 手順 18、 3の画像 1 Samsung Galaxy A51 ディスプレイ交換: 手順 18、 3の画像 2 Samsung Galaxy A51 ディスプレイ交換: 手順 18、 3の画像 3
    • スクリーンが熱くて触れない程度まで温まったら、スマートフォン上部の縁に吸盤カップを装着します。

    • スクリーンがひび割れている場合、吸盤が上手く装着しないことがあります。強力なテープで持ち上げてみたり、瞬間接着剤で吸盤を固定し、硬化させると上手くいきます。

    • 隙間にオープニングピックを差し込み、右上にスライドさせて接着剤を切り始めます。

  19. Samsung Galaxy A51 ディスプレイ交換: 手順 19、 3の画像 1 Samsung Galaxy A51 ディスプレイ交換: 手順 19、 3の画像 2 Samsung Galaxy A51 ディスプレイ交換: 手順 19、 3の画像 3
    • 2つ目のピックを挿入し、左上にスライドさせます。

    • 接着剤の再付着を防ぐため、開口部のピックをそのままにしておきます。

  20. Samsung Galaxy A51 ディスプレイ交換: 手順 20、 3の画像 1 Samsung Galaxy A51 ディスプレイ交換: 手順 20、 3の画像 2 Samsung Galaxy A51 ディスプレイ交換: 手順 20、 3の画像 3
    • 3枚目のオープニングピックを差し込み、左端に沿ってスライドさせて粘着剤をカットします。

    • 接着剤の再付着を防ぐため、左下隅の開口部にオープニングピックを残してください。

  21. Samsung Galaxy A51 ディスプレイ交換: 手順 21、 3の画像 1 Samsung Galaxy A51 ディスプレイ交換: 手順 21、 3の画像 2 Samsung Galaxy A51 ディスプレイ交換: 手順 21、 3の画像 3
    • 4枚目のオープニングピックを左下コーナーに挿入し、右下隅へス向けてライドさせます。

    • 接着剤の再付着を防ぐため、オープニングピックをそのままにしておきます。

  22. Samsung Galaxy A51 ディスプレイ交換: 手順 22、 3の画像 1 Samsung Galaxy A51 ディスプレイ交換: 手順 22、 3の画像 2 Samsung Galaxy A51 ディスプレイ交換: 手順 22、 3の画像 3
    • 5枚目のオープニングピックを差し込み、デバイス左端に沿ってスライドさせながら、残りの接着剤をカットします。

  23. Samsung Galaxy A51 ディスプレイ交換: 手順 23、 2の画像 1 Samsung Galaxy A51 ディスプレイ交換: 手順 23、 2の画像 2
    • 加熱したiOpenerを再度フレームに当て、下に留められた接着剤を柔らかくします。

    • スクリーン下に留められている長方形の接着剤に注意しながら、温まるまで待ってください。

  24. Samsung Galaxy A51 ディスプレイ交換: 手順 24、 3の画像 1 Samsung Galaxy A51 ディスプレイ交換: 手順 24、 3の画像 2 Samsung Galaxy A51 ディスプレイ交換: 手順 24、 3の画像 3
    • ディスプレイと本体左側端に出来た隙間に、プラスチックカードを挿入します。

    • プラスチックカードを押し込んで、接着剤全体が切り開くまで前後にスライドします。

    • 接着剤全体を切開したことを確認したら、四隅にあるオープニングピックを外します。

    • まだスクリーンを完全に取り外さないでください。ディスプレイケーブルはまだフレームに繋がったままの状態です。

  25. Samsung Galaxy A51 ディスプレイ交換: 手順 25、 3の画像 1 Samsung Galaxy A51 ディスプレイ交換: 手順 25、 3の画像 2 Samsung Galaxy A51 ディスプレイ交換: 手順 25、 3の画像 3
    • ディスプレイケーブルを慎重にフレームに通して解放します。

  26. Samsung Galaxy A51 ディスプレイ交換: 手順 26、 3の画像 1 Samsung Galaxy A51 ディスプレイ交換: 手順 26、 3の画像 2 Samsung Galaxy A51 ディスプレイ交換: 手順 26、 3の画像 3
    • ディスプレイをを取り外します。

終わりに

可能であれば、新しい接着剤を取り付けて接着する前に、デバイスの電源を入れ、修理が成功したかテストを行ってください。

新しい交換部品とオリジナルの部品を比較し、部品を取り付ける前に、足りないパーツを新しいパーツに移植したり、新しい部品から接着剤を取り除く必要がある場合があります。

デバイスを再組み立てするには、以下の手順を逆にたどってください。アルコール(90%以上)で該当箇所をクリーニングした後、必要に応じて新しい接着剤を塗布してください。

新しい画面の固定には、カットした両面テープをスクリーンの裏側に装着するのが最適です。

破損した元のディスプレイはリサイクル業者に持ち込みましょう。

修理がうまくいかなかったら、修理後のトラブルシューティング|基本的なトラブルシューティング]]を試してみるか、[リンク|https://www.ifixit.com/Answers/Device/Sa...|アンサーコミュニティ]で助けを求めてみてください。

57 の人々がこのガイドを完成させました。

以下の翻訳者の皆さんにお礼を申し上げます:

en jp

100%

これらの翻訳者の方々は世界を修理する私たちのサポートをしてくれています。 あなたも貢献してみませんか?
翻訳を始める ›

作成者

3人の作成者と共同で作成されました。

Adriana Zwink

メンバー登録日: 12/18/19

48,990 ポイント

167のガイドは作成済み

チーム

iFixit iFixit人のメンバー

Staff

137 メンバー

17,462のガイドは作成済み

13 件のコメント

Can we get a video for this soon? Thanks.

hello3459 - 返信

Fingerprint scanner is disabled when original screen is replaced

JustAThought - 返信

You need to buy the right replacement screen like the one that supports fingerprint like amoled

Jeremy Kisluk -

Attention, Fingerprint makes some trouble after replaceing the display

Fernseh Hartung - 返信

I see that users have posted about the Fingerprint Scanner causing issues. “…disabled when original screen is replaced” or “… some trouble after replacing…” Are these issues that since have been resolved? Scanner can be re-enabled or disabled and re-enabled to bypass the “issues”?

Obfuscated_Hate - 返信

コメントを追加

統計データ:

過去 24時間: 43

過去 7 日: 396

過去 30 日: 1,807

今までの合計 122,562