メインコンテンツにスキップ

このバージョンは誤った内容を含んでいる可能性があります。最新の承認済みスナップショットに切り替えてください。

必要な工具と部品

  1. この手順は未翻訳です。 翻訳を手伝う。

    : 手順 1、 3の画像 1 : 手順 1、 3の画像 2 : 手順 1、 3の画像 3
    • Insert a SIM card eject tool, a SIM eject bit or a straightened paper clip into the hole on the SIM tray located at the left side of the phone.

    • Press firmly to eject the tray.

    • Remove the SIM card tray.

    • When reinserting the cards, make sure to properly orient them in the tray.

  2. この手順は未翻訳です。 翻訳を手伝う。

    : 手順 2、 1の画像 1
    • Start by switching off your phone.

    • Heat an iOpener and apply it to the back cover to soften the adhesive.

    • The adhesive of the Samsung Galaxy A50 is very strong. A hair dryer, heat gun, or hot plate may also be used if you aren't able to open the device with the iOpener. Be careful not to overheat the phone—the AMOLED display and internal battery are both susceptible to heat damage.

  3. この手順は未翻訳です。 翻訳を手伝う。

    : 手順 3、 3の画像 1 : 手順 3、 3の画像 2 : 手順 3、 3の画像 3
    • Insert an opening pick at the bottom of your phone near the USB-C port.

    • If you can't get between the back cover and midframe with your opening pick, you can use a suction handle or strong tape to pull up the back cover to create a gap.

    • Slide the opening pick to the bottom left corner.

  4. この手順は未翻訳です。 翻訳を手伝う。

    : 手順 4、 2の画像 1 : 手順 4、 2の画像 2
    • Insert a second opening pick and slide it from the bottom to the top left corner to cut the adhesive.

    • If you have trouble, apply more heat to further soften the adhesive. Follow the iOpener instructions to avoid overheating.

    • Leave the opening picks in place to prevent the adhesive from resealing.

  5. この手順は未翻訳です。 翻訳を手伝う。

    : 手順 5、 3の画像 1 : 手順 5、 3の画像 2 : 手順 5、 3の画像 3
    • Insert a third opening pick under the top left corner of the back cover.

    • Slide the opening pick along the top edge of the phone.

    • Leave the opening pick in the top right corner to prevent the adhesive from resealing.

  6. この手順は未翻訳です。 翻訳を手伝う。

    : 手順 6、 3の画像 1 : 手順 6、 3の画像 2 : 手順 6、 3の画像 3
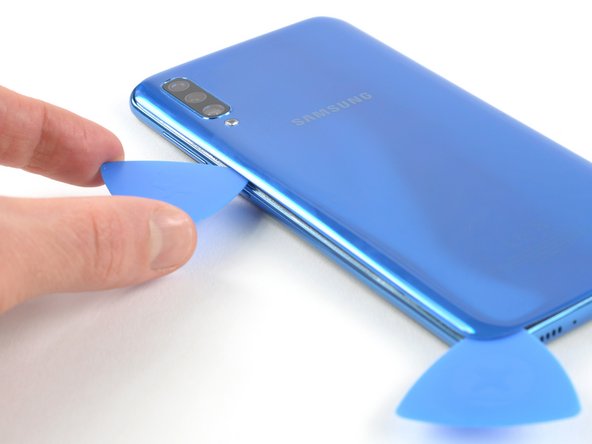
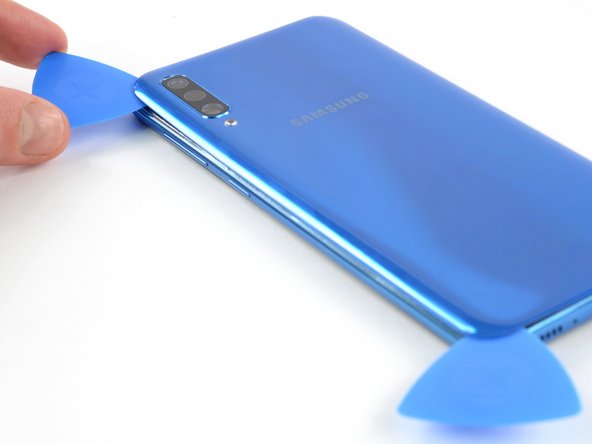
    • Insert a fourth opening pick under the top right corner of the back cover.

    • Slide the tip of the opening pick along the side of the phone to the bottom right corner to cut the adhesive.

    • Leave the opening pick in the bottom right corner to prevent the adhesive from resealing.

  7. この手順は未翻訳です。 翻訳を手伝う。

    : 手順 7、 1の画像 1
    • Remove the back cover.

    • After installing the back cover, apply strong, steady pressure to your phone for several minutes to help the adhesive form a good bond—a stack of heavy books works well.

  8. この手順は未翻訳です。 翻訳を手伝う。

    : 手順 8、 1の画像 1
    • Remove the 13 Phillips #00 screws (4 mm length).

  9. この手順は未翻訳です。 翻訳を手伝う。

    : 手順 9、 3の画像 1 : 手順 9、 3の画像 2 : 手順 9、 3の画像 3
    • Insert an opening pick between the display and the midframe at the bottom of your phone above the USB-C port.

    • Slide the pick along the bottom edge to release the clips.

  10. この手順は未翻訳です。 翻訳を手伝う。

    : 手順 10、 3の画像 1 : 手順 10、 3の画像 2 : 手順 10、 3の画像 3
    • Continue sliding the pick along the left edge of the phone to release the clips.

  11. この手順は未翻訳です。 翻訳を手伝う。

    : 手順 11、 2の画像 1 : 手順 11、 2の画像 2
    • Slide the opening pick along the top edge.

  12. この手順は未翻訳です。 翻訳を手伝う。

    : 手順 12、 3の画像 1 : 手順 12、 3の画像 2 : 手順 12、 3の画像 3
    • Slide your opening pick along the right edge towards the bottom right corner.

  13. この手順は未翻訳です。 翻訳を手伝う。

    : 手順 13、 2の画像 1 : 手順 13、 2の画像 2
    • Make sure you free all the clips securing the midframe.

    • Separate the midframe from the phone.

  14. この手順は未翻訳です。 翻訳を手伝う。

    : 手順 14、 2の画像 1 : 手順 14、 2の画像 2
    • Use a spudger to disconnect the battery by prying the connector straight up from its socket.

  15. この手順は未翻訳です。 翻訳を手伝う。

    : 手順 15、 3の画像 1 : 手順 15、 3の画像 2 : 手順 15、 3の画像 3
    • Use the flat end of a spudger to pry up and disconnect the interconnect and display flex cables from the motherboard.

  16. この手順は未翻訳です。 翻訳を手伝う。

    : 手順 16、 3の画像 1 : 手順 16、 3の画像 2 : 手順 16、 3の画像 3
    • Use the flat end of a spudger to pry up and disconnect the charging port and display flex cables from the daughterboard.

  17. この手順は未翻訳です。 翻訳を手伝う。

    : 手順 17、 2の画像 1 : 手順 17、 2の画像 2
    • The adhesive that holds down the battery in the Samsung Galaxy A50 is extremely strong.

    • Apply some isopropyl alcohol under each corner of the battery and allow it to penetrate for several minutes to help weaken the adhesive.

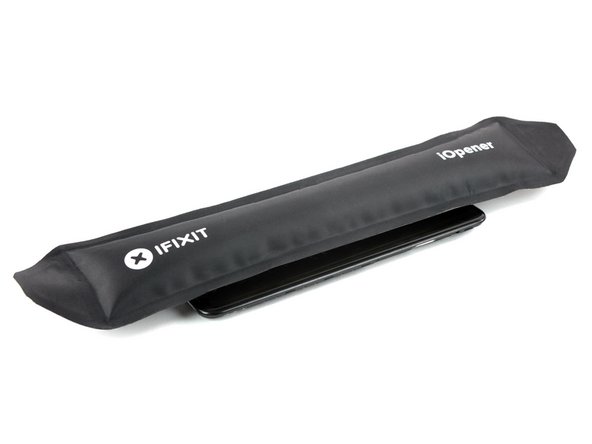
    • Alternatively, apply a heated iOpener to the display directly behind the battery for two minutes to help soften the adhesive. Repeat the process as necessary.

  18. この手順は未翻訳です。 翻訳を手伝う。

    : 手順 18、 3の画像 1 : 手順 18、 3の画像 2 : 手順 18、 3の画像 3
    この手順で使用する道具:
    Plastic Cards
    $2.99
    購入する
    • Try your best not to deform the battery during this process. Soft-shell lithium-ion batteries can leak dangerous chemicals, catch fire, or even explode if damaged. Do not use excessive force or pry at the battery with metal tools.

    • Insert a plastic card underneath the bottom edge of the battery and carefully slide it underneath the battery.

    • Continue sliding the plastic card underneath the battery to loosen the battery adhesive.

  19. この手順は未翻訳です。 翻訳を手伝う。

    : 手順 19、 2の画像 1 : 手順 19、 2の画像 2
    • Remove the battery.

    • Do not reinstall a damaged or deformed battery, as doing so is a potential safety hazard. Replace it with a new battery.

    • Before installing a new battery, remove any remaining adhesive from the phone, and clean the glued areas with isopropyl alcohol and a lint-free cloth.

ゴール

41 の人々がこのガイドを完成させました。

作成者

4人の作成者と共同で作成されました。

Adriana Zwink

メンバー登録日: 12/18/19

48,446 ポイント

167のガイドは作成済み

チーム

iFixit iFixit人のメンバー

Staff

135 メンバー

17,198のガイドは作成済み

15 件のコメント

Great guide.. One tip… ALWAYS make sure to decharge the battery so it have no power before you do anything… example turn on wifi and stream a movie and when phone is out of power you can remove the battery.. never bend it, use heat, use fluid to desolve the glue behind battery.. never cut/damage or bend the battery and use safety glasses just in case. Battery in a mobile phone is NOT a toy

Peder - 返信

Teşekkürler. Çok açıklayıcı ve anlaşılır biçimde hazırlanan değerli bir rehber olmuş. Gerçekten başarılı.

Ahmet Külahlıoğlu - 返信

My a50 just got a black screen, I have tried the forced reboot for a couple of time it opened but returns to black screen, now I can't open it with force reboot, is this battery or something else

allan_heyz - 返信

I have same problem in same time. On the screen, I only have a circle charging sign, but not a percentage of battery charge when it's charging normally. I think the battery's dead.

inaumoski -

Hi Allan, It's difficult to remotely identify what's wrong with your A50. Let us know what the reason is if you can figure it out.

Adriana Zwink -

コメントを追加

統計データ:

過去 24時間: 49

過去 7 日: 333

過去 30 日: 1,498

今までの合計 71,108