メインコンテンツにスキップ

Samsung Galaxy A40 Back Cover Replacement

必要な工具と部品

  1. Samsung Galaxy A40 Back Cover Replacement, Loosen the back cover adhesive: 手順 1、 1の画像 1
    • Apply a heated iOpener to the back cover to loosen the adhesive underneath. Apply the iOpener for at least two minutes.

  2. Samsung Galaxy A40 Back Cover Replacement, Insert an opening pick: 手順 2、 2の画像 1 Samsung Galaxy A40 Back Cover Replacement, Insert an opening pick: 手順 2、 2の画像 2
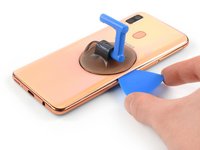
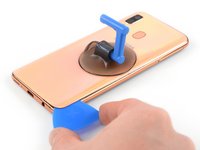
    • Secure a suction handle to the right edge of the back cover, as close to the edge as possible.

    • If the phone's back cover is damaged, the suction handle may not stick. Try lifting it with strong tape, or superglue the suction handle in place and allow it to cure so you can proceed.

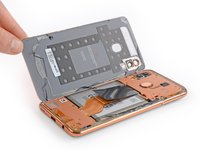
    • Lift the back cover with the suction handle to create a small gap between the back cover and the frame.

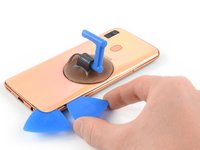
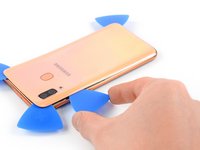
    • Insert an opening pick into the gap.

    • In case you have trouble creating a gap, apply more heat to further soften the adhesive. Follow the iOpener instructions to avoid overheating.

  3. Samsung Galaxy A40 Back Cover Replacement, Slice the adhesive: 手順 3、 2の画像 1 Samsung Galaxy A40 Back Cover Replacement, Slice the adhesive: 手順 3、 2の画像 2
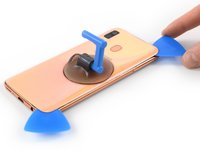
    • Slide the opening pick to the bottom right corner and leave it in place to prevent the adhesive from resealing.

  4. Samsung Galaxy A40 Back Cover Replacement, Insert a second opening pick: 手順 4、 2の画像 1 Samsung Galaxy A40 Back Cover Replacement, Insert a second opening pick: 手順 4、 2の画像 2
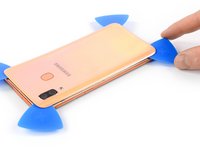
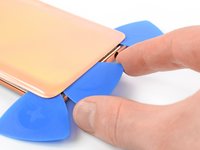
    • Insert a second opening pick at the bottom right corner.

    • Slide the opening pick along the right edge of your phone to cut the adhesive beneath the back cover.

    • Leave the opening pick in the top right corner.

    • At this point of the back cover removal feel free to remove the suction cup or continue to use it for a better grip.

  5. Samsung Galaxy A40 Back Cover Replacement, Cut the adhesive: 手順 5、 2の画像 1 Samsung Galaxy A40 Back Cover Replacement, Cut the adhesive: 手順 5、 2の画像 2
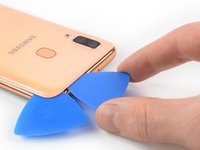
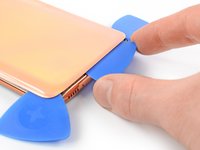
    • Insert a third opening pick at the top right corner of your phone.

    • Slide the opening pick along the top edge of your phone to cut the adhesive.

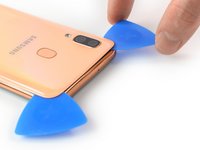
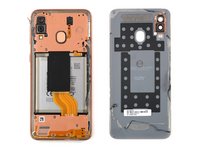
    • Leave the opening pick in the top left corner to prevent the adhesive from resealing.

    • If the adhesive becomes hard to cut, it has most likely cooled down. Use your iOpener to reheat it.

  6. Samsung Galaxy A40 Back Cover Replacement: 手順 6、 2の画像 1 Samsung Galaxy A40 Back Cover Replacement: 手順 6、 2の画像 2
    • Insert a fourth opening pick at the top left corner of your phone.

    • Slide the opening pick along the left edge of your phone to cut the adhesive.

    • Leave the opening pick in the bottom left corner.

  7. Samsung Galaxy A40 Back Cover Replacement: 手順 7、 2の画像 1 Samsung Galaxy A40 Back Cover Replacement: 手順 7、 2の画像 2
    • Insert a fifth opening pick to cut the remaining adhesive at the bottom edge of your phone.

    • In order to cut all the adhesive at the bottom edge of the device, you need to insert the opening pick about 0.4 inch (1cm).

  8. Samsung Galaxy A40 Back Cover Replacement, Remove the back cover: 手順 8、 2の画像 1 Samsung Galaxy A40 Back Cover Replacement, Remove the back cover: 手順 8、 2の画像 2
    • To avoid tearing the fingerprint cable during the following step, make sure to gently press down the fingerprint reader while lifting the back cover.

    • Fold the back cover upwards and remove it.

終わりに

To reassemble your device, follow these instructions in reverse order. Apply new adhesive where necessary after cleaning the relevant areas with isopropyl alcohol (>90%).

Secure the rear glass with pre-cut adhesive or double-sided adhesive tape during reassembly.

Removal didn’t go as planned? Try some basic troubleshooting, or ask our Answers community for help.

5 の人々がこのガイドを完成させました。

作成者

1人の作成者と共同作成されました。

Dominik Schnabelrauch

メンバー登録日: 11/23/16

203,115 ポイント

682のガイドは作成済み

チーム

iFixit iFixit人のメンバー

Staff

135 メンバー

16,767のガイドは作成済み

0 件のコメント

コメントを追加

統計データ:

過去 24時間: 1

過去 7 日: 23

過去 30 日: 133

今までの合計 5,821