メインコンテンツにスキップ
リペアコミュニティに参加 - アカウントの作成

Samsung 27E510C VGA Port Replacement

必要な工具と部品

    1. Samsung 27E510C VGA Port Replacement, Back Panel: 手順 1、 3の画像 1 Samsung 27E510C VGA Port Replacement, Back Panel: 手順 1、 3の画像 2 Samsung 27E510C VGA Port Replacement, Back Panel: 手順 1、 3の画像 3
      • Use the #1 Phillips head screw driver to remove each 13.75mm length screw from the rear panel.

      • The screw alone with the ports is a different size than the rest, its length is 12mm.

      FixBotに聞いてみる

      コメントを追加

    2. Samsung 27E510C VGA Port Replacement: 手順 2、 2の画像 1 Samsung 27E510C VGA Port Replacement: 手順 2、 2の画像 2
      この手順で使用する道具:
      Heavy-Duty Spudger
      $4.99
      • Insert the heavy duty spudger in between the monitors back panel and its frame.

      • Use the heavy duty spudger to pry open the back panel.

      • Over aggressive prying could break the tabs holding the back panel in place.

      FixBotに聞いてみる

      コメントを追加

    1. Samsung 27E510C VGA Port Replacement, Motherboard: 手順 3、 1の画像 1
      • Remove the navigation button connector by pulling while holding down its thumb tab.

      FixBotに聞いてみる

      コメントを追加

    2. Samsung 27E510C VGA Port Replacement: 手順 4、 1の画像 1
      • Remove the screen connector by gripping its sides and gently pulling while wiggling back and forth.

      FixBotに聞いてみる

      コメントを追加

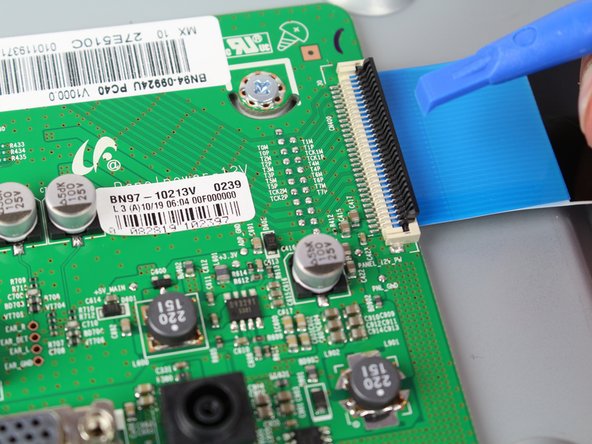
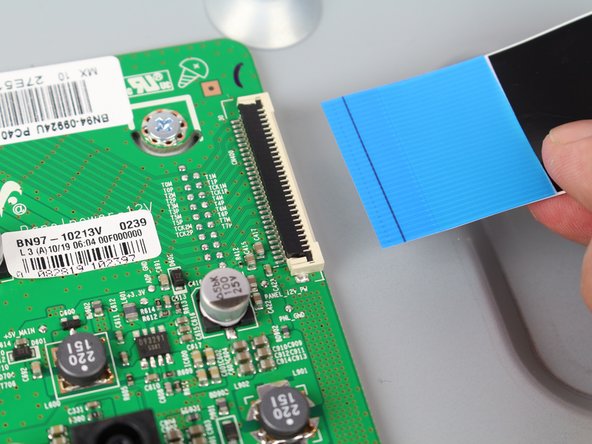
    3. Samsung 27E510C VGA Port Replacement: 手順 5、 3の画像 1 Samsung 27E510C VGA Port Replacement: 手順 5、 3の画像 2 Samsung 27E510C VGA Port Replacement: 手順 5、 3の画像 3
      • For the ribbon cable, Lift the tab from the side facing the inside of the mother board with your fingernail or a spudger.

      • Remove the cable by pulling while lifting slightly.

      • If the cable does not come out easily, than the secure tab may not be fully opened.

      FixBotに聞いてみる

      コメントを追加

    4. Samsung 27E510C VGA Port Replacement: 手順 6、 3の画像 1 Samsung 27E510C VGA Port Replacement: 手順 6、 3の画像 2 Samsung 27E510C VGA Port Replacement: 手順 6、 3の画像 3
      • Remove each of the 5mm length screws attaching the motherboard to the body of the monitor using a #1 Phillips head screwdriver.

      FixBotに聞いてみる

      コメントを追加

    5. Samsung 27E510C VGA Port Replacement: 手順 7、 2の画像 1 Samsung 27E510C VGA Port Replacement: 手順 7、 2の画像 2
      • Using both hands, lift the board off of the monitor body by the motherboards base.

      FixBotに聞いてみる

      コメントを追加

    1. Samsung 27E510C VGA Port Replacement, VGA Port: 手順 8、 1の画像 1
      • Gently place the motherboard on a static free surface.

      • It is imperative that this is done on a static free surface, as any discharge of static electricity can 'fry' your motherboard and render it useless.

      FixBotに聞いてみる

      コメントを追加

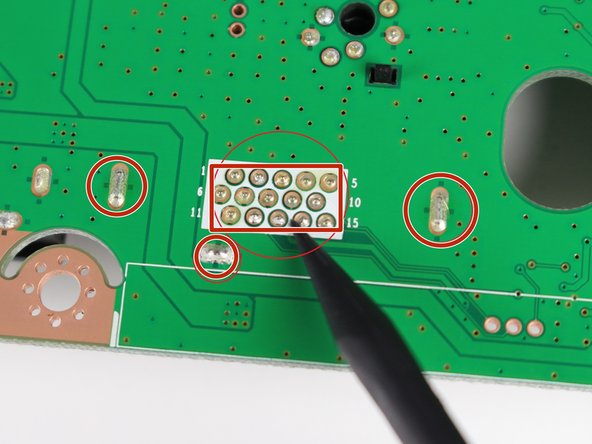
    2. Samsung 27E510C VGA Port Replacement: 手順 9、 2の画像 1 Samsung 27E510C VGA Port Replacement: 手順 9、 2の画像 2
      • Desolder the four regions in the area indicated on the back side of the motherboard using a soldering iron and some desoldering wick.

      • The VGA Port should fall off the board if all of the solder is removed.

      FixBotに聞いてみる

      コメントを追加

    3. Samsung 27E510C VGA Port Replacement: 手順 10、 1の画像 1
      • If the VGA Port does not fall off the board, try tugging on it with your hand.

      • The VGA Port may be too hot to touch right after desoldering.

      • Excessive tugging could damage the motherboard.

      FixBotに聞いてみる

      コメントを追加

終わりに

To reassemble your device, follow these instructions in reverse order.

キャンセル: このガイドを終了できませんでした。

作成者

3人の作成者と共同で作成されました。

Jesus Blanco

メンバー登録日: 09/27/17

240 ポイント

2のガイドは作成済み

チーム

Cal Poly, Team S9-G1, Banghart Fall 2017 Cal Poly, Team S9-G1, Banghart Fall 2017人のメンバー

CPSU-BANGHART-F17S9G1

6 メンバー

63のガイドは作成済み

0件のガイドコメント

コメントを追加

統計データ:

過去 24時間: 2

過去 7 日: 6

過去 30 日: 27

今までの合計 1,552