メインコンテンツにスキップ

Ridgid R82005 Motor Replacement

必要な工具と部品

  1. Ridgid R82005  Motor Replacement, Housing Assembly: 手順 1、 1の画像 1
    • Eject the battery from the drill.

    • Unscrew the seven M3x15.3mm screws, with the 2mm hex screwdriver bit, that secures the Housing Assembly.

  2. Ridgid R82005  Motor Replacement: 手順 2、 1の画像 1
    • Push the metallic Housing Connecting clip out with flat side of the plastic opening tool.

    • Eject battery before attempting this step.

  3. Ridgid R82005  Motor Replacement: 手順 3、 2の画像 1 Ridgid R82005  Motor Replacement: 手順 3、 2の画像 2
    • Remove the top half of the Housing Assembly.

  4. Ridgid R82005  Motor Replacement: 手順 4、 2の画像 1 Ridgid R82005  Motor Replacement: 手順 4、 2の画像 2
    • Grasp carefully the top and bottom of drill components.

    • LED light needs to be manually removed.

    • Lift and transfer, as a whole, the drill components from the old housing assembly to the new housing.

    • Make sure all drill components fit properly in the grooves of new Housing Assembly.

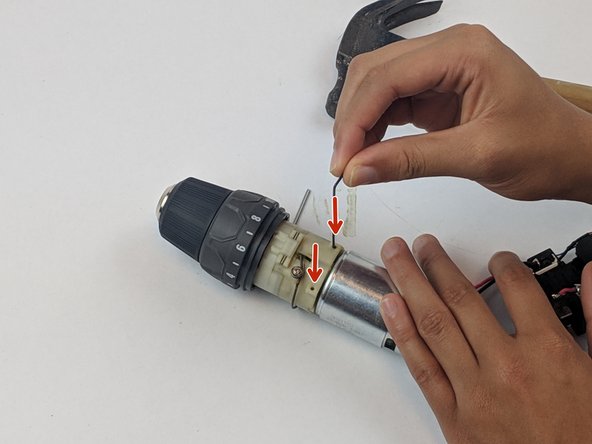
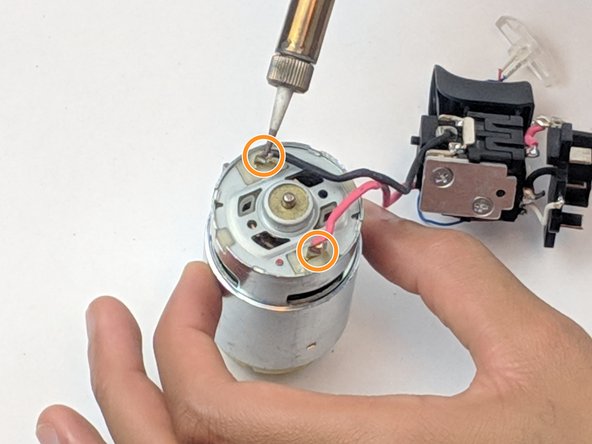
  5. Ridgid R82005  Motor Replacement, Motor: 手順 5、 3の画像 1 Ridgid R82005  Motor Replacement, Motor: 手順 5、 3の画像 2 Ridgid R82005  Motor Replacement, Motor: 手順 5、 3の画像 3
    • Push the two pins through the motor assembly.

    • We used an Alan wrench to push the pins through, but any small tool will do.

    • Unsolder the wires from the back of the motor to free the motor from the trigger assembly.

    • To learn how to solder, check out the How to Solder and Desolder Connections guide.

    • Make sure all drill components fit properly in the grooves of the Housing Assembly.

終わりに

To reassemble your device, follow these instructions in reverse order.

3 の人々がこのガイドを完成させました。

作成者

3人の作成者と共同で作成されました。

Andrew McPherson

メンバー登録日: 02/14/19

479 ポイント

3のガイドは作成済み

チーム

USF Tampa, Team S1-G2, Leahy Spring 2019 USF Tampa, Team S1-G2, Leahy Spring 2019人のメンバー

USFT-LEAHY-S19S1G2

4 メンバー

10のガイドは作成済み

0 件のコメント

コメントを追加

統計データ:

過去 24時間: 0

過去 7 日: 4

過去 30 日: 19

今までの合計 796