この翻訳は、ソースガイドの最新の更新を反映していない可能性があります。 翻訳の更新に協力してください。 または ソースガイドを参照してください。
はじめに
ようこそ!新しいプロセッサーの交換やインストールは、圧倒的に難しい手順であることがお分かりいただけると思います。完了すると、コンピュータがより速くなり、Mac Proをより深く理解することができます。
必要な工具と部品
-
-
コンピューターをシャットダウンします。
-
コンピューター内部のコンポーネントが冷却されるまで、約5~10秒間待機してください。
-
コンピューターから電源コード以外の外付けケーブルを全て外します。
-
コンピューター裏側のメタル製PCIアクセスカバーに触れて、身体から静電気を放電します。
-
電源コードの接続を外します。
-
ESDリストストラップを装着します。
-
-
-
タイプ:Serial Attached SCSI (SAS) or Serial ATA (SATA) 3 Gb/s
-
幅:102mm (3.9インチ)
-
奥行:147mm (5.7インチ)
-
高さ:25mm(1.0インチ)
-
-
-
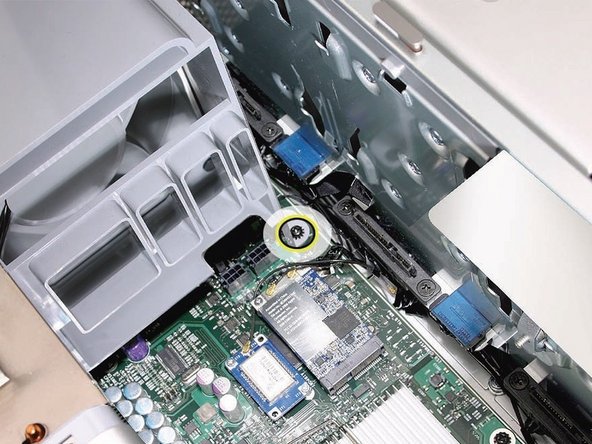
この手順ではスタンダードカードとブースターケーブルを含むカードを取り出します。どちらのタイプのカードを取り出す前に、まず、PCIブラケットと筐体を固定している2本の非脱落型ネジを緩めて、ブラケットを取り出します。
-
-
-
ブースターケーブルの接続をロジックボードから外します。
-
カードのロジックボードコネクタにある小さなロッキングクリップを、メディアシェルフ側にクリップを押し出して外します。
-
カードの上部端のみを掴んでください。ゆっくりとカードを引き上げて、拡張スロットから取り外します。
-
-
-
指をロジックボード付近のヒートシンク淵の下に片手を置きます。淵をメディアシェルフに向けてわずかに持ち上げて、カバーの上面の下にあるタブとマグネットを外します。
-
指をカバー下側の淵に載せて、カバーをまっすぐ持ち上げて、カバー表面の下にある残りのタブとマグネットを外します。
-
筐体からカバーを外します。
-
-
-
この手順は未翻訳です。 翻訳を手伝う。
-
Using a long-handled, magnetized #1 Phillips screwdriver, loosen the four captive screws that mount the memory cage to the logic board.
-
Rotate the computer so that it is standing vertically. Using a magnetized short-handled or right-angled jeweler’s #1 Phillips screwdriver, carefully remove the two short screws that mount the memory cage to the bottom panel of the enclosure.
-
-
この手順は未翻訳です。 翻訳を手伝う。
-
Preparing an EXISTING Heatsink for Re-installation. If you have a new heatsink, follow the NEW Heatsink procedure.
-
Using the alcohol pad included with the logic board or processor replacement part, clean off any used thermal grease from the processor and the bottom of the heatsink.
-
Using the thermal grease included with the logic board or processor replacement part, apply one dot of fresh grease to the raised square area on the bottom of the heatsink.
-
Spread the grease evenly across the square to a thickness of approximately 1 mm.
-
-
この手順は未翻訳です。 翻訳を手伝う。
-
Preparing a New Heatsink for Re-installation. If you have a existing heatsink, follow the EXISTING Heatsink procedure.
-
Apply the top gasket included in the parts box to the top of the heatsink.
-
If you are replacing the lower processor heatsink with a new heatsink, install the bumper included in the parts box on the side of the heatsink.
-
-
この手順は未翻訳です。 翻訳を手伝う。
-
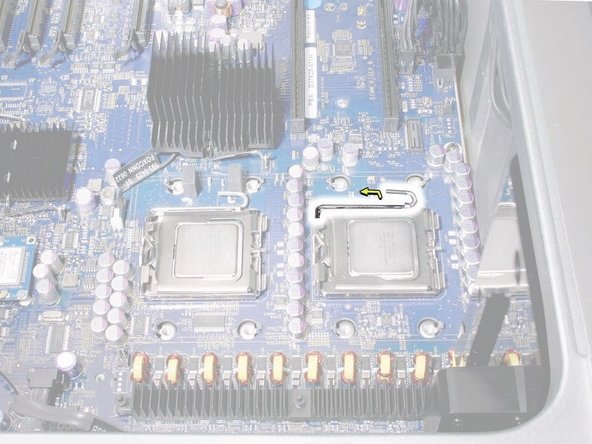
Use the following guidelines when handling the processor heatsink and/or processor:
-
Wear disposable nitrile or latex gloves
-
Avoid touching the silver-colored coating on the underside of the heatsink and the top of the processor.
-
Always make a visual inspection of new or existing heatsinks and processors before installing them in the computer.
-
When removing or replacing the heatsink and/or processor, do not allow the heatsink to be separated from the processor for more than 30 minutes. The special coating on the heatsink and processor degrades with exposure to air; more than 30 minutes exposure could result in damage to the computer and a repeat, multi-part repair.
-


デバイスを交換するには、これらの手順を逆の順番に従って作業を進めてください。
デバイスを交換するには、これらの手順を逆の順番に従って作業を進めてください。
61 の人々がこのガイドを完成させました。
以下の翻訳者の皆さんにお礼を申し上げます:
45%

Midori Doiさんは世界中で修理する私たちを助けてくれています! あなたも貢献してみませんか?
翻訳を始める ›

8 件のコメント
Hi there! Can you recommend which processor best fit with my machine: QUAD CORE XEON 3.0 (intel) 2.1 (mid 2008) with LION (10.7.6). I wish to run El Captain (10.11) or Sierra (10.12)..
Hey, buddy, how you doing?
Has a problem with your Mac Pro 2008
After the device is turned on for a few seconds, it is stopped
Please, what's the problem?
Hi!
I just bought a 2008 3,1 MacPro with 1cpu and I was wondering if it is possible that I can add a 2nd cpu… Do I have to order another Heatsink or anything else?
You will need a matching processor, a heat sink, (be careful to get the muliti copper pipes for a 3,1, not eh 1,1 or 2,1 although the older ones will work, it wont be matching), and some thermal paste.
If you are getting the 3.2 2 processor upgrade, then you will need 2 new 3.2 specific heat sinks. See the guide above for those.
Also you will need a long 3mm hex head screw driver. The Ifixit drivers barley worked.