メインコンテンツにスキップ

Reconnecting the Wiring of a Logitech G430 Headset

必要な工具と部品

  1. Reconnecting the Wiring of a Logitech G430 Headset, Wiring: 手順 1、 1の画像 1
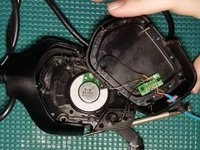
    • Pull the top-left corner of the foam padding up and to the left, and then pull it away from the frame.

  2. Reconnecting the Wiring of a Logitech G430 Headset: 手順 2、 1の画像 1
    • Remove five screws using a Phillips #0 screwdriver.

    • Pull the blue panel off of the ear piece.

    • Separate these screws for ease of reassembly, as the second layer are a different size!

  3. Reconnecting the Wiring of a Logitech G430 Headset: 手順 3、 1の画像 1
    • Flip up the microphone to get to the fifth screw in this layer.

    • Remove five screws using a Phillips #1 screwdriver.

  4. Reconnecting the Wiring of a Logitech G430 Headset: 手順 4、 2の画像 1 Reconnecting the Wiring of a Logitech G430 Headset: 手順 4、 2の画像 2
    • Pull apart the casing to open it.

    • Most of the connections will be to the small circuit board against the outside piece.

  5. Reconnecting the Wiring of a Logitech G430 Headset: 手順 5、 3の画像 1 Reconnecting the Wiring of a Logitech G430 Headset: 手順 5、 3の画像 2 Reconnecting the Wiring of a Logitech G430 Headset: 手順 5、 3の画像 3
    • Evaluate the internal connections. There should be 6 wires soldered into the top of the board, and 6 wires soldered into the bottom of the board.

    • See the table in the images for the pin connections list. Pins marked with T are on the top half of the circuit board, and B are on the bottom.

    • The first color of each wire lists the color of the casing grouping the wires together. For the top half, the component the wire is coming from is listed first.

  6. Reconnecting the Wiring of a Logitech G430 Headset: 手順 6、 1の画像 1
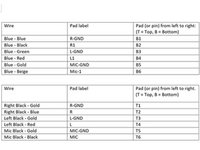
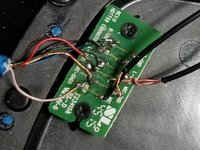
    • Solder any severed connections. I recommend referencing はんだ付けとはんだ除去の作業ガイド for how to do this!

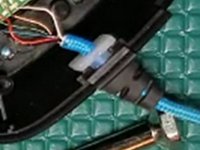
    • If necessary, you may have to strip some of the casing to expose enough of the wires to be able to reconnect them. You can get away with using scissors if nothing else, but I recommend using a wire stripper for this purpose, as instructed in Wire Stripping.

    • Solder is a toxic substance, so do not inhale it. Do not eat or drink anything after handling solder until after you have thoroughly washed your hands.

    • The wires will get hot very quickly on contact with the iron, so be quick and careful not to burn yourself.

  7. Reconnecting the Wiring of a Logitech G430 Headset: 手順 7、 1の画像 1
    • After you have finished soldering all connections, test the headset by plugging it into a computer, and check each speaker and the mic. If it still doesn't work, you may not have soldered it correctly, or there might be another problem in the headset or cable.

  8. Reconnecting the Wiring of a Logitech G430 Headset: 手順 8、 1の画像 1
    • Place the casing back together, and flip over to get to the screw holes.

  9. Reconnecting the Wiring of a Logitech G430 Headset: 手順 9、 1の画像 1
    • Insert and tighten the bottom layer of screws using a Phillips #1 screwdriver.

  10. Reconnecting the Wiring of a Logitech G430 Headset: 手順 10、 1の画像 1
    • Insert and tighten top layer of screws using a #1 Phillips screwdriver.

  11. Reconnecting the Wiring of a Logitech G430 Headset: 手順 11、 1の画像 1
    • Replace foam padding by sliding the back of the padding over the top of the speakers in a downward motion, then pulling the bottom edges of the pads over the bottom of the speakers.

    • Don't forget to thoroughly wash your hands after putting away the solder!

終わりに

Your headset should now be in working order and in one piece! Enjoy!

2 の人々がこのガイドを完成させました。

作成者

2人の作成者と共同で作成されました。

Merddyn Sheeley

メンバー登録日: 02/24/21

247 ポイント

1ガイドが承認済み

チーム

University of North Texas, Team S1-G25, Raign Spring 2021 University of North Texas, Team S1-G25, Raign Spring 2021人のメンバー

UNT-RAIGN-S21S1G25

2 メンバー

2のガイドは作成済み

0 件のコメント

コメントを追加

統計データ:

過去 24時間: 1

過去 7 日: 7

過去 30 日: 62

今までの合計 3,712