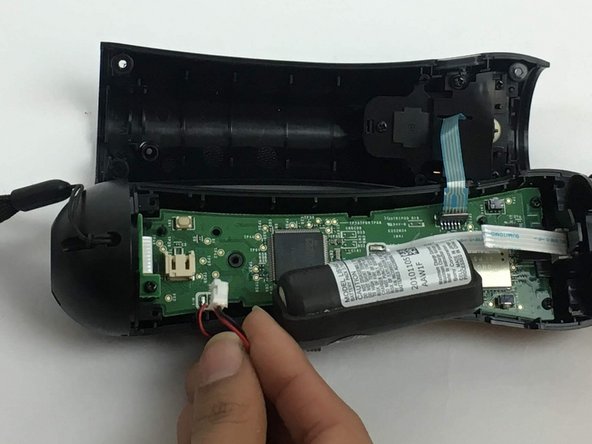
メインコンテンツにスキップ

PlayStation Move Battery Replacement

必要な工具と部品

  1. PlayStation Move  Battery Replacement, Battery: 手順 1、 3の画像 1 PlayStation Move  Battery Replacement, Battery: 手順 1、 3の画像 2 PlayStation Move  Battery Replacement, Battery: 手順 1、 3の画像 3
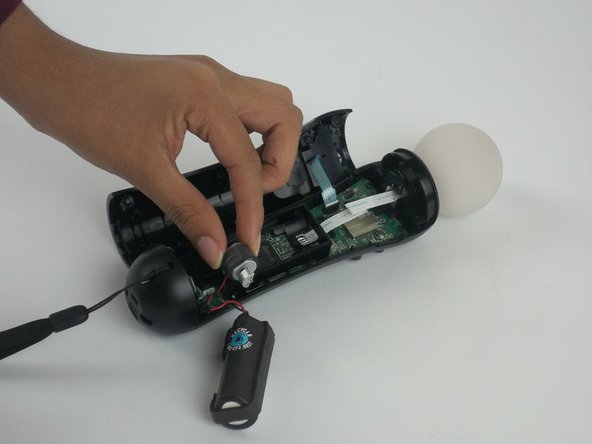
    • Using a Phillips #0 screwdriver, remove the four 10mm screws located on the back of the device.

  2. PlayStation Move  Battery Replacement: 手順 2、 2の画像 1 PlayStation Move  Battery Replacement: 手順 2、 2の画像 2
    • Insert the plastic opening tool at the indent.

    • Gently use a forward and backward motion to safely pop open the cover.

    • Using your hands to further pull it apart.

  3. PlayStation Move  Battery Replacement: 手順 3、 2の画像 1 PlayStation Move  Battery Replacement: 手順 3、 2の画像 2
    • Once the device is opened, lift the battery out of the black plastic holder.

    • Carefully pull the battery out and ensure that it's wires are still connected to the inside.

  4. PlayStation Move  Battery Replacement: 手順 4、 3の画像 1 PlayStation Move  Battery Replacement: 手順 4、 3の画像 2 PlayStation Move  Battery Replacement: 手順 4、 3の画像 3
    • Using a Phillips head screwdriver, remove the 9mm screw located to the right of the battery, which is connected to the inner plastic frame.

    • Using the plastic opening tool carefully take out the grey cylindrical piece (vibrator) that is also attached to a wire.

  5. PlayStation Move  Battery Replacement: 手順 5、 2の画像 1 PlayStation Move  Battery Replacement: 手順 5、 2の画像 2
    • Gently pull out the small grey cylindrical piece (vibrator).

    • Removing this piece makes it easier to access the wire connection of the battery and remove it.

  6. PlayStation Move  Battery Replacement: 手順 6、 2の画像 1 PlayStation Move  Battery Replacement: 手順 6、 2の画像 2
    • Using tweezers, remove the small piece with a cylindrical top that is located to the left of the inner plastic frame.

  7. PlayStation Move  Battery Replacement: 手順 7、 3の画像 1 PlayStation Move  Battery Replacement: 手順 7、 3の画像 2 PlayStation Move  Battery Replacement: 手順 7、 3の画像 3
    • Using one hand to hold the device, and the other hand to squeeze the inner plastic frame.

    • Remove by squeezing the inner plastic frame, lift and pull it towards you.

    • While removing the frame, be extremely careful because it could damage the frame or the motherboard.

  8. PlayStation Move  Battery Replacement: 手順 8、 2の画像 1 PlayStation Move  Battery Replacement: 手順 8、 2の画像 2
    • Gently pull on the white piece connecting the battery and the connector.

終わりに

To reassemble your device, follow these instructions in reverse order.

8 の人々がこのガイドを完成させました。

作成者

12人の作成者と共同で作成されました。

Jenelle Mohammed

メンバー登録日: 09/28/16

217 ポイント

1ガイドが承認済み

チーム

USF Tampa, Team 3-3, Passmore Fall 2016 USF Tampa, Team 3-3, Passmore Fall 2016人のメンバー

USFT-PASSMORE-F16S3G3

4 メンバー

8のガイドは作成済み

4 件のコメント

When putting the plastic battery rig back in on my second time doing this, I bent one of the little plastic pins that fits into a hole in the PCB. Definitely want to be careful with that. To make it a bit easier, I unscrewed the bottom port PCB part of the way so I could take the bottom plastic housing and put the plastic battery rig in straight. It made it a lot easier.

Burke Cates - 返信

No need to take out the motor, just use sharp tweezers and grab the connector (NOT the wires) and with small wiggling pull it out. Worked for mine.

crus - 返信

Worked great! Thanks for this. I did not need to take out the black battery / motor piece. Tweezers worked great to remove and install the battery cable

Harry Skigis - 返信

Any recommended online / physical store to buy new batteries for this because ifixit doesn’t have them?

Silas Stewart - 返信

コメントを追加

統計データ:

過去 24時間: 1

過去 7 日: 20

過去 30 日: 94

今までの合計 14,149