メインコンテンツにスキップ

PlayStation 5 電源ユニットの交換

必要な工具と部品

  1. PlayStation 5 電源ユニットの交換, スタンドネジを外します: 手順 1、 1の画像 1
    • PlayStation 5が縦置きの場合は、スタンドが上を向くように逆さまにしてください。

    • PlayStation 5が横向きに配置されている場合は、手順6に進んでください。

    • PlayStationが倒れないように、平らな場所で作業してください。

    • コインもしくはマイナスドライバーを使って、長さ26.5mmのスタンドネジを外します。

  2. PlayStation 5 電源ユニットの交換, 縦置きスタンドの取り外し: 手順 2、 2の画像 1 PlayStation 5 電源ユニットの交換, 縦置きスタンドの取り外し: 手順 2、 2の画像 2
    • スタンドをまっすぐ持ち上げて外します。

  3. PlayStation 5 電源ユニットの交換, スタンドネジを保管します: 手順 3、 2の画像 1 PlayStation 5 電源ユニットの交換, スタンドネジを保管します: 手順 3、 2の画像 2
    • スタンドの底面にある立方形の穴にネジを入れます。

  4. PlayStation 5 電源ユニットの交換, ネジ穴を塞ぎます: 手順 4、 3の画像 1 PlayStation 5 電源ユニットの交換, ネジ穴を塞ぎます: 手順 4、 3の画像 2 PlayStation 5 電源ユニットの交換, ネジ穴を塞ぎます: 手順 4、 3の画像 3
    • ピンセットもしくは指先を使って、立方形の溝からキャップを取り出します。

    • 指先を使って、キャップをネジ穴に押し込みます。

  5. PlayStation 5 電源ユニットの交換, 立方体の溝を閉じます: 手順 5、 3の画像 1 PlayStation 5 電源ユニットの交換, 立方体の溝を閉じます: 手順 5、 3の画像 2 PlayStation 5 電源ユニットの交換, 立方体の溝を閉じます: 手順 5、 3の画像 3
    • スタンドを反時計回りにスライドして、溝を閉めます。

  6. PlayStation 5 電源ユニットの交換, 横向きスタンドの取り外し: 手順 6、 2の画像 1 PlayStation 5 電源ユニットの交換, 横向きスタンドの取り外し: 手順 6、 2の画像 2
    • PlayStation 5が横向きに配置されている場合、充電ポートが上向きに配置されるように設置します。

    • スタンドをまっすぐ持ち上げて、取り出します。

    Do you guys sell the stand

    Corey Lewis - 返信

    Steps 1 through 6 are just about removing the stand, correct? Storing the screw and all that is just about being neat and tidy?

    tofu - 返信

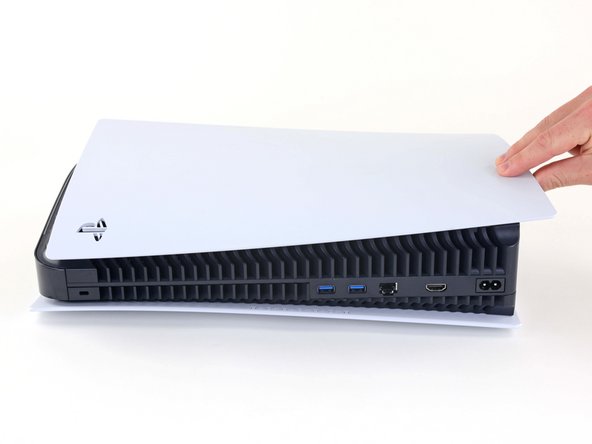
  7. PlayStation 5 電源ユニットの交換, 右側フェイスプレートを外します: 手順 7、 3の画像 1 PlayStation 5 電源ユニットの交換, 右側フェイスプレートを外します: 手順 7、 3の画像 2 PlayStation 5 電源ユニットの交換, 右側フェイスプレートを外します: 手順 7、 3の画像 3
    • デバイスを裏返して、USBとイーサーネットポートを左側に配置します。

    • フェイスプレートのコーナーを持ち上げてクリップを外し、ケースから外します。

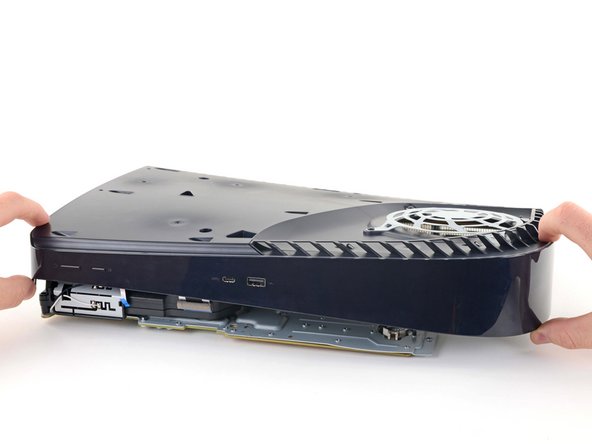
  8. PlayStation 5 電源ユニットの交換: 手順 8、 2の画像 1 PlayStation 5 電源ユニットの交換: 手順 8、 2の画像 2
    • コーナーを持ち上げながら、フェイスプレートをデバイスの下側に向けてスライドします。

    • 右側のフェイスプレートを外します。

    I recommend doing both covers at this time, to avoid hassle later. Skip to step 38, then come back here

    UnitedShoes - 返信

  9. PlayStation 5 電源ユニットの交換, グリルをこじ開けます: 手順 9、 3の画像 1 PlayStation 5 電源ユニットの交換, グリルをこじ開けます: 手順 9、 3の画像 2 PlayStation 5 電源ユニットの交換, グリルをこじ開けます: 手順 9、 3の画像 3
    • グリルの下からファンの上の隙間にスパッジャーの平面側先端を差し込みます。

    • スパッジャーでグリルを持ち上げて、ケースから外します。

  10. PlayStation 5 電源ユニットの交換, グリルを外します: 手順 10、 2の画像 1 PlayStation 5 電源ユニットの交換, グリルを外します: 手順 10、 2の画像 2
    • グリルをケースから持ち上げて取り出します。

    During reassembling:

    There is a little flat pin in each end, they need to go into the console

    Janick Carstens - 返信

  11. PlayStation 5 電源ユニットの交換, ファンシュラウドのネジを外します: 手順 11、 1の画像 1
    この手順で使用する道具:
    Magnetic Project Mat
    $19.95
    購入する
    • T8トルクスセキュリティドライバーを使って、ファンシュラウドをケースに固定している4本のネジを外します。

    • 23.3 mm長ネジー2本

    • 11.4 mm 長ネジー1本

    • 31 mm 長ネジー1本

    • デバイスの破損を防ぐため、修理中はネジの位置を確認し、正しい位置に戻してください。

    My ps5 seems to have tiny black caps over each screw. My spudger can’t get them off I see no other way to move forward besides breaking the shroud

    Anthony Pouliot - 返信

    wrong side, take the cover off the other side

    Alan Sears -

    The 31 mm-long screw just wont budge! do I turn that one counter-clockwise or clockwise? someone please help!

    Chris Love - 返信

    counter clockwise to remove

    Alan Sears -

    I damaged the 23.3mm on the bottom right next to fan connector. Is there any replacements? Can't seem to find any 23.3mm t8 screw anywhere online

    forsage.rh - 返信

    I used a t8 for all of them and had no problem removing, except for that bottom right screw

    forsage.rh -

    Is there any replacement screws you can buy for the fan? I slightly damage 23.3mm screw.

    Kevin Sarmiento - 返信

    My PS5 has TX8 (security Torx bit) screws on my fan shroud and all the case screws. A normal Torx driver won’t work you need the one with the hole in the middle of the bit driver.

    Daniel Sutczak - 返信

    Why does my ps5 have 3 different screws? 2 are the same then 2 other ones? Why?

    GoodContentKing - 返信

    Does anyone know the thread pitch of these screws? I just bought a used PS5 and the screws are missing. The fan has been glued in. Can't make this up.....

    Steven Brien - 返信

    Ci sono viti di ricambio?

    Dove posso trovarle?

    Ho guardato dappertutto e non se ne trovano

    Alessio Zecca - 返信

    Sind mit den Massen die dicke oder die Länge gemeint

    Zombiehunter -_- - 返信

  12. PlayStation 5 電源ユニットの交換, ファンシュラウドを取り出します。: 手順 12、 2の画像 1 PlayStation 5 電源ユニットの交換, ファンシュラウドを取り出します。: 手順 12、 2の画像 2
    • ファンシュラウドをまっすぐ持ち上げて、取り出します。

    wo bekomme ich die original Torx M8 für die Ps5?

    Elli Pirelly - 返信

  13. PlayStation 5 電源ユニットの交換, ワイヤカバーを外します: 手順 13、 3の画像 1 PlayStation 5 電源ユニットの交換, ワイヤカバーを外します: 手順 13、 3の画像 2 PlayStation 5 電源ユニットの交換, ワイヤカバーを外します: 手順 13、 3の画像 3
    • スパッジャーの平面側先端を、黒いワイヤカバーとファンワイヤ上部の隙間に差し込みます。

    • ワイヤカバーのみをこじ開けてください。ファンワイヤ自体には接触しないでください。

    • スパッジャーを使って、ワイヤカバーを指で掴めるまで剥がします。

    Some PS5's have a smaller sticky cover instead , remove it in this step

    UnitedShoes - 返信

  14. PlayStation 5 電源ユニットの交換: 手順 14、 3の画像 1 PlayStation 5 電源ユニットの交換: 手順 14、 3の画像 2 PlayStation 5 電源ユニットの交換: 手順 14、 3の画像 3
    • 指でワイヤカバーを剥がします。

  15. PlayStation 5 電源ユニットの交換, ファンの接続を外します: 手順 15、 2の画像 1 PlayStation 5 電源ユニットの交換, ファンの接続を外します: 手順 15、 2の画像 2
    • ファンケーブルのコネクタの先端を指で摘み、引き上げてマザーボードから外します。

    • ケーブルを引っ張るときは、必ずワイヤではなく、コネクターを引っ張ってください。

  16. PlayStation 5 電源ユニットの交換, ファンを取り出します: 手順 16、 3の画像 1 PlayStation 5 電源ユニットの交換, ファンを取り出します: 手順 16、 3の画像 2 PlayStation 5 電源ユニットの交換, ファンを取り出します: 手順 16、 3の画像 3
    • ファンを持ち上げて、ケースから取り出します。

  17. PlayStation 5 電源ユニットの交換, SSDカバーを取り出します: 手順 17、 1の画像 1
    • SSDカバーに留められた17mm ネジを、プラスドライバーで外します。

  18. PlayStation 5 電源ユニットの交換: 手順 18、 3の画像 1 PlayStation 5 電源ユニットの交換: 手順 18、 3の画像 2 PlayStation 5 電源ユニットの交換: 手順 18、 3の画像 3
    • 指を使って、SSDカバーをデバイス上部に向けてスライドして、ケースからクリップを外します。

    • SSDカバーを外します。

    It is unnecessary to remove the SSD screw and cover for power supply replacement.

    Daniel Sutczak - 返信

    The only thing you can do without removing the ssd cover and screw is remove the fan.

    David Fear -

  19. PlayStation 5 電源ユニットの交換, 光学ドライブのワイヤを外します: 手順 19、 2の画像 1 PlayStation 5 電源ユニットの交換, 光学ドライブのワイヤを外します: 手順 19、 2の画像 2
    • 指を使って光学ドライブのケーブルコネクタの端を摘み、マザーボードから引き抜いて接続を外します。

    • 常にケーブルを引っ張る際は、ワイヤ自体ではなく、コネクタを抜いてください。

    For some PS5's, the optical drive connector is still covered in this step. Proceed up to step 22, then you will be able to access these connecters. The connectors will be running across the heatsink visible from step 24.

    UnitedShoes - 返信

  20. PlayStation 5 電源ユニットの交換: 手順 20、 2の画像 1 PlayStation 5 電源ユニットの交換: 手順 20、 2の画像 2
    • 光学ドライブケーブルのコネクタの端を指でつ摘み、光学ドライブから引き上げて外します。

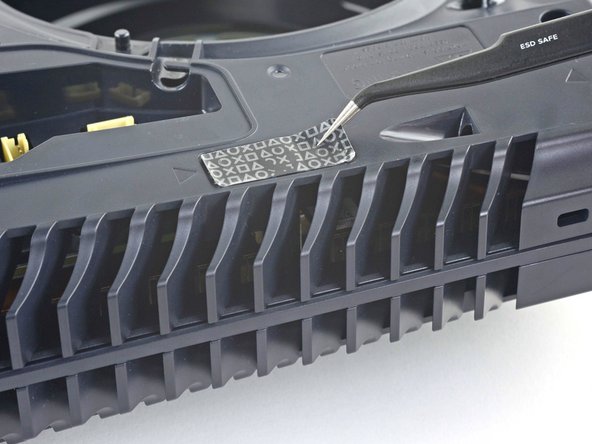
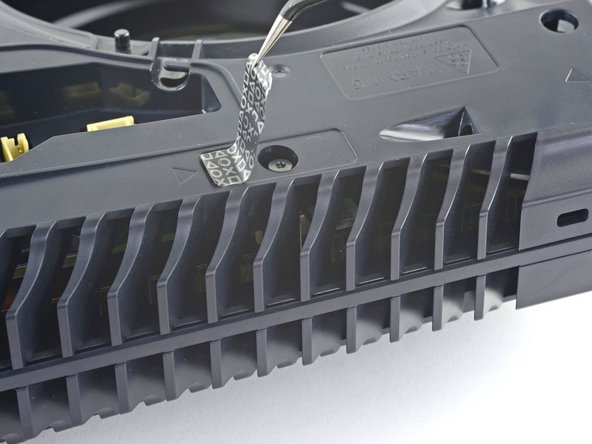
  21. PlayStation 5 電源ユニットの交換, タンパーエビデントシールを剥がします: 手順 21、 3の画像 1 PlayStation 5 電源ユニットの交換, タンパーエビデントシールを剥がします: 手順 21、 3の画像 2 PlayStation 5 電源ユニットの交換, タンパーエビデントシールを剥がします: 手順 21、 3の画像 3
    • ピンセットを使って、残りのケースのネジを覆っているタンパーエビデントシールを剥がします。

    • 未開封のPlayStation 5の場合、このシールは真っ黒になります。剥がすと模様が出てきます。

    • 厳密に言えば、これはいたずら防止用のシールですが、何も傷つけない限り、Sonyは法的に保証を無効にすることはできませんのでご安心ください。

  22. PlayStation 5 電源ユニットの交換, ケースのネジを外します: 手順 22、 1の画像 1
    • T8トルクスドライバーを使って、ケースを固定している11本のネジを外します。

    • 18.6mm 長ネジー6本

    • 23.3mm 長ネジー2本

    • 43.2mm 長ネジー2本

    • 7.3mm 長ネジー1本

  23. PlayStation 5 電源ユニットの交換, ケースを外します: 手順 23、 2の画像 1 PlayStation 5 電源ユニットの交換, ケースを外します: 手順 23、 2の画像 2
    • ケースをまっすぐ持ち上げて、取り出します。

  24. PlayStation 5 電源ユニットの交換, 光学ドライブのリボンケーブルを外します: 手順 24、 3の画像 1 PlayStation 5 電源ユニットの交換, 光学ドライブのリボンケーブルを外します: 手順 24、 3の画像 2 PlayStation 5 電源ユニットの交換, 光学ドライブのリボンケーブルを外します: 手順 24、 3の画像 3
    • スパッジャーの平面側先端を使って、光学ドライブコネクタのメタル製ロッキングタブを押さえます。

    • メタルタブを押し下げた状態で、ピンセットを使って青いプルタブをコネクタから直接引き抜き、光学ドライブからケーブルを取り外します。

    • ケーブル自体ではなく、プルタブのみ引っ張ってください。

  25. PlayStation 5 電源ユニットの交換, 光学ドライブを外します: 手順 25、 2の画像 1 PlayStation 5 電源ユニットの交換, 光学ドライブを外します: 手順 25、 2の画像 2
    • デバイスから光学ドライブを持ち上げて、取り出します。

  26. PlayStation 5 電源ユニットの交換, 光学ドライブのリボンケーブルを外します: 手順 26、 3の画像 1 PlayStation 5 電源ユニットの交換, 光学ドライブのリボンケーブルを外します: 手順 26、 3の画像 2 PlayStation 5 電源ユニットの交換, 光学ドライブのリボンケーブルを外します: 手順 26、 3の画像 3
    • 光学ドライブコネクターのメタル製のロックタブをスパッジャーの平面側を使って押してください。

    • メタル製タブを押し下げた状態で、ピンセットを使って青いプルタブをコネクタから直接引き抜き、マザーボードからケーブルを取り外します。

  27. PlayStation 5 電源ユニットの交換, 電源とエジェクトボタンのリボンケーブルを外します: 手順 27、 2の画像 1 PlayStation 5 電源ユニットの交換, 電源とエジェクトボタンのリボンケーブルを外します: 手順 27、 2の画像 2
    • ピンセットを使って、ブルーのプルタブをコネクタから抜いて、電源とエジェクトボタンのリボンケーブルの接続を外します。

    where to get the ribbon cable from

    sameh - 返信

  28. PlayStation 5 電源ユニットの交換, LEDリボンケーブルを外します: 手順 28、 2の画像 1 PlayStation 5 電源ユニットの交換, LEDリボンケーブルを外します: 手順 28、 2の画像 2
    • ピンセットを使って、ブルーのプルタブを直接コネクタから引き抜いて、LEDリボンケーブルの接続を外します。

  29. PlayStation 5 電源ユニットの交換, アンテナワイヤを外します: 手順 29、 3の画像 1 PlayStation 5 電源ユニットの交換, アンテナワイヤを外します: 手順 29、 3の画像 2 PlayStation 5 電源ユニットの交換, アンテナワイヤを外します: 手順 29、 3の画像 3
    • ピンセットを使って、白いWi-Fiアンテナ線のメタル製ベースを摘みます。

    • ワイヤのコネクタをまっすぐ持ち上げて、マザーボードから接続を外します。

    • 黒いWi-Fiアンテナワイヤにも同じ作業を繰り返します。

    Black and white antennas are reversed, black should go on RB and white on RW

    iPod Fix It - 返信

    It looks like some models of PS5 lack these antenna wires. My PS5 only has Power Supply antennas, which are in the next step.

    UnitedShoes - 返信

    Can confirm, on a PS5 I got for repair, there are only antenna connectors that are in the next step. The antenna connectors of this step are physically absent from the PCB. There are only 2 coaxial connectors in total, not 4. From the image it seems the PCB routing is slightly different (my board with missing connectors seems to use PCB traces as antennae given trace shapes)

    Ilya - 返信

  30. PlayStation 5 電源ユニットの交換: 手順 30、 3の画像 1 PlayStation 5 電源ユニットの交換: 手順 30、 3の画像 2 PlayStation 5 電源ユニットの交換: 手順 30、 3の画像 3
    • ピンセットで黒色の電源アンテナワイヤのメタルベースを摘みます。できる限りコネクターに近い位置を摘んでください。

    • ワイヤのコネクタを真上に持ち上げて、マザーボードから接続を外します。

    • 白色の電源アンテナワイヤも同じ作業を繰り返してください。

  31. PlayStation 5 電源ユニットの交換, 白色のスティッカーを剥がします: 手順 31、 3の画像 1 PlayStation 5 電源ユニットの交換, 白色のスティッカーを剥がします: 手順 31、 3の画像 2 PlayStation 5 電源ユニットの交換, 白色のスティッカーを剥がします: 手順 31、 3の画像 3
    • ピンセットを使って、アンテナワイヤを上部シールドプレートに固定している白いシールを剥がします。

    • スティッカーの下からアンテナワイヤを取り出します。

    • 白いシールをトップシールドプレートに戻して、再利用します。

  32. PlayStation 5 電源ユニットの交換: 手順 32、 3の画像 1 PlayStation 5 電源ユニットの交換: 手順 32、 3の画像 2 PlayStation 5 電源ユニットの交換: 手順 32、 3の画像 3
    • 前の手順を繰り返して、4つの残りのステッカーも剥がします。

  33. PlayStation 5 電源ユニットの交換: 手順 33、 3の画像 1 PlayStation 5 電源ユニットの交換: 手順 33、 3の画像 2 PlayStation 5 電源ユニットの交換: 手順 33、 3の画像 3
    • ピンセットを使って、ヒートシンクにLEDリボンケーブルを固定している白いステッカーを剥がします。

    • ステッカーの下からLEDリボンケーブルを取り出します。

    • 白いステッカーをヒートシンクに戻して、再利用します。

  34. PlayStation 5 電源ユニットの交換, 上部シールドプレートのネジを外します: 手順 34、 1の画像 1
    • T8トルクスドライバーを使って、上部シールドプレートを固定している7.3mm長ネジを41本外します。

    Your image already has the long black screw removed from the left hand side half way down.

    You should add a step for this screw for people re-assembling.

    infiniti25 - 返信

    I second this! I had an extra long screw when I was done, it was likely this. This is one of the screws that reach down to the PSU

    UnitedShoes -

    I believe that this was an unintentional oversight in the guide, as I cannot find any guide that mentions removing this screw. I have made an edit to this guide to clarify that final screw must also be removed, hoping it is approved and published!

    Cyberdragon E207 -

    I can’t see how removing 41 of these 7.3mm screws to replace the power supply. None of them hold the power supply to the board. Waste of time.

    Daniel Sutczak - 返信

    The reason why is because you need to remove the top shield plate to get to the usb ribbon cable.

    Bryson Morgan -

    Some PS5's have a removable cover for the USB board (step 36). If this is your situation, then I think removing this entire plate is unnecessary for removing the PSU (80% sure, I haven't exactly tried.)

    UnitedShoes -

  35. PlayStation 5 電源ユニットの交換, 上部シールドプレートを取り出します: 手順 35、 3の画像 1 PlayStation 5 電源ユニットの交換, 上部シールドプレートを取り出します: 手順 35、 3の画像 2 PlayStation 5 電源ユニットの交換, 上部シールドプレートを取り出します: 手順 35、 3の画像 3
    • 上部シールドプレートをマザーボードから持ち上げて、取り出します。

    Unnecessary step to replace power supply.

    Daniel Sutczak - 返信

    Debatable, removing the top shield makes it much more comfortable to remove the USB ribbon cable.

    Bryson Morgan -

    I would say it's required since there's no way to get to the metal release otherwise

    UnitedShoes -

    The grey rubber came off in some spots, what do I use to replace it? It attaches to cylinder things (opposite side of power supply) which then attaches to a copper bus.

    Fortyr - 返信

    That's thermal paste, it's recommended to keep it all on there. If you lost some paste, check on Google for the proper thermal paste for the PS5

    UnitedShoes -

  36. PlayStation 5 電源ユニットの交換, USBボードの接続を外します: 手順 36、 3の画像 1 PlayStation 5 電源ユニットの交換, USBボードの接続を外します: 手順 36、 3の画像 2 PlayStation 5 電源ユニットの交換, USBボードの接続を外します: 手順 36、 3の画像 3
    • USBボードケーブルのボードコネクタのメタル製ロッキングタブを指で押します。

    • メタルタブを押し下げた状態で、スパッジャーの平面側先端を、リボンケーブルの絶縁フォームパッドに当て、コネクタからまっすぐ離して、ケーブルをの接続を外します。

    What happens if this cable disconnects from the front?

    Carolyn Page - 返信

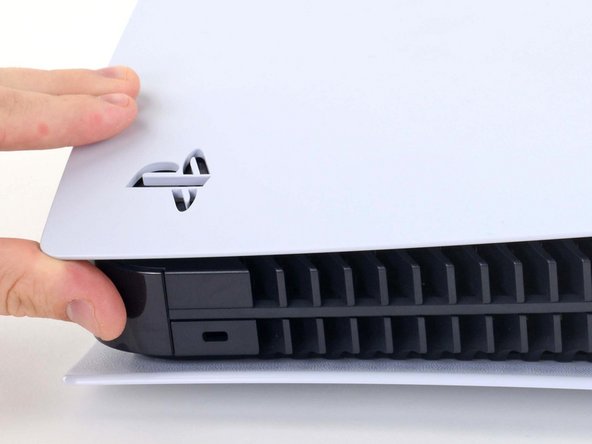
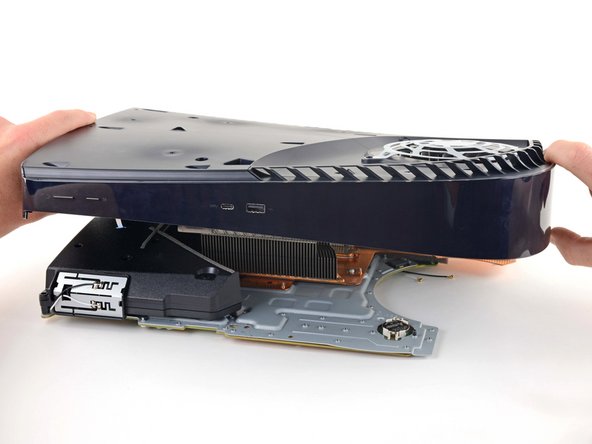
  37. PlayStation 5 電源ユニットの交換, 左側フェイスプレートを外します: 手順 37、 3の画像 1 PlayStation 5 電源ユニットの交換, 左側フェイスプレートを外します: 手順 37、 3の画像 2 PlayStation 5 電源ユニットの交換, 左側フェイスプレートを外します: 手順 37、 3の画像 3
    • PlayStationロゴの入っている側のフェイスプレートのコーナーを持ち上げて、ケースからクリップを外します。

    Wrong picture: the other face of Playstation has already been removed at this point, while in the picture it looks as if we have just started disassembly. This note applies to all following steps.

    Ilya - 返信

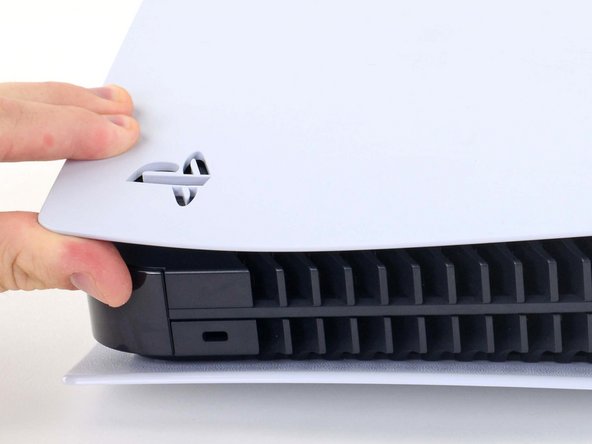
  38. PlayStation 5 電源ユニットの交換: 手順 38、 2の画像 1 PlayStation 5 電源ユニットの交換: 手順 38、 2の画像 2
    • コーナーを持ち上げながら、フェースプレートを本体底面に向けてスライドさせます。

    • 左側フェイスプレートを外します。

  39. PlayStation 5 電源ユニットの交換, ネジを外します: 手順 39、 1の画像 1
    • トルクスT8ドライバーを使って、ヒートシンクアセンブリとマザーボードを固定している29.4mm 長ネジを2本外します。

    These screws are T9 security, or, if they are designed to be T8 security, they also accommodate T9 bits and you should definitely use T9. Source: Myself after stripping a highly torqued bolt 🤦‍♂️

    just chris... - 返信

  40. PlayStation 5 電源ユニットの交換, ケースを外します: 手順 40、 3の画像 1 PlayStation 5 電源ユニットの交換, ケースを外します: 手順 40、 3の画像 2 PlayStation 5 電源ユニットの交換, ケースを外します: 手順 40、 3の画像 3
    • ケース前端を持ち上げて、マザーボードとヒートシンクアセンブリから外します。

    • フロントエッジを上げたままで、マザーボードとヒートシンクアセンブリから離してケースを押し戻し、充電ポートをケースのスロットから出します。

    • ケースを外します。

  41. PlayStation 5 電源ユニットの交換, 電源ユニットを取り出します: 手順 41、 2の画像 1 PlayStation 5 電源ユニットの交換, 電源ユニットを取り出します: 手順 41、 2の画像 2
    • 指でリアシールドプレートを作業面に押し込みます。

    • 電源ユニットをしっかりと摘んで、マザーボードからまっすぐ持ち上げて接続を外します。

終わりに

このデバイスを再組み立てするには、インストラクションを逆の順番に従って作業を進めてください。

e-wasteを処理する場合は、認可済みリサイクルセンターR2を通じて廃棄してください。

修理が上手く進みませんか?ベーシックなトラブルシューティングを試してみるか、PlayStation 5のアンサーコミュニティに尋ねてみましょう。

27 の人々がこのガイドを完成させました。

以下の翻訳者の皆さんにお礼を申し上げます:

en jp

100%

Midori Doiさんは世界中で修理する私たちを助けてくれています! あなたも貢献してみませんか?
翻訳を始める ›

作成者

2人の作成者と共同で作成されました。

Robert Boyd

メンバー登録日: 02/01/21

26,569 ポイント

94のガイドは作成済み

15 件のコメント

Is there any place to buy a replacement power supply?

anon - 返信

Where can I get the power supply unit which is Model ADP-400DR ? Please help me

Addis - 返信

egamephone have ps5 power supply replacement

kasynlife -

So I started with a dead PS5. I had another power supply laying about but from a different revision. I replaced the power supply with said other power supply that works. When I put it back together still no power. Does each revision used a different power supply or would it be the same?

askanison420 - 返信

i’m having the same problem, did you ever get it to work?

abrey -

The SMPS Controller IC "DAP053T" is just a relabeld TEA2016AAT/1J.
If the PSU doesn´t work anymore you can try to replace this chip.

Christoph Forstner - 返信

You really should include the APU pressure clamp in these instructions for people following it for reassembly.

Especially since it's under the plate with 41 screws.

infiniti25 - 返信

Did the power supply replacement and still couldn’t turn on. The only positive that came out of this was the fact it was warm to the touch when plugged in.

SZNdaDON - 返信

did you get it working having same issue

Jeremy Alicea -

Where can I get a rear shield plate becasue mine is broken from where I mount the screw to have the ps5 stand vertical

P Y - 返信

Mijn ps5 gaat niet meer aan heb hem gekocht op 21 mei 2023 heb hem afgesloten en de volgende dag wil ik hem weer aan zetten en hij gaat niet meer aan hoor wel piep maar start niet meer op en gaat ook niet meer aan

TobiGamesNL - 返信

Performed the repair PS still does not turn on. No lights nothing. Three beeps when plugged in and thats it.

Wade Pinkston - 返信

Performed the repair PS still does not turn on. No lights nothing. Three beeps when plugged in and thats it.

Wade Pinkston - 返信

Genuinely why is this guide telling users to unscrew 41 unrelated screws for a power supply? The only screw required to remove at this step is the black 43mm screw on the bottom.
The PS5 opens like a book and the power supply can be swapped quickly. There is no reason to remove the plate for a power supply and no reason to suggest that users waste this much time for replacing one. Please revise this step.

ha1vorsen - 返信

I hope. I am very afraid of encountering such a problem.

Onur Aksoy - 返信

コメントを追加

統計データ:

過去 24時間: 107

過去 7 日: 784

過去 30 日: 3,486

今までの合計 93,022