この翻訳は、ソースガイドの最新の更新を反映していない可能性があります。 翻訳の更新に協力してください。 または ソースガイドを参照してください。
はじめに
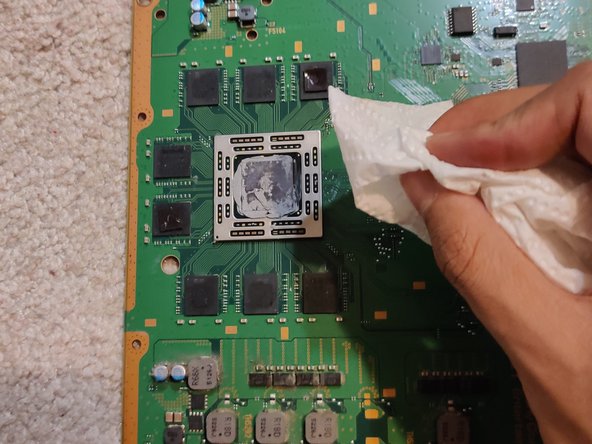
このガイドでは、PS4内部のサーマルペーストを交換する方法を紹介します。サーマルペーストとは、プロセッサに塗布され、熱を冷却液に伝えるための銀色の液体です。あらゆる電子機器のサーマルペーストは乾燥するため、2、3年ごとに交換する必要があります。
PS4では、ヒートシンクのすぐ下にサーマルペーストの付いた基板があり、ヒートシンクには多くの埃が溜まっています。ヒートシンクのクリーニングとサーマルペーストの交換で、PS4はまるで新品のように動作するようになります。私のPS4は約6年前のものですが、この作業をすべて終えた後、オーバーヒートが止まり、マウスのように静かになりました。この作業に必要なスキルは、ネジをねじったり外したりできることくらいです。とても簡単ですが、面倒な作業なので、やるなら暇な日を選びましょう。
必要な工具と部品
ビデオの概要
-
-
トップカバーの隙間に沿って両手でPS4を握ります。
-
トップカバーの光沢がある側を親指で外れるまでスライドさせます。
-
トップカバーの光沢のある側を持ち上げ、PS4から取り外します。
-
-
この手順で使用する道具:Tweezers$4.99
-
ピンセットを使って、PS4裏側の中央に貼られた2箇所のステッカーを剥がして、その下に留められたネジを露出させます。
-
-
-
この手順で使用する道具:Tweezers$4.99
-
指先で光学ドライブ上部にある、リボンケーブルのメタルリリースレバーを押さえます。
-
指先もしくはピンセットを使って、リボンケーブルに付いた黒いタブを引っ張って、ケーブルの接続を外します。
-
-
-
ファンケーブルとマザーボードの間にスパッジャーの先端を差し込みます。
-
スパッジャーをひねりながらコネクタをまっすぐ持ち上げて、マザーボードから接続を外します。
-


このデバイスを再組み立てするには、インストラクションを逆の順番に従って作業を進めてください。
このデバイスを再組み立てするには、インストラクションを逆の順番に従って作業を進めてください。
173 の人々がこのガイドを完成させました。
以下の翻訳者の皆さんにお礼を申し上げます:
83%

Midori Doiさんは世界中で修理する私たちを助けてくれています! あなたも貢献してみませんか?
翻訳を始める ›
チーム

CSU Los Angeles, Team S12-G1, Harris Fall 2020 CSU Los Angeles, Team S12-G1, Harris Fall 2020人のメンバー
CSULA-HARRIS-F20S12G1
1 メンバー
9のガイドは作成済み
22 件のコメント
Se me hizo muy buena la guia, sobre todo para no cometer algun error al trabajar en la reparacion, mi PS4 dejo de zumbar el abanico con el cambio de pasta termica y una limpieza general de polvo y pelusa.
I followed this guide step by step, including reversing the order to reassemble my unit.
My PS4 is still loud but not as loud as before, so everything worked well. Thanks for the writeup!
i might be a little late to reply, but i followed this guide aswell BUT after step 31 i took off the extra metal/aluminum plating and saw thats that where the bulk of the dust will be built up, this plate has the vents that go to the cooling fan on the opposite side of it after unscrewing. i bought an original ps4, it sounded like a jet engine taking off. The vents on my ps4 were just about covered in dust almost no airflow was able to get through, after taking the extra step and taking off the 1 extra panel (the one under the motherboard in step 31) and of course after replacing the thermal paste made my ps4 run and sound like new again,
Beau -
I cannot reply to Beau's comment.
I also went the extra step of taking that metal shroud that sits below the motherboard (step 31).
I completely recommend this step. It is then you can get access to the heat sink fins to remove dust. There are 3 screws that hold this metal shroud in place. Easy to get out.
Then you can also now remove the fan - 2 screws for this.
You can then clean out the accumulated dust from the fan and in the plastic shroud, that the fan sits in.
Holy cow, dust factory. :)
Great guide! Just did it and now the console is dead silent during gameplay of super demanding games <3 I just went a step further after Step 31 and removed the plate there so that I could properly take care of the heat sink underneath that had lots of dust on it.