メインコンテンツにスキップ

OnePlus 6T Rear Camera Replacement

必要な工具と部品

  1. OnePlus 6T Rear Camera Replacement, Back Cover: 手順 1、 1の画像 1
    • Make sure the phone is powered off and placed with the back cover facing towards you on a stable surface.

  2. OnePlus 6T Rear Camera Replacement: 手順 2、 1の画像 1
    • Pop open the SIM card tray by inserting a SIM card removal tool into a small hole on the upper-left side of the phone.

    • Carefully remove the SIM card from its tray.

  3. OnePlus 6T Rear Camera Replacement: 手順 3、 1の画像 1
    • Loosen the binding glue within the phone using a hairdryer or an iOpener.

    • If you choose to use a hairdryer, hold the dryer at least eight inches from the phone and apply heat for two minutes in a circular motion around the edges of the phone.

  4. OnePlus 6T Rear Camera Replacement: 手順 4、 3の画像 1 OnePlus 6T Rear Camera Replacement: 手順 4、 3の画像 2 OnePlus 6T Rear Camera Replacement: 手順 4、 3の画像 3
    この手順で使用する道具:
    Plastic Cards
    $2.99
    購入する
    • Insert a Jimmy under one of the heated corners of the phone to lift it slightly.

    • Insert a plastic card underneath the slightly lifted lip on the back cover and gently glide the card under the lifted phone casing.

    • There will be a small amount of tension, but this is normal as the card is removing the adhesive within the phone.

    • Remove the back cover from the phone.

    • Use high concentration (>90%) isopropyl alcohol and a lint-free cloth to remove all adhesive residue from the back cover and the frame.

  5. OnePlus 6T Rear Camera Replacement, Front Camera: 手順 5、 2の画像 1 OnePlus 6T Rear Camera Replacement, Front Camera: 手順 5、 2の画像 2
    • Remove the single 3mm Phillips #00 screws holding the metal battery cover on the phone.

    • Use tweezers to remove the battery cover and place it to the side.

  6. OnePlus 6T Rear Camera Replacement: 手順 6、 1の画像 1
    • Remove eight 3mm Phillips #00 screws that connect the midframe to the phone.

  7. OnePlus 6T Rear Camera Replacement: 手順 7、 1の画像 1
    • Using a spudger, gently remove the midframe and place it to the side.

  8. OnePlus 6T Rear Camera Replacement: 手順 8、 1の画像 1
    • Using a spudger, lift the light brown tab in the middle of phone to disconnect the front camera.

    • Remove the front camera from the phone.

  9. OnePlus 6T Rear Camera Replacement, Motherboard: 手順 9、 2の画像 1 OnePlus 6T Rear Camera Replacement, Motherboard: 手順 9、 2の画像 2
    • Remove the single 3mm Phillips #00 screw to the right of the top rear camera.

  10. OnePlus 6T Rear Camera Replacement: 手順 10、 1の画像 1
    • Using a spudger, disconnect the charging port flex connector, the main flex connector, and the screen flex connector at the bottom of the camera.

  11. OnePlus 6T Rear Camera Replacement: 手順 11、 1の画像 1
    • Use a spudger to disconnect the signal cables on the right side of the motherboard.

  12. OnePlus 6T Rear Camera Replacement: 手順 12、 2の画像 1 OnePlus 6T Rear Camera Replacement: 手順 12、 2の画像 2
    • Disconnect the slider from the top of the phone with a spudger.

    • The slider is extremely delicate, so it is important you do not attempt to remove it from the sides.

    • Gently pull the motherboard from the left side and remove it from the phone.

  13. OnePlus 6T Rear Camera Replacement, Rear Camera: 手順 13、 2の画像 1 OnePlus 6T Rear Camera Replacement, Rear Camera: 手順 13、 2の画像 2
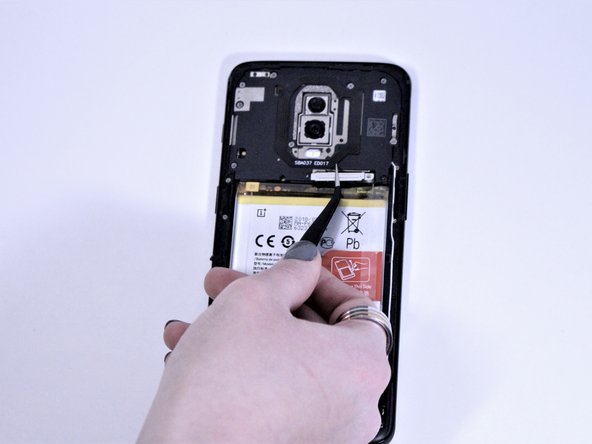
    • Using a spudger, disconnect the two metal rear camera tabs on the left side of the camera.

    • Remove the camera from its slot on the motherboard.

終わりに

To reassemble your device, follow these instructions in reverse order.

3 の人々がこのガイドを完成させました。

作成者

5人の作成者と共同で作成されました。

Rylee Cronin

メンバー登録日: 10/15/19

220 ポイント

1ガイドが承認済み

チーム

Grand Valley State University, Team S4-G6, DeVasto Fall 2019 Grand Valley State University, Team S4-G6, DeVasto Fall 2019人のメンバー

GVSU-DEVASTO-F19S4G6

4 メンバー

19のガイドは作成済み

コメント 1 件

In step 6 the screw under the humidity sensor is not shown. this needs to be removed as well

W W - 返信

コメントを追加

統計データ:

過去 24時間: 1

過去 7 日: 2

過去 30 日: 9

今までの合計 1,122