メインコンテンツにスキップ

Nook BNRV300 Display Replacement

必要な工具と部品

  1. Nook BNRV300 Display Replacement, Power Button: 手順 1、 3の画像 1 Nook BNRV300 Display Replacement, Power Button: 手順 1、 3の画像 2 Nook BNRV300 Display Replacement, Power Button: 手順 1、 3の画像 3
    • Power off your Nook before working on your device. Hold the power button for about 5 seconds and select the “Power Off” option.

    • Turn the Nook over to find the power button along the back upper edge.

    • Wedge the spudger between the top of the power button and the upper edge of the device.

    • Push the tool down to pry the button up and off.

  2. Nook BNRV300 Display Replacement: 手順 2、 1の画像 1
    • Using your fingers, take off the power button.

  3. Nook BNRV300 Display Replacement, Back Cover: 手順 3、 3の画像 1 Nook BNRV300 Display Replacement, Back Cover: 手順 3、 3の画像 2 Nook BNRV300 Display Replacement, Back Cover: 手順 3、 3の画像 3
    • Peel off the white sticker that is covering the screw head.

    • Remove the one 2mm-long screw using a size T5 Torx screwdriver.

  4. Nook BNRV300 Display Replacement: 手順 4、 1の画像 1
    • Slide the back cover down towards the USB port to release it. The pictures show the case being prised open but this should not be necessary.

  5. Nook BNRV300 Display Replacement: 手順 5、 3の画像 1 Nook BNRV300 Display Replacement: 手順 5、 3の画像 2 Nook BNRV300 Display Replacement: 手順 5、 3の画像 3
    • Use a spudger or your fingers to gently pry the connector out of the white socket.

    • The back cover is now fully detached.

  6. Nook BNRV300 Display Replacement: 手順 6、 2の画像 1 Nook BNRV300 Display Replacement: 手順 6、 2の画像 2
    この手順で使用する道具:
    Tweezers
    $4.99
    購入する
    • Use tweezers to remove the brass-colored threaded fastener from the Nook plastic casing.

  7. Nook BNRV300 Display Replacement, Motherboard: 手順 7、 2の画像 1 Nook BNRV300 Display Replacement, Motherboard: 手順 7、 2の画像 2
    • Use an anti-static mat to prevent electric shock from damaging the motherboard and its components. Be careful when using metal tools on your device.

    • Using a T5 Torx screwdriver, remove the eleven 3mm screws.

  8. Nook BNRV300 Display Replacement: 手順 8、 3の画像 1 Nook BNRV300 Display Replacement: 手順 8、 3の画像 2 Nook BNRV300 Display Replacement: 手順 8、 3の画像 3
    • Place the spudger through the loop of the display cable. Lift the tool up, which will unhook the display cable.

    • Do not put force on the motherboard with the spudger. This could damage components on the motherboard.

    • Using your fingers, lift up the display cable.

  9. Nook BNRV300 Display Replacement: 手順 9、 1の画像 1
    • Using your fingers, gently lift the motherboard from the display.

  10. Nook BNRV300 Display Replacement, Display: 手順 10、 3の画像 1 Nook BNRV300 Display Replacement, Display: 手順 10、 3の画像 2 Nook BNRV300 Display Replacement, Display: 手順 10、 3の画像 3
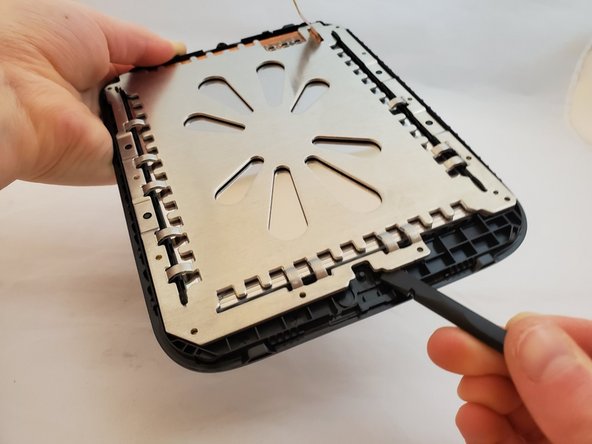
    • Insert a nylon spudger between the display's metal backing and the front cover plastic.

    • Gently pry the display away from the front cover by moving the spudger up and down.

    • During reassembly, align the small black plastic peg at the bottom right of the plastic frame with the inner hole at the bottom right of the metal display backing.

  11. Nook BNRV300 Display Replacement: 手順 11、 2の画像 1 Nook BNRV300 Display Replacement: 手順 11、 2の画像 2
    • Press down on the fastener tab with your finger.

  12. Nook BNRV300 Display Replacement: 手順 12、 2の画像 1 Nook BNRV300 Display Replacement: 手順 12、 2の画像 2
    • The display cracks very easily. If this happens, there will be glass shards that could potentially cause injury. You may want to wear protection for hands and eyes while completing this step.

    • Insert a nylon spudger between the plastic frame on the display and the metal casing on the display.

    • Gently pry the display away from the plastic frame. Place the display on a hard, flat surface to support it when prying it off the metal backing. The screen may crack anyway.

終わりに

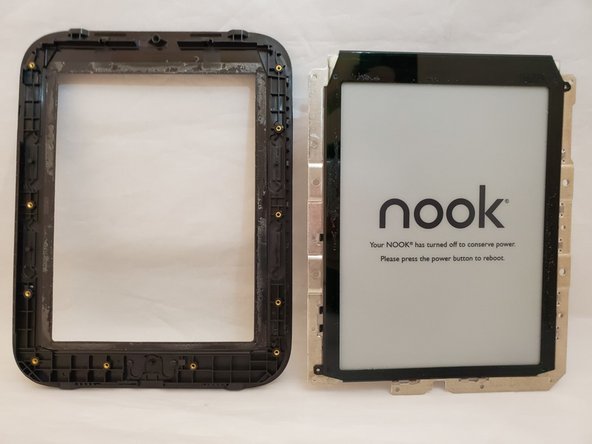
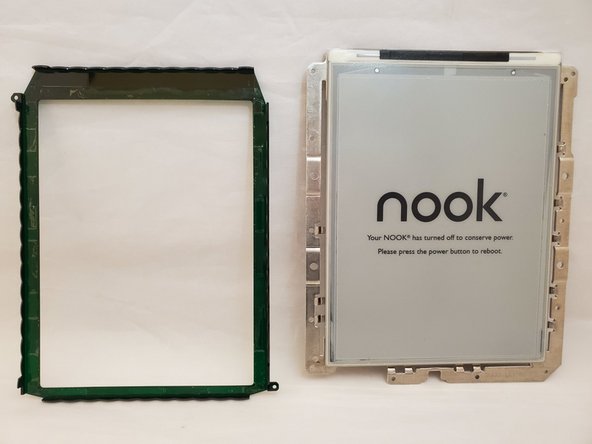
To reassemble your device, follow these instructions in reverse order.

2 の人々がこのガイドを完成させました。

作成者

2人の作成者と共同で作成されました。

Alisyn Waite

メンバー登録日: 10/03/19

384 ポイント

3のガイドは作成済み

チーム

5 件のコメント

Was all good till I got here:

Gently pry the display away from the plastic frame. Place the display on a hard, flat surface to support it when prying it off the metal backing. The screen may crack anyway.

The display was glued to the metal backing. Needs something to heat up the adhesive in order to remove it.

Joseph W Charpentier - 返信

Hi. What display model should I look for? Is this one ED060SC7 good?

pogo79 - 返信

I'm looking in the Aliexp... store and I don't know what display to choose .

pogo79 - 返信

Check the comments on each step. There are some adjustments to the process to properly and safely take this apart.

dl200010 - 返信

Appreciate the feedback!

Emily Tracy - 返信

コメントを追加

統計データ:

過去 24時間: 3

過去 7 日: 7

過去 30 日: 26

今までの合計 2,417