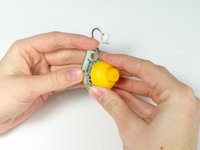
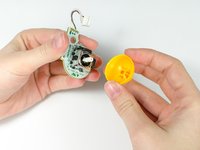
メインコンテンツにスキップ

Nintendo GameCube Controller C Stick Replacement

必要な工具と部品

  1. Nintendo GameCube Controller C Stick Replacement, Back Panel: 手順 1、 1の画像 1
    • Place the controller (buttons down) on a solid surface.

    • Remove the six 9.2mm Tri-wing Y0 screws that hold the back panel in place.

  2. Nintendo GameCube Controller C Stick Replacement: 手順 2、 1の画像 1
    • Gently lift the back panel up, separating it from the front panel.

    • Some of the buttons may fall out if they are knocked around.

  3. Nintendo GameCube Controller C Stick Replacement, Z Button: 手順 3、 2の画像 1 Nintendo GameCube Controller C Stick Replacement, Z Button: 手順 3、 2の画像 2
    • Grab the Z-button by the peg with tweezers and lift it out of the controller.

    • During re-assembly, make sure the plastic rim and spring fit into the slot provided, or else the case will not shut.

  4. Nintendo GameCube Controller C Stick Replacement, Circuit Board: 手順 4、 1の画像 1
    • Carefully unhook the cable that is looped around the peg.

  5. Nintendo GameCube Controller C Stick Replacement: 手順 5、 1の画像 1
    • Lift the circuit board out of the controller.

    • Do not grab the rumble motor to lift the circuit board as shown in the picture. It will in many cases just remove the rumble motor. Instead, grab the edges of the board.

  6. Nintendo GameCube Controller C Stick Replacement, C Stick: 手順 6、 3の画像 1 Nintendo GameCube Controller C Stick Replacement, C Stick: 手順 6、 3の画像 2 Nintendo GameCube Controller C Stick Replacement, C Stick: 手順 6、 3の画像 3
    • Use your fingers to grab the two sides of the connector and gently wiggle out.

    • Be sure not to pull on the cables. This may pull the cables out and damage your device even more.

  7. Nintendo GameCube Controller C Stick Replacement: 手順 7、 2の画像 1 Nintendo GameCube Controller C Stick Replacement: 手順 7、 2の画像 2
    • Grab the yellow cover by the base and pull it off.

    • During reassembly, make sure the slots inside the joy stick line up so they can fit back together.

終わりに

To reassemble your device, follow these instructions in reverse order.

13 の人々がこのガイドを完成させました。

作成者

4人の作成者と共同で作成されました。

Sean Michel

メンバー登録日: 01/14/13

2,496 ポイント

8のガイドは作成済み

チーム

Cal Poly, Team 19-44, Regan Winter 2013 Cal Poly, Team 19-44, Regan Winter 2013人のメンバー

CPSU-REGAN-W13S19G44

4 メンバー

26のガイドは作成済み

2 件のコメント

This doesnt help by c stick is broken and i need help. Up and down work just fine on it, but it doesnt rgister left and right. Anybody have any help?

Shane Roy - 返信

I did a mod on it and it worked fine until then but its really weird that left and right arent working but up and down are i couldve accidentally got hot glue in there... Any way to buy an entirely new c stick unit?

Shane Roy -

コメントを追加

統計データ:

過去 24時間: 2

過去 7 日: 22

過去 30 日: 73

今までの合計 21,160