はじめに
このガイドを参照して、下部LCDから下部タッチスクリーンを取り外しましょう。
必要な工具と部品
-
-
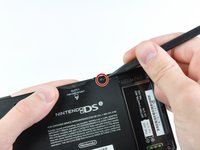
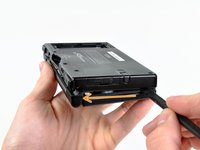
DSiの右上角付近の、下部ケースと下部パネルの間にスパッジャーを差し込みます。
-
アウターケース端に沿ってスパッジャーを注意深くスライドして、本体とケースの間に開口部を作ります。
-
続けて、DSi本体の周りをスライドして、下部ケースの大部分を離します。
-
-
-
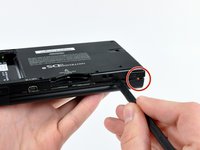
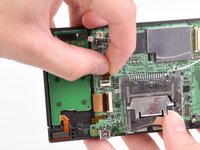
底部端から下部ケースを注意深く持ち上げます。
-
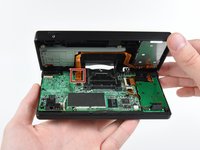
ボリュームとSDボードのケーブルをマザーボード上のソケットからスパッジャーで引き抜きます。
-
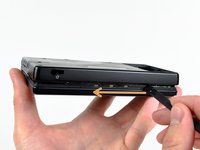
ケーブルが完全に取り外せたら、外箱全体を取り外します。
-
-
-
この手順で使用する道具:Tweezers$4.99
-
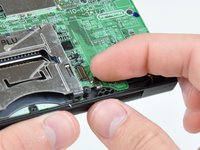
指の爪やプラスチック製開口ツールの先端を使って、次の3つのZIFソケット上の固定フラップを跳ね上げます:
-
下部タッチスクリーンケーブル
-
下部LCDケーブル
-
電源ボードケーブル
-
3つ全てのソケット上のロッキングタブを跳ね上げた後、指やピンセットを使って、ソケットからケーブルを慎重にまっすぐ引き抜きます。
-
-
-
指の爪やプラスチック製開口ツールの先端を使って、タッチスクリーンリボンケーブルの固定フラップを注意深く跳ね上げます。
-
スパッジャーの先端を使って、ソケットからタッチスクリーンリボンケーブルをまっすぐ引き抜きます。
-
-
-
指の爪やプラスチック製開口ツールの先端を使って、デュアルカメラリボンケーブルの固定フラップを注意深く跳ね上げます。
-
スパッジャーの先端を使って、ソケットからデュアルカメラリボンケーブルをまっすぐ引き抜きます。
-
-
-
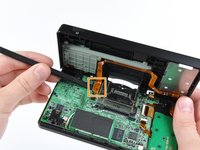
マザーボードをDSiのフレームワークに固定している次の4本のプラスネジを外します。
-
長いネジ 3本
-
短いネジ 1本
-
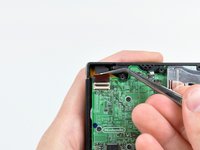
ヘッドホンジャック付近のマザーボードの切り欠きからマイクとWi-Fiアンテナケーブルを引き抜きます。
-
-
-
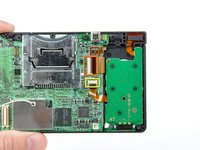
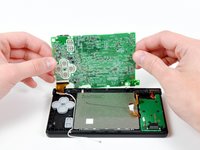
マザーボードをわずかに上部に持ち上げ、ABXYボタンの上にある上部LCDリボンケーブルを露出させます。
-
指の爪やプラスチック製開口ツールの先端を使って、上部LCDリボンケーブルの固定フラップを注意深く跳ね上げます。
-
DSiからマザーボードを取り外します。
-
-
-
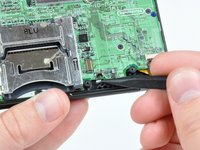
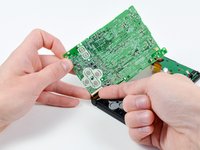
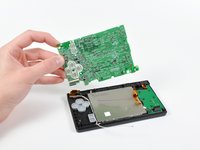
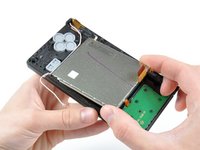
スパッジャーの先端を使って、DSiのフレームワークから下部LCDのメタル製バッキングを持ち上げます。
-
DSiから下部LCDアセンブリを持ち上げます。
-
-
-
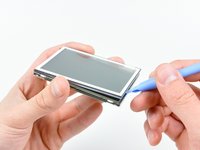
プラスチック製開口ツールの先端を下部タッチスクリーンと下部LCDの間に差し込みます。
-
タッチスクリーンの周囲に沿って開口ツールの先端を注意深くスライドし、下部LCDからタッチスクリーンを引き離します。
-
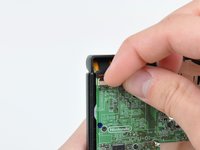
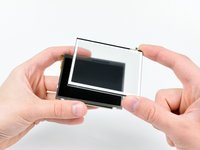
下部LCDからタッチスクリーンを取り外します。
-
下部LCDが残ります。
-


デバイスを再度組み立てるには、この説明書の逆の順番で組み立ててください。
19 の人々がこのガイドを完成させました。

4件のガイドコメント
On Step 9 please add something like this to the description. I didn’t fully understand what was said and i ended up breaking my power connector off the motherboard. I luckily went to Ebay and someone had a replacement thankfully that i was able to solder back on the motherboard. ——————To remove the power wire connector off the motherboard use a small flathead screwdriver to push the white part of the connector straight up. If you try to pull it back like a standard connector it will break! ————-
Hello! I have a DSi with a missing lower display. It won’t turn on (even pluged in). Can anyone tell me if it’s supposed to turn on with the lower display missing? If it is not supposed to turn on without the lower display, then I can buy a replacement display so it probably work, but if it supposed to turn on even without the lower display, then there is some extra problem there.