メインコンテンツにスキップ

Nintendo 2DS Volume Button Replacement

必要な工具と部品

  1. Nintendo 2DS Volume Button Replacement, Volume Button: 手順 1、 3の画像 1 Nintendo 2DS Volume Button Replacement, Volume Button: 手順 1、 3の画像 2 Nintendo 2DS Volume Button Replacement, Volume Button: 手順 1、 3の画像 3
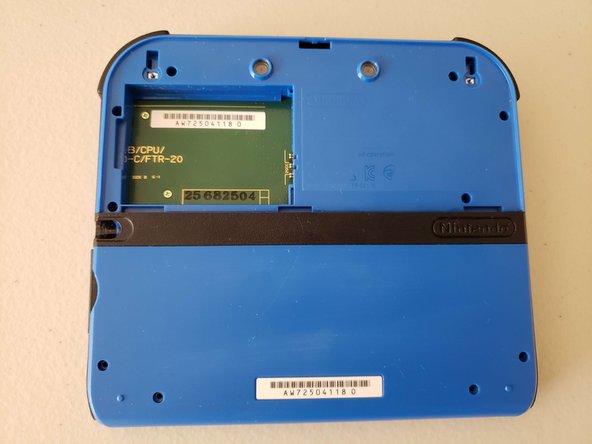
    • Turn the 2DS over so that the backside is facing upwards.

    • Identify the two Phillips #00 screws on the upper rear panel.

  2. Nintendo 2DS Volume Button Replacement: 手順 2、 3の画像 1 Nintendo 2DS Volume Button Replacement: 手順 2、 3の画像 2 Nintendo 2DS Volume Button Replacement: 手順 2、 3の画像 3
    • Loosen the two screws on the upper back panel using a Phillips #00 screwdriver.

    • The screws are captive and will not detach from the back panel or separate from the panel upon removal.

    • Use a spudger to pry the upper back panel off, starting at the indent at the center top of the panel.

    • Use a spudger and work your way around the perimeter to release the clips and then lift the panel off.

  3. Nintendo 2DS Volume Button Replacement: 手順 3、 3の画像 1 Nintendo 2DS Volume Button Replacement: 手順 3、 3の画像 2 Nintendo 2DS Volume Button Replacement: 手順 3、 3の画像 3
    • Use your finger or a spudger to lift and pull the battery outwards from the side closest to the outer edge.

  4. Nintendo 2DS Volume Button Replacement: 手順 4、 3の画像 1 Nintendo 2DS Volume Button Replacement: 手順 4、 3の画像 2 Nintendo 2DS Volume Button Replacement: 手順 4、 3の画像 3
    • Pull the stylus out from the middle of the left edge of the device.

    • Use a Phillips #00 screwdriver to remove ten 2.0 mm screws from the back panel.

    • Unlike the top rear panel, these screws come out, so be sure to keep them in a safe place.

  5. Nintendo 2DS Volume Button Replacement: 手順 5、 3の画像 1 Nintendo 2DS Volume Button Replacement: 手順 5、 3の画像 2 Nintendo 2DS Volume Button Replacement: 手順 5、 3の画像 3
    • Use a spudger to pry the back case off by working around the perimeter of the device, starting from the bottom of the 2DS.

    • Don't yank or pull the back case off because the camera ribbon is attached to the motherboard and back case and may rip or damage the cable or camera itself.

    • Use the tip of a spudger, an opening tool, or your fingernail to flip up the small, hinged locking flap on the camera cable.

    • Use your spudger to gently slide the cable out of the connector.

    • Remove the back case.

  6. Nintendo 2DS Volume Button Replacement: 手順 6、 3の画像 1 Nintendo 2DS Volume Button Replacement: 手順 6、 3の画像 2 Nintendo 2DS Volume Button Replacement: 手順 6、 3の画像 3
    • Gently pry the side that holds the volume button off of the 2DS.

  7. Nintendo 2DS Volume Button Replacement: 手順 7、 3の画像 1 Nintendo 2DS Volume Button Replacement: 手順 7、 3の画像 2 Nintendo 2DS Volume Button Replacement: 手順 7、 3の画像 3
    • Remove the volume button from the sidebar housing.

終わりに

To reassemble your device, follow these instructions in reverse order.

作成者

2人の作成者と共同で作成されました。

S. Leng

メンバー登録日: 10/24/22

145 ポイント

1ガイドが承認済み

0 件のコメント

コメントを追加

統計データ:

過去 24時間: 1

過去 7 日: 26

過去 30 日: 104

今までの合計 1,599