メインコンテンツにスキップ

Nikon COOLPIX P7700 LCD Screen Display Replacement

必要な工具と部品

  1. Nikon COOLPIX P7700 LCD Screen Display Replacement, LCD Screen Display: 手順 1、 2の画像 1 Nikon COOLPIX P7700 LCD Screen Display Replacement, LCD Screen Display: 手順 1、 2の画像 2
    • Push down and slide the lock of the battery compartment to the unlock position.

    • The battery door should pop open.

    • Remove the battery.

  2. Nikon COOLPIX P7700 LCD Screen Display Replacement: 手順 2、 1の画像 1
    • Open the camera LCD screen so it's away from the body of the camera.

  3. Nikon COOLPIX P7700 LCD Screen Display Replacement: 手順 3、 1の画像 1
    • Use a Phillips #00 screwdriver to remove the 4.3 screw on both the top and bottom of the screen's casing.

  4. Nikon COOLPIX P7700 LCD Screen Display Replacement: 手順 4、 2の画像 1 Nikon COOLPIX P7700 LCD Screen Display Replacement: 手順 4、 2の画像 2
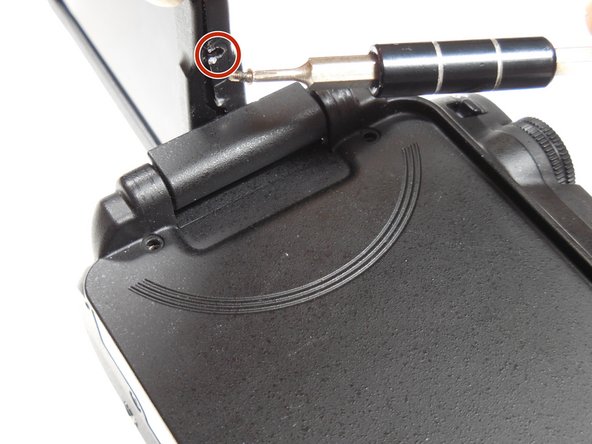
    • Place the camera lens-side down and twist the screen so that it is perpendicular to the camera.

    • Remove the 4.3 mm screw on the side of the casing using the Phillips #00 screwdriver.

    • Twist the screen in the other direction and remove the other 4.3 mm screw.

    • These screws are very brittle! Be careful not to strip the screws. If you find that one has become stripped, follow this guide.

  5. Nikon COOLPIX P7700 LCD Screen Display Replacement: 手順 5、 1の画像 1
    • Remove the case from the screen.

  6. Nikon COOLPIX P7700 LCD Screen Display Replacement: 手順 6、 1の画像 1
    • Replace the LCD display.

終わりに

To reassemble your device, follow these instructions in reverse order.

2 の人々がこのガイドを完成させました。

作成者

7人の作成者と共同で作成されました。

Matthew Seidel

メンバー登録日: 03/11/15

145 ポイント

1ガイドが承認済み

チーム

Colorado Springs, Team 2-7, Panko Spring 2015 Colorado Springs, Team 2-7, Panko Spring 2015人のメンバー

UCCS-PANKO-S15S2G7

3 メンバー

10のガイドは作成済み

コメント 1 件

Do NOT follow this guide. There are numerous details left out of step 6 and there’s no troubleshooting guide. Most importantly, there’s no warning that this kind of repair really isn’t meant to be done by laypeople and that it’s to be done at the user’s own risk. These instructions don’t equip someone for this delicate task that, if done wrongly, can waste a lot of time and damage the camera, as happened in my case.

Alan Green - 返信

コメントを追加

統計データ:

過去 24時間: 0

過去 7 日: 5

過去 30 日: 15

今までの合計 1,512