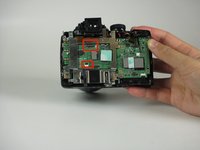
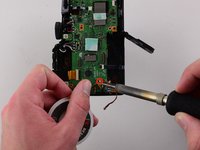
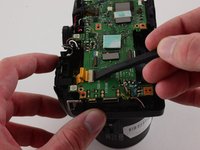
メインコンテンツにスキップ

Nikon COOLPIX P500 Motherboard Replacement

必要な工具と部品

  1. Nikon COOLPIX P500 Motherboard Replacement, Battery: 手順 1、 2の画像 1 Nikon COOLPIX P500 Motherboard Replacement, Battery: 手順 1、 2の画像 2
    • Electric shock is a huge risk if the battery is not removed while taking the camera apart.

    • Press down and forward on the battery cover latch.

    • Push the orange latch, in the direction of the arrow on it, to release the battery.

  2. Nikon COOLPIX P500 Motherboard Replacement, Motherboard: 手順 2、 3の画像 1 Nikon COOLPIX P500 Motherboard Replacement, Motherboard: 手順 2、 3の画像 2 Nikon COOLPIX P500 Motherboard Replacement, Motherboard: 手順 2、 3の画像 3
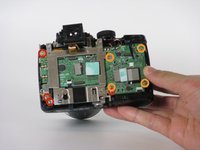
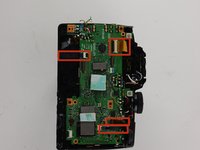
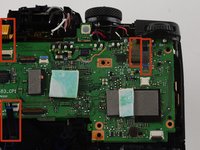
    • Remove all the marked screws using a PH00 screwdriver.

    • Remove the two 3mm screws on the grip.

    • Remove the two 4mm screws on the side opposite the grip.

    • Remove the three 4mm screws on the base of the camera.

    • Remove the four 3mm screws on the base of the camera.

  3. Nikon COOLPIX P500 Motherboard Replacement, Removing hidden screws: 手順 3、 2の画像 1 Nikon COOLPIX P500 Motherboard Replacement, Removing hidden screws: 手順 3、 2の画像 2
    • Open the flash module of the camera.

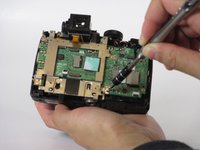
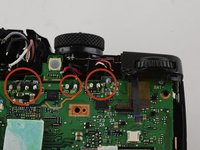
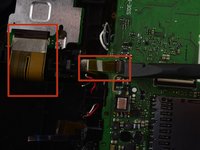
    • Remove the 2mm screw from the microphone metal grid using a PH00 screwdriver.

    • Remove the 4mm screw that was under the metal microphone grid using a PH00 screwdriver.

  4. Nikon COOLPIX P500 Motherboard Replacement: 手順 4、 2の画像 1 Nikon COOLPIX P500 Motherboard Replacement: 手順 4、 2の画像 2
    • Separate the two parts of the body of the camera slightly.

    • Release the two cables by lifting up their respective clips with a spudger.

    • Make sure not to pull too hard because there are connector ribbons.

    • Detach the connector ribbons before fully separating the camera into two pieces.

    • These pictures were taken after the connector ribbons were released and the camera was separated into two parts. You will need to release the connector ribbons while the camera is still in one piece before you can separate it like the pictures.

  5. Nikon COOLPIX P500 Motherboard Replacement: 手順 5、 1の画像 1
    • Use a spudger to flip up the cable lock in order to release the ribbon.

  6. Nikon COOLPIX P500 Motherboard Replacement: 手順 6、 2の画像 1 Nikon COOLPIX P500 Motherboard Replacement: 手順 6、 2の画像 2
    • Use a PH00 screwdriver to unscrew the four labeled 3mm metal screws on the metal backing.

    • Remove the four labeled 4mm screws connected to the motherboard.

    • Remove the metal support.

  7. Nikon COOLPIX P500 Motherboard Replacement: 手順 7、 2の画像 1 Nikon COOLPIX P500 Motherboard Replacement: 手順 7、 2の画像 2
    • Desolder the labeled soldering points.

    • Soldering irons are very hot. They can damage your device and inflict physical harm if proper care is not taken.

  8. Nikon COOLPIX P500 Motherboard Replacement: 手順 8、 2の画像 1 Nikon COOLPIX P500 Motherboard Replacement: 手順 8、 2の画像 2
    • Desolder the labeled soldering points.

  9. Nikon COOLPIX P500 Motherboard Replacement: 手順 9、 3の画像 1 Nikon COOLPIX P500 Motherboard Replacement: 手順 9、 3の画像 2 Nikon COOLPIX P500 Motherboard Replacement: 手順 9、 3の画像 3
    • Use a spudger to unlock the labeled connector ribbons.

    • Disconnect the labeled connector ribbons.

  10. Nikon COOLPIX P500 Motherboard Replacement: 手順 10、 2の画像 1 Nikon COOLPIX P500 Motherboard Replacement: 手順 10、 2の画像 2
    • Use a spudger to unlock the two connector ribbons.

    • Disconnect the two connector ribbons.

  11. Nikon COOLPIX P500 Motherboard Replacement: 手順 11、 1の画像 1
    • Remove the mother board from the camera.

終わりに

To reassemble your device, follow these instructions in reverse order.

3 の人々がこのガイドを完成させました。

作成者

7人の作成者と共同で作成されました。

Carmen Dang

メンバー登録日: 01/28/15

385 ポイント

3のガイドは作成済み

チーム

Cal Poly, Team 19-10, Maness Winter 2015 Cal Poly, Team 19-10, Maness Winter 2015人のメンバー

CPSU-MANESS-W15S19G10

4 メンバー

14のガイドは作成済み

0 件のコメント

コメントを追加

統計データ:

過去 24時間: 3

過去 7 日: 8

過去 30 日: 26

今までの合計 4,892