メインコンテンツにスキップ

このバージョンは誤った内容を含んでいる可能性があります。最新の承認済みスナップショットに切り替えてください。

必要な工具と部品

  1. この手順は未翻訳です。 翻訳を手伝う。

    , リアパネル: 手順 1、 1の画像 1
    • In the following steps you will release the clips (highlighted in red) along the perimeter of the Nexus 7's rear panel.

    • Do not use excessive force while prying the clips. They can be easily broken.

  2. この手順は未翻訳です。 翻訳を手伝う。

    : 手順 2、 2の画像 1 : 手順 2、 2の画像 2
    • Gently insert a plastic opening tool near the top of the Nexus 7 between the rear panel and the front panel assembly.

    • Carefully run the plastic opening tool along the top edge to pry the rear panel away from the front panel assembly of the Nexus 7.

  3. この手順は未翻訳です。 翻訳を手伝う。

    : 手順 3、 3の画像 1 : 手順 3、 3の画像 2 : 手順 3、 3の画像 3
    • Insert the plastic opening tool between the rear panel and the front panel assembly near the power button and pry up at several points along the right edge of the Nexus 7.

  4. この手順は未翻訳です。 翻訳を手伝う。

    : 手順 4、 3の画像 1 : 手順 4、 3の画像 2 : 手順 4、 3の画像 3
    • Pry up the rear panel along the left edge using the method described in previous steps.

  5. : 手順 5、 2の画像 1 : 手順 5、 2の画像 2
    • フロントパネルアセンブリからリアパネルを慎重に持ち上げて外します。

  6. この手順は未翻訳です。 翻訳を手伝う。

    , バッテリーケーブル: 手順 6、 2の画像 1 , バッテリーケーブル: 手順 6、 2の画像 2
    • Using the tip of a spudger, push first on one side then the other to "walk" the battery cable straight out of its socket on the motherboard.

  7. この手順は未翻訳です。 翻訳を手伝う。

    , スピーカーケーブル: 手順 7、 1の画像 1
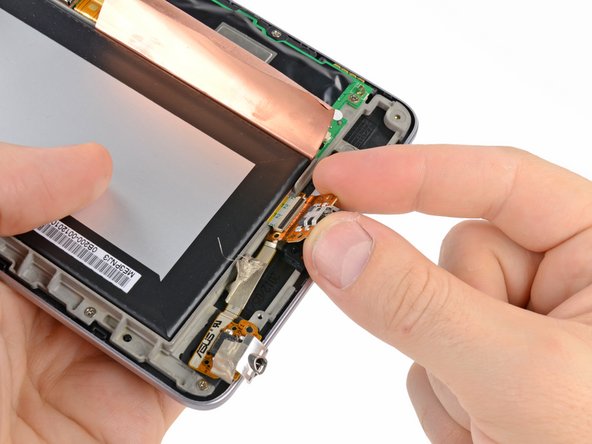
    • Peel back the copper ESD shielding covering the bottom of the motherboard.

    • Do not try to remove the copper shielding, as it is still attached underneath the battery.

    • If you're just replacing the micro usb charge port, there is no need to peel back the copper heatsink like in the photo, the speaker assembly can simply be moved out of the way once unscrewed. If the speakers are to be replaced simply peel back the bottom corner to expose the speaker connection. Leave the rest of the heatsink shield alone.

  8. : 手順 8、 1の画像 1
    • スパッジャーの先端を使って、マザーボード上のソケットからスピーカーケーブルをまっすぐ押し出します。

  9. , スピーカーアセンブリ: 手順 9、 1の画像 1
    • スピーカーアセンブリをディスプレイアセンブリに固定している次のネジを外します。

    • 4.25mmプラスネジ(黒) 2本

    • 3.2mmプラスネジ(シルバー) 1本

  10. : 手順 10、 1の画像 1
    • Nexus 7からスピーカーアセンブリを持ち上げて外します。

  11. この手順は未翻訳です。 翻訳を手伝う。

    : 手順 11、 2の画像 1 : 手順 11、 2の画像 2
    • Use the tip of a spudger to peel back the cloth tape covering the headphone jack and the I/O assembly cable.

    • There is no need to completely remove the tape. Just peel it back enough so that the tape is only adhering to the ribbon cable and not the metal frame.

  12. この手順は未翻訳です。 翻訳を手伝う。

    : 手順 12、 1の画像 1
    • Use the tip of a spudger to flip up the retaining flap on the I/O assembly data ribbon cable ZIF socket.

    • Be sure you are prying up on the hinged retaining flap, not the socket itself.The hinged retaining flap is the black piece which flips up easily with the spudger.

  13. この手順は未翻訳です。 翻訳を手伝う。

    : 手順 13、 1の画像 1
    • Remove the following screws securing the I/O assembly cable to the Nexus 7:

    • Three 3.2 mm silver Phillips screws

    • Two 2.3 mm black Phillips screws

  14. この手順は未翻訳です。 翻訳を手伝う。

    : 手順 14、 1の画像 1
    • Without stressing the cable, and minding any tape that may still be holding the cable in place, gently lift the headphone jack up off its placement pins.

  15. この手順は未翻訳です。 翻訳を手伝う。

    : 手順 15、 3の画像 1 : 手順 15、 3の画像 2 : 手順 15、 3の画像 3
    • In a similar fashion, lift the micro-USB port up off its retaining pins.

    • Lift and remove the I/O assembly cable out of the Nexus 7.

ゴール

146 の人々がこのガイドを完成させました。

作成者

9人の作成者と共同で作成されました。

Walter Galan

694,692 ポイント

1,203のガイドは作成済み

32 件のコメント

This fix isn't too much of a pain if you can find the parts! The tape on the lower-left hand side was, oddly, a bit of a pain for me. Make sure you try to remove it from the left, and not from the right!

Daniel Horner - 返信

Hi,

Where to find this cable ? It seems to be out of stock everywhere :/

kytrix me - 返信

bloody brilliant guide. Thank you!! Thank you!! new usb port/music jack arrived today and I managed to replace old with new.

Muzza - 返信

Got the cable and some recommended tools on Ebay for $30. Just did this on my old N7 and it works perfect now. Head up tho, the recommended tools didn't come with a small enough head for the two 2.3 mm black Phillips screws. Luckily i did have a super small one. Don't strip those or you SOL. Also the cable doesn't come with the headphone jack cover. it is held on with just tape so take that from the original cable.

Cable: http://www.ebay.com/itm/IO-PORT-CHARGER-...

Do a ebay search for "Nexus 7 I/O". Should pop up. Look for cheaper ones than the $60 ones.

Mike Ricketts - 返信

Thank you so much for the clear guide. My Nexus 7 2012 is charging again! I ordered the part here: http://www.asusparts.eu/Asus-08301-00522...

Hans Iseger - 返信

コメントを追加

統計データ:

過去 24時間: 0

過去 7 日: 5

過去 30 日: 24

今までの合計 110,265