メインコンテンツにスキップ

Motorola Moto E4 Plus Daughterboard Replacement

必要な工具と部品

  1. Motorola Moto E4 Plus Daughterboard Replacement, Remove the back cover: 手順 1、 3の画像 1 Motorola Moto E4 Plus Daughterboard Replacement, Remove the back cover: 手順 1、 3の画像 2 Motorola Moto E4 Plus Daughterboard Replacement, Remove the back cover: 手順 1、 3の画像 3
    • Power off your phone before beginning disassembly.

    • Insert the edge of the spudger into the notch on the bottom right corner of the phone.

    • Twist the spudger to start releasing the back cover from the phone.

    • Slide the spudger along the bottom edge to separate the back cover from the phone.

  2. Motorola Moto E4 Plus Daughterboard Replacement: 手順 2、 2の画像 1 Motorola Moto E4 Plus Daughterboard Replacement: 手順 2、 2の画像 2
    • Lift the phone unit out of the back cover.

  3. Motorola Moto E4 Plus Daughterboard Replacement, Remove the midframe screws: 手順 3、 1の画像 1
    • Remove the nineteen 3.2 mm long T3 screws securing the plastic midframe.

  4. Motorola Moto E4 Plus Daughterboard Replacement, Release the midframe clips: 手順 4、 2の画像 1 Motorola Moto E4 Plus Daughterboard Replacement, Release the midframe clips: 手順 4、 2の画像 2
    • The plastic midframe is still held in place with clips.

    • Insert the flat end of a spudger into the midframe seam at the bottom left corner of the phone (near the microphone hole).

    • Twist the spudger to release the plastic clip.

    • Repeat the process for the clip near the top right corner of the phone.

  5. Motorola Moto E4 Plus Daughterboard Replacement, Remove the midframe: 手順 5、 2の画像 1 Motorola Moto E4 Plus Daughterboard Replacement, Remove the midframe: 手順 5、 2の画像 2
    • Lift the bottom edge of the plastic midframe upwards until the clips along the top edge release.

    • Remove the plastic midframe.

    • To reattach the plastic midframe, line up the midframe to the phone and squeeze along the edges to engage the clips.

  6. Motorola Moto E4 Plus Daughterboard Replacement, Disconnect the battery: 手順 6、 2の画像 1 Motorola Moto E4 Plus Daughterboard Replacement, Disconnect the battery: 手順 6、 2の画像 2
    • Use the point of a spudger to pry up and disconnect the battery connector from its motherboard socket.

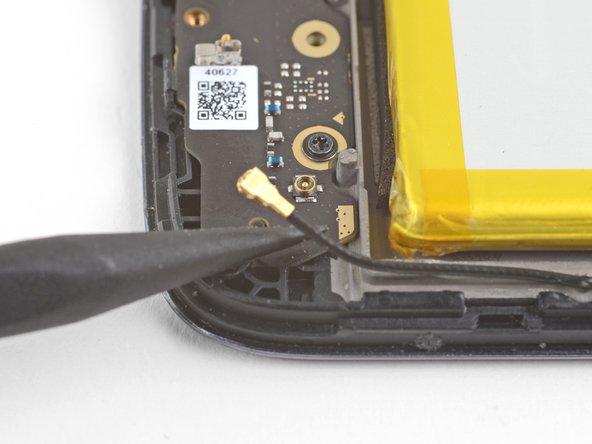
  7. Motorola Moto E4 Plus Daughterboard Replacement, Disconnect the antenna: 手順 7、 2の画像 1 Motorola Moto E4 Plus Daughterboard Replacement, Disconnect the antenna: 手順 7、 2の画像 2
    • Use the point of a spudger to pry up and disconnect the antenna cable from its daughterboard socket.

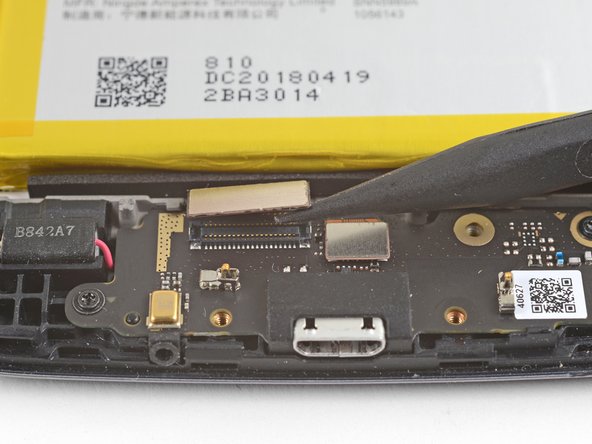
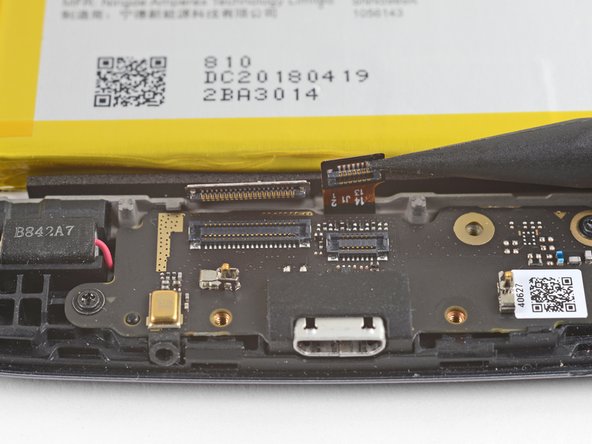
  8. Motorola Moto E4 Plus Daughterboard Replacement, Disconnect the daughterboard connectors: 手順 8、 3の画像 1 Motorola Moto E4 Plus Daughterboard Replacement, Disconnect the daughterboard connectors: 手順 8、 3の画像 2 Motorola Moto E4 Plus Daughterboard Replacement, Disconnect the daughterboard connectors: 手順 8、 3の画像 3
    • Use the point of a spudger to pry up and disconnect the interconnect cable from its daughterboard socket.

    • Pry up and disconnect the fingerprint sensor cable next to it from the daughterboard.

  9. Motorola Moto E4 Plus Daughterboard Replacement, Remove the daughterboard screws: 手順 9、 1の画像 1
    • Remove the two 3.2 mm long T3 screws securing the daughterboard.

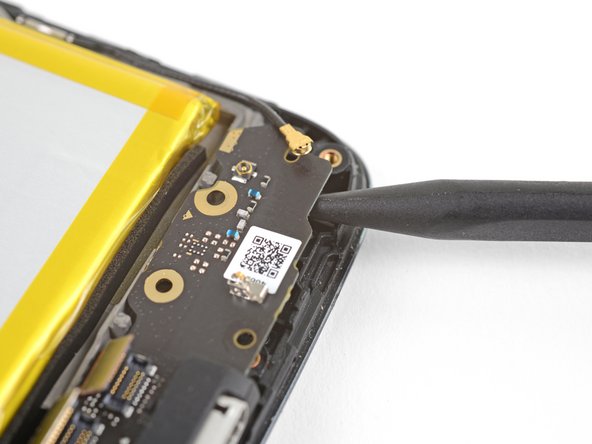
  10. Motorola Moto E4 Plus Daughterboard Replacement, Loosen the daughterboard: 手順 10、 2の画像 1 Motorola Moto E4 Plus Daughterboard Replacement, Loosen the daughterboard: 手順 10、 2の画像 2
    • Insert the point of a spudger under the bottom right corner of the daughterboard and pry up to loosen the daughterboard.

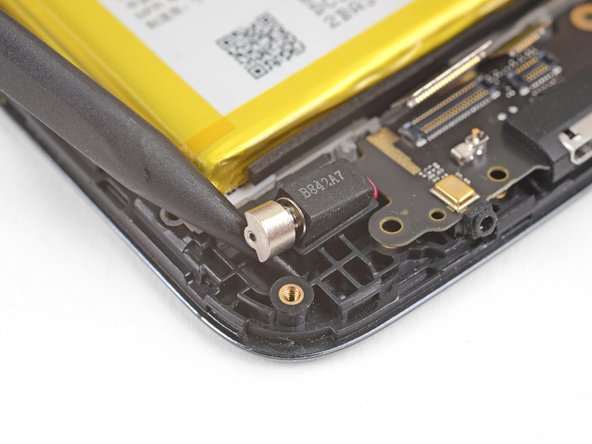
  11. Motorola Moto E4 Plus Daughterboard Replacement, Loosen the vibration motor: 手順 11、 2の画像 1 Motorola Moto E4 Plus Daughterboard Replacement, Loosen the vibration motor: 手順 11、 2の画像 2
    • Insert the point of a spudger underneath the vibration motor and pry upwards to loosen it.

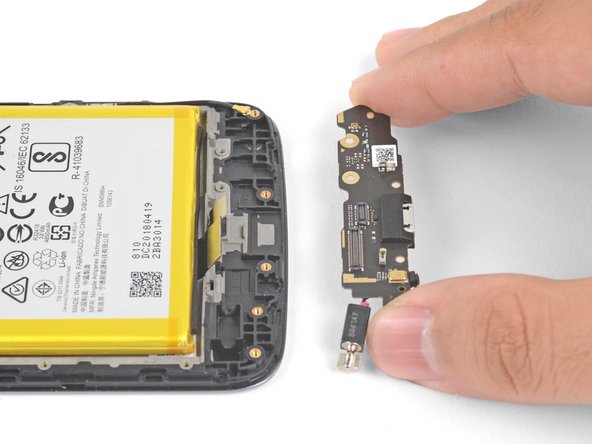
  12. Motorola Moto E4 Plus Daughterboard Replacement, Remove the daughterboard: 手順 12、 2の画像 1 Motorola Moto E4 Plus Daughterboard Replacement, Remove the daughterboard: 手順 12、 2の画像 2
    • Grasp the daughterboard by the edges and lift it out of its recess.

    • Remove the daughterboard. The vibration motor will be attached to it.

終わりに

To reassemble your device, follow these instructions in reverse order.

2 の人々がこのガイドを完成させました。

作成者

2人の作成者と共同で作成されました。

Arthur Shi

メンバー登録日: 01/03/18

249,876 ポイント

503のガイドは作成済み

チーム

iFixit iFixit人のメンバー

Staff

135 メンバー

16,734のガイドは作成済み

0 件のコメント

コメントを追加

統計データ:

過去 24時間: 0

過去 7 日: 4

過去 30 日: 9

今までの合計 1,469