はじめに
Use this guide to remove or replace the Moto E4 motherboard.
Before you begin, download the Rescue and Smart Assistant app to backup your device and diagnose whether your problem is software or hardware related.
必要な工具と部品
-
-
Remove the plastic cover by gently prying it up from the notch at the bottom right corner of the phone.
-
With the phone face down, lift the battery up by the labeled tab and remove it from the device.
-
-
-
Remove all nine 4 mm Phillips screws from the top plastic cover.
-
-
-
Gently pry up the plastic cover using a plastic opening tool.
-
Start by inserting the tool under the cover's right edge, as indicated by the first picture.
-
Pry up, and continue prying around the rest of the cover in a counter clockwise path.
-
Once loose, remove the plastic cover from the phone.
-
-
-
-
Disconnect the display cable by prying it straight up from the motherboard.
-
-
-
Unlock the ZIF connector for the side buttons by prying up the black locking flap opposite the cable.
-
Pull the cable carefully toward the edge of the phone to slide it from its socket.
-
-
-
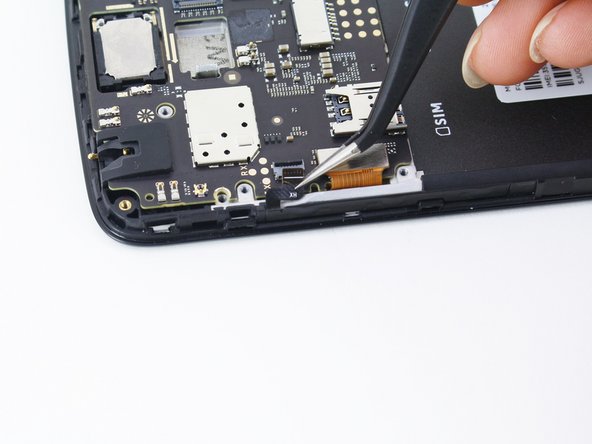
Disconnect the antenna cable by sliding a plastic pry tool or fine tweezers under the wire close to its socket, and then prying straight up.
-
-
-
Grab the top edge of the motherboard and lift to hinge it upward (but don't try to fully remove it). While doing so, keep all other cables clear of the motherboard.
-
Use a spudger or other fine-tip pry tool to pry off and disconnect the last remaining ribbon cable on the underside of the motherboard.
-
Remove the Moto E4 motherboard.
-


To reassemble your device, follow these instructions in reverse order.
To reassemble your device, follow these instructions in reverse order.
6 の人々がこのガイドを完成させました。
チーム

Cal Poly, Team S2-G4, White Winter 2019 Cal Poly, Team S2-G4, White Winter 2019人のメンバー
CPSU-WHITE-W19S2G4
4 メンバー
22のガイドは作成済み