メインコンテンツにスキップ

Motorola Droid RAZR Battery Replacement

必要な工具と部品

  1. Motorola Droid RAZR Battery Replacement, Back Cover: 手順 1、 2の画像 1 Motorola Droid RAZR Battery Replacement, Back Cover: 手順 1、 2の画像 2
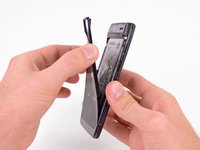
    • Insert a plastic opening tool between the back cover and rear case at the lower left edge of the back cover.

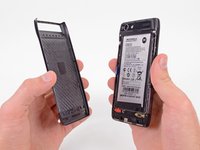
    • Pry the back cover up with the plastic opening tool to free the plastic clips.

    • Continue prying along the left edge of the back cover towards the top of the phone.

  2. Motorola Droid RAZR Battery Replacement: 手順 2、 3の画像 1 Motorola Droid RAZR Battery Replacement: 手順 2、 3の画像 2 Motorola Droid RAZR Battery Replacement: 手順 2、 3の画像 3
    • Work the plastic opening tool across the top of the back case to free the plastic clips.

    • The top edge of the back case is very thin. Pry carefully to avoid cracking or snapping it.

    • Continue prying down the right side of the back cover to free the remaining clips.

  3. Motorola Droid RAZR Battery Replacement: 手順 3、 3の画像 1 Motorola Droid RAZR Battery Replacement: 手順 3、 3の画像 2 Motorola Droid RAZR Battery Replacement: 手順 3、 3の画像 3
    • Pull the back cover away from the phone to remove it.

    • The back cover is attached to the battery with a generous amount of adhesive, so you may have to use quite a bit of force to separate the two pieces.

    • The battery must remain in the phone and not come off with the back cover or you will break the power lead.

    • Since the back cover is made of Kevlar, it can handle a fair amount of twisting and tugging without breaking.

  4. Motorola Droid RAZR Battery Replacement, Battery: 手順 4、 2の画像 1 Motorola Droid RAZR Battery Replacement, Battery: 手順 4、 2の画像 2
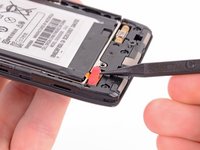
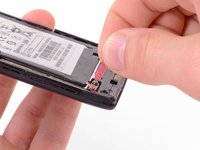
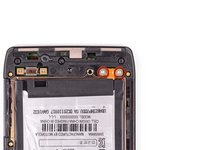
    • Use the tip of a spudger to lift up the red silicone cover over the battery terminal screws and remove it.

  5. Motorola Droid RAZR Battery Replacement: 手順 5、 3の画像 1 Motorola Droid RAZR Battery Replacement: 手順 5、 3の画像 2 Motorola Droid RAZR Battery Replacement: 手順 5、 3の画像 3
    • Remove the two 3.3 mm T5 Torx battery terminal screws.

    • Grab the blue battery removal tab and lift the battery out to remove it.

    • There is quite a bit of adhesive securing the battery to the motherboard. Work slowly to avoid deforming the battery.

    • Your phone will have a number of metal EMI shields on the motherboard, rather than the bare ICs seen here.

終わりに

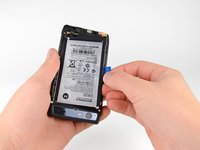
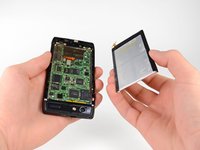
To reassemble your device, follow these instructions in reverse order.

46 の人々がこのガイドを完成させました。

作成者

3人の作成者と共同で作成されました。

David Hodson

メンバー登録日: 04/13/10

150,493 ポイント

127のガイドは作成済み

8 件のコメント

Where can i get a battery?

Jennifer Monticello - 返信

You can find a replacement Droid Razr Battery at www.cellphone-repair-shop.com

H M -

Great guide. Honestly the spudger tool made it soooo easy.. I even used the spuder to remove the case from the phone. gently inserting the spudger while using slight pressure on removing the case. you could hear the small cracks as the adhesive gave way.. Take your time when doing this and it will come out just fine.... Also used the spudger on removing the battery from the case..... again carefully inserting the tool while pulling up slowly with the blue tab...

You guys rock.....Thanks again.

alphageek20 - 返信

I bought a knock off brand battery off of amazon and used it. At first i thought it wouldn't work but after a little playing around with it i got it to fit. Big thing is be delicate, SLOWLY remove the back paneling and try not to bump the bottom thing where the screws go.

Thomas Butler - 返信

Very helpful and informative article, it made it easy for me to fix my phone at home. Thank you a million!

Squedwart • - 返信

コメントを追加

統計データ:

過去 24時間: 3

過去 7 日: 10

過去 30 日: 23

今までの合計 211,257