メインコンテンツにスキップ

Moto G4 Midframe Replacement

必要条件のみ
この修理ガイドは、他のガイドの前提条件として使用されます。それ自体は不完全で、単独で使用されることはありません。

必要な工具と部品

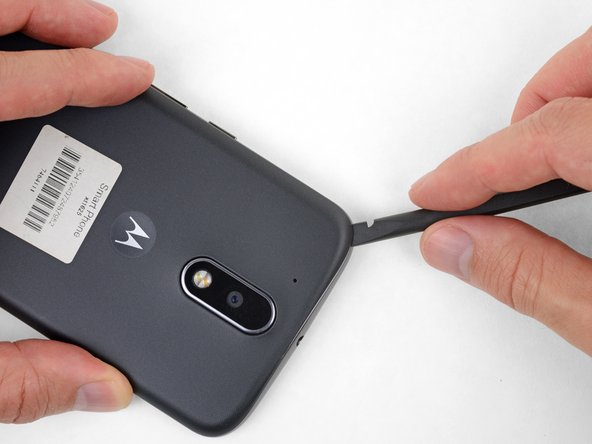
  1. Moto G4 Midframe Replacement, Back Cover: 手順 1、 3の画像 1 Moto G4 Midframe Replacement, Back Cover: 手順 1、 3の画像 2 Moto G4 Midframe Replacement, Back Cover: 手順 1、 3の画像 3
    • Insert a fingernail or a spudger into the notch on the bottom edge of the phone, near the charge port.

    • Gently twist or pry to open a small gap between the back cover and the body of the phone.

    • While keeping your tool (or fingernail) inserted into the gap between the back cover and the body of the phone, slide it around the corner to begin loosening the plastic clips holding the cover in place.

  2. Moto G4 Midframe Replacement: 手順 2、 2の画像 1 Moto G4 Midframe Replacement: 手順 2、 2の画像 2
    • Slide your tool all along the side of the phone to separate more of the clips securing the back cover.

  3. Moto G4 Midframe Replacement: 手順 3、 3の画像 1 Moto G4 Midframe Replacement: 手順 3、 3の画像 2 Moto G4 Midframe Replacement: 手順 3、 3の画像 3
    • Keep your tool inserted slightly under the back cover, and slide it around the top corner.

    • If necessary, continue prying around the remaining edges of the phone until the back cover comes free.

  4. Moto G4 Midframe Replacement: 手順 4、 2の画像 1 Moto G4 Midframe Replacement: 手順 4、 2の画像 2
    • Remove the back cover.

    • To install the back cover, carefully position it over the phone and then press gently all around the edges until you feel the clips snap into place.

  5. Moto G4 Midframe Replacement, Midframe: 手順 5、 3の画像 1 Moto G4 Midframe Replacement, Midframe: 手順 5、 3の画像 2 Moto G4 Midframe Replacement, Midframe: 手順 5、 3の画像 3
    • Push to eject and remove the MicroSD and SIM cards (if installed).

  6. Moto G4 Midframe Replacement: 手順 6、 2の画像 1 Moto G4 Midframe Replacement: 手順 6、 2の画像 2
    • Use a spudger to pry up the rubber cover for the camera flash connector.

  7. Moto G4 Midframe Replacement: 手順 7、 1の画像 1
    • Remove the rubber cover.

  8. Moto G4 Midframe Replacement: 手順 8、 2の画像 1 Moto G4 Midframe Replacement: 手順 8、 2の画像 2
    • Use a spudger to disconnect the camera flash connector by prying it straight up.

  9. Moto G4 Midframe Replacement: 手順 9、 1の画像 1
    • Use a T3 Torx driver to remove the nineteen identical 3.1 mm screws securing the midframe.

  10. Moto G4 Midframe Replacement: 手順 10、 1の画像 1
    • Insert a spudger under the midframe at the top left corner, and gently twist to separate it from the body of the phone.

  11. Moto G4 Midframe Replacement: 手順 11、 1の画像 1
    • Remove the midframe.

終わりに

To reassemble your device, follow these instructions in reverse order.

Jeff Suovanen

メンバー登録日: 08/06/13

428,582 ポイント

259のガイドは作成済み

チーム

iFixit iFixit人のメンバー

Staff

135 メンバー

17,243のガイドは作成済み

0 件のコメント

コメントを追加

統計データ:

過去 24時間: 0

過去 7 日: 2

過去 30 日: 8

今までの合計 75