はじめに
Appleのデバイスに飽きてきた方は他にもおられますか?Microsoftから発売された新鮮なSurface Pro 4の中身をひとかじりする時間です。個人的には、この一年間、Microsoftが成し遂げたことや、より修理しやすいラップレット(ラップトップ+タブレット え?一体どっち?)という選択について考えて過ごしてきたことを願っています。中身を見る方法はたった一つしかありません…いやいや二つあります、私たちにはX線ビジョンがあるのです。さあ分解の時間です!
分解の秋のラインアップをご覧いただく際には、私たちのFacebook、Twitter、Twitter日本語版や Instagram をまず #firstにチェックしてください。
必要な工具と部品
-
-
最上位モデルが 2600 ドルを超える価格で登場することを考えると、Surface Pro 4 は他の製品よりも優れており、スペック シートによると有能なことがわかります。
-
12.3インチ PixelSense 2736 × 1824 (267 ppi) IPS LCD ディスプレイ
-
Intel Skylake Core m3 (4M Cache, 2.20 GHz) からCore i7 (8M Cache, 3.80 GHz) CPU
-
4 GB/8 GB/16 GB DDR3L 1600 MHz RAM
-
128 GB/256 GB/512 GB/1 TB of PCIe ソリッドステートストレージ
-
背面8 MP 1080p カメラ、正面5 MP カメラ
-
USB 3.0 ポート、マイクロSDスロット、ミニディスプレイポート、SurfaceConnect 電源ポート
-
802.11a/b/g/n/ac デュアルバンド Wi-Fi とBluetooth 4.0
-
-
この手順は未翻訳です。 翻訳を手伝う。
-
At first glance, the Surface Pro 4 appears to outshine its predecessors with its forward sensor array.
-
We spy at least four nodes of interest. One's a camera, one's probably a microphone, but the rest?
-
On the rear of the new Surface, we find a familiar arrangement of circles—the 8 MP rear-facing camera accompanied by a status LED and microphone.
-
Anxious to see the camera array but too impatient to open the device? X-ray it.
-
-
この手順は未翻訳です。 翻訳を手伝う。
-
That's something we don't see too often—grease! The Pro 4's exposed kickstand hinges are lubricated to meet your transforming computational needs.
-
Just try not to get any lint, or pet hair, or sand in there...
-
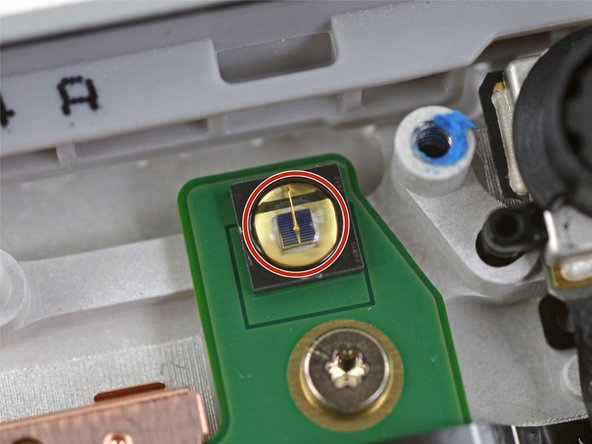
To get such a wide spread of kickstand angles, with the resistance required to support the tablet's weight, Microsoft's engineers probably spent a lot of time on these hinges. So we X-rayed them.
-
-
-
Surface Pro3と同様に、分解エンジニアを悩ませる厄介な悪夢のような分解作業が必要です。今回は最悪の事態に備えました。
-
本体とディスプレイを分離する必要があります。iOpener を温めてからディスプレイの上に置きます。温めることによりディスプレイと本体との接着剤を弱めます。
-
我々が提供する工具のiSclackもディスプレイを分離するために使用しています。
-
温めた接着剤が再び冷えてしまい、本体とディスプレイがくっついてしまう前に、柔らかい素材で作られたオープニング用ピックを差し込みます。
-
-
-
前回、Surface Pro を分解したとき、弾力性のあるメタル製ブラケットの下にディスプレイ コネクタが引っかかるということがありました。
-
今回は、ディスプレイと本体を接続する2 本のケーブルがあり、ヒンジの部分から本のように開くのを妨げています。2本のコネクタに接続されているケーブルを対処しなければいけません。
-
Microsoft は前回の機種からコネクタの設計を変更しました。 ディスプレイ コネクタは、iPhone ディスプレイに似た比較的一般的なプレス オン コネクタですが、薄い蓋のような金属シールドの下にコネクタがあります。
-
-
-
正確にはグリーティングカードではありませんが、ディスプレイの下側には心のこもったバーコードが飾られています。
-
お祝いメッセージかもしれません! おそらく、厳しい品質管理の証です。
-
私たちのお気に入りの時間です。中身のハードウェアであるシリコンベースのICを見て見ましょう。その中には、多くの N-trig ICがあり、Surface ペンのハードウェアを制御しているのではないでしょうか。
-
N-trig DS-D5000 (タッチスクリーンロードライバだと思います)
-
N-trig DS-A5048 (タッチスクリーン ラインドライバだと思います)
-
Macronix MX25U1635F 1.8V 16Mb MXSMIO シリアル フラッシュ メモリがあります。
-
-
-
この手順は未翻訳です。 翻訳を手伝う。
-
Turning our attention to the rest of the Pro 4, we spy a suspicious blank space beside the motherboard (and heat sink tubing!).
-
The motherboard is so close, yet so far. Unable to wait, we skip to dessert and pop off some shields to get a closer look.
-
The rest of the motherboard is nestled too snugly to investigate, but that SSD looks ripe for the picking...
-
-
この手順は未翻訳です。 翻訳を手伝う。
-
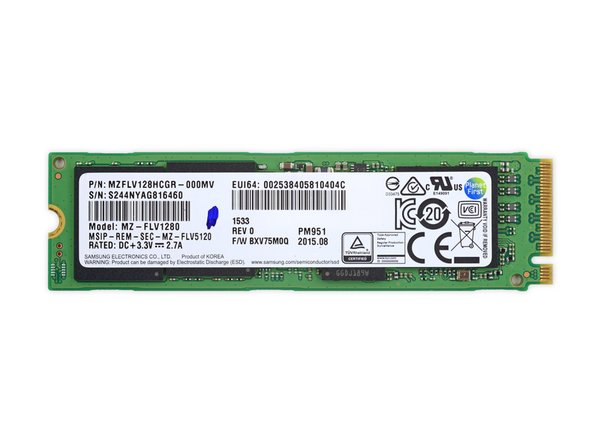
Oh Surface, look how you've grown!
-
The Surface 4's Samsung branded SSD is considerably larger than the little whipper snapper we saw in the previous generation.
-
Awww, they brought us more chips. The 128 GB Samsung PM951 SSD is packing the following:
-
Samsung S4LN058A01-8030 PCIe 3.0 x4 NVMe flash controller
-
Samsung K9CHGY8S5C-CCK0 64 GB NAND flash
-
Samsung K4E4E324EE-SGCF 4 Gb (512 MB) DRAM
-
Texas Instruments TPS22966 5.5V, 6A, 16mΩ, 2-channel load switch
-
Silergy power management (likely)
-
-
この手順は未翻訳です。 翻訳を手伝う。
-
The Surface Pro 4's heat sink shows off its impressive makeover, flaunting longer copper heat pipes and a large copper plate for added heat dissipation.
-
Designed with a hybrid cooling system, the Pro 4 takes advantage of both passive and active cooling.
-
-
この手順は未翻訳です。 翻訳を手伝う。
-
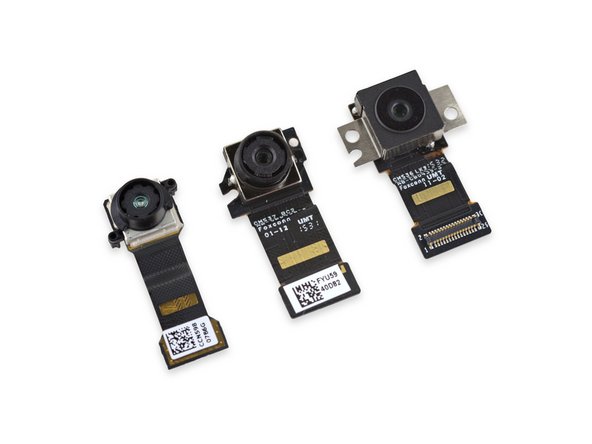
Amidst this sea of tech, the tablet's three cameras all float to the surface.
-
From left to right:
-
Infrared face-detection camera supporting Windows Hello
-
Front-facing 5 MP camera
-
Rear-facing 8 MP main camera
-
-
この手順は未翻訳です。 翻訳を手伝う。
-
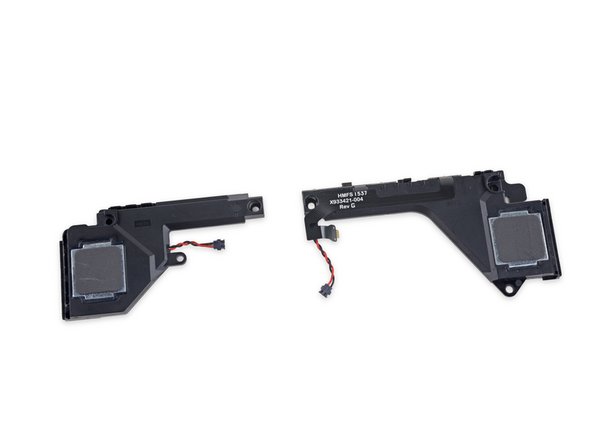
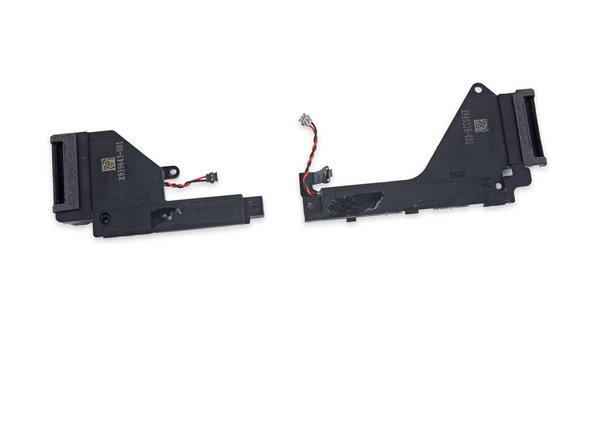
We tweeze out the two stereo speakers from the corners of the case and make an interesting discovery...
-
The Good: These integrated buttons are much less fidgity to replace as one piece than each button individually.
-
The Bad: The entire speaker will have to be replaced to replace one of the buttons, increasing the cost of repair.
-
-
この手順は未翻訳です。 翻訳を手伝う。
-
With the peripherals deftly dissected, we can move on to the main event—the motherboard!
-
Intel SR2EN Core m3-6Y30 (4M Cache, up to 2.20 GHz)
-
Samsung K4E8E304EE-EGCF 8 Gb LPDDR3 (4 chips × 1 GB for a total of 4 GB)
-
Marvell Avastar 88W8897 802.11ac, NFC and Bluetooth SoC
-
Freescale Kinetis KL17 MKL17Z256VFM4 48 MHz ARM Cortex-M0+
-
ITE Tech, Inc. IT8528VG Embedded Controller
-
Realtek ALC3269 Audio Codec
-
Realtek RTS5304 micro-SD Card Reader Controller
-
-
この手順は未翻訳です。 翻訳を手伝う。
-
Chip ID continued...
-
Winbond W25Q128FV Serial NOR Flash
-
Texas Instruments TPS51367 Integrated FET Converter
-
Infineon Technologies SLB96659TT20 Trusted Platform Module
-
Monolithic Power Systems MP3388S 50V, 8-String, Step-Up, White LED Driver
-
And on the reverse...
-
Intersil ISL95857 1+2+1 Voltage Regulator for Intel IMVP8 CPUs
-
This huge array of spring contacts connects the motherboard to the battery and the keyboard dock cable.
-
-
この手順は未翻訳です。 翻訳を手伝う。
-
IC Identification—even more!
-
Bosch Sensortec BMI160 3-Axis Accelerometer/Gyroscope
-
Monolithic Power Systems MP2370DGT White LED Driver
-
Texas Instruments BQ24770 Battery Charge Controller w/ System Power Monitor
-
ON Semiconductor and Winbond Serial Memory
-
Texas Instruments TPS51285A Dual-Synchronous Buck Controller
-
Texas Instruments TPS62140, TPS62175, TPS62134A, TPS62134C, and TPS62134D Step-Down Converter
-
ON Semiconductor NCP380HMUAJAATBG Adj. Current‐Limiting Power‐Distribution Switch
-
-
この手順は未翻訳です。 翻訳を手伝う。
-
This 38.2 Wh, 7.5 V battery is rated at 5087 mAh—a 9 percent decrease from the 5547 mAh battery in the Surface Pro 3.
-
Despite the smaller battery capacity, the 4 generally outperforms the 3 in terms of battery life.
-
Just to compare Apples to oranges, the iPad Air 2 weighs in with a 27.62 Wh battery, however the upcoming iPad Pro is probably a more apt comparison, function-wise. We'll have to wait and see!
-
-
この手順は未翻訳です。 翻訳を手伝う。
-
Microsoft Surface Pro 4 Repairability Score: 2 out of 10 (10 is easiest to repair).
-
The SSD is replaceable.
-
The battery is not soldered to the motherboard, but very strong adhesive makes removal and replacement a hazardous chore.
-
Non-standard connectors make for tricky display removal.
-
The display removal procedure, while difficult, and required for any repair, is not as hard as in previous generations, due to less stubborn adhesive.
-
The display assembly consists of a fused glass panel and LCD, and is difficult to remove and replace.
-
Adhesive holds many components in place, including the display and battery.
-


以下の翻訳者の皆さんにお礼を申し上げます:
30%

これらの翻訳者の方々は世界を修理する私たちのサポートをしてくれています。 あなたも貢献してみませんか?
翻訳を始める ›
82 件のコメント
Looks great, much better than last year's. Pity about the glue for the screen. Would love to see screws. Know it's hard, because these are miracles of engineering, but there are lots of very smart men and women working on this, I'm sure they could find a way, especially since these are billed as enterprise devices, and having worked in an IT department, devices get broken a lot. No pen teardown? I'd imagine it's super similar to last year.
I want one of these even more now. Can't wait to see the Surface Book, if they managed to get one.
Thanks everyone at iFixit, keep up the good work. You're an inspiration to us all.
Is the set of huge connectors on the back of the motherboard in step 14 where the battery connects? They look too large for anything else.
Glad you liked it! They're tough to get ahold of, but we're definitely gunning for a Surface Book as soon as we can! Those are spring contacts on the reverse of the motherboard, that press against the battery cable and also the keyboard dock connector cable. I updated step 14 to mark them up and explain that, thanks for the reminder!
Hi,
I am curious about the copper plate over the battery. Is there some insulation against heat radiation to the battery? Does the plate radiate against the lcd (the battery also tells that the temperatures should not be higher then 140°F. Thinking about how they manage this)?
Thank you for the nice teardown (and fast!).
Hi ddink! The flat plate does diffuse heat into the battery and LCD plate. It actually works as one of two condensers that make up the hybrid cooling system. This article shows a bit more about how that works: http://www.techspot.com/news/62361-surfa...