はじめに
Surface Pro 4はM.2 Samsung SSDが標準装備されています。このガイドでは、SSDが故障した時どう交換するか、そしてアップグレードの方法も書いています。
必要な工具と部品
-
-
-
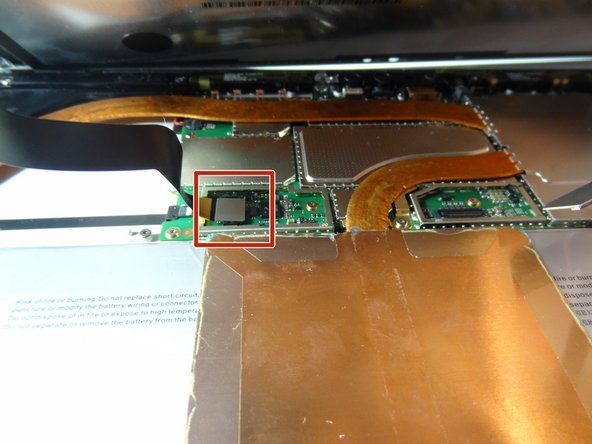
青のプラスチック製開口ツールを使って、SSDドライブを覆っているメタル製シールド端周辺を持ち上げます。
-
-
-
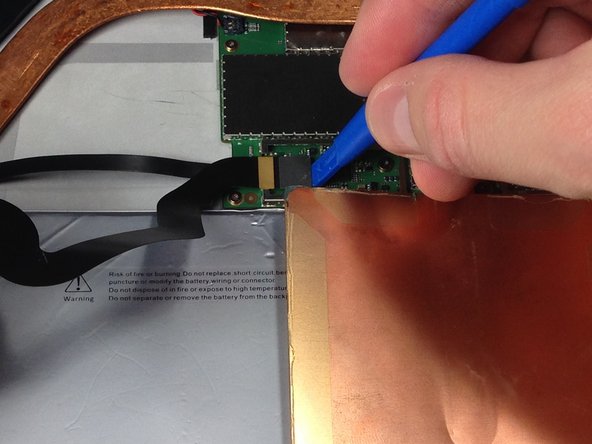
青のプラスチック製開口ツールやスパッジャーを使って、わずかにSSDドライブを持ち上げ、指で掴みます。ドライブを引き寄せて、デバイスから取り外します。
Hi, what kind of hard drive should i get if I were to replace the one that comes with the surface pro 4?
What do you mean follow the steps in reverse? What about the adhesive?
Same as others. I have i5/8GB/256GB model. Same question about the adhesive and which exact SSD replacement.
It’s a m.2 ssd or nvme ssd
josh -
Hallo, ich habe mein Surface pro 4 128gb erweitert durch eine samsung nvme 512gb Disk. Jedoch bootet das Surface nicht von der neuen Platte. 1.versuch war direkt neu installieren
2. Versuch war wiederherstellungslaufwerk
3. Versuch war clonen
Nichts davon hat geklappt. Hat jemand ne Idee?
Erl. Ihr benötigt die samsung pm951 oder pm961. Dann klappt es. :-)
So, the drive in the picture is an m.2-sata (micro sata 2 drive).
Most drives today are SATA (Serial Advanced Technology Attachment)
I haven’t tried this yet, so I’m assuming that the glue would be reheated, screen replaced, and cooled down.
But one of the steps recommends TESA tape, the only thing I can imagine this would be used for is reattaching the screen.
Good luck.
When it says it is difficult, they mean super hard. The screen is very thin and easy to crack. I had one of the guitar picks pop out and the screen cracked. So you I am out an extra $130 for a new screen. Not too big of a deal for me. The touch screen was dead anyway. I just used the black double sided tape to put the screen back on. I used a 1Tb Samsung 970 EVO SSD. Just make sure you have windows 10 install on a thumb drive.
The SSD in the picture is a NVME SSD, not SATA. It only has the notch on the right. SATA drives have 2 notches, left and right sides.
-


デバイスを組み立て直すには、これらの手順と逆の順序に従ってください。
デバイスを組み立て直すには、これらの手順と逆の順序に従ってください。
88 の人々がこのガイドを完成させました。

チーム

Metro State, Team 1-3, Carpenter Spring 2016 Metro State, Team 1-3, Carpenter Spring 2016人のメンバー
MSU-CARPENTER-S16S1G3
2 メンバー
12のガイドは作成済み
44 件のコメント
Can you add more SSD to the SP4??
I would love to upgrade my storage while repairing my broken screen, does anyone know of which sdd would be compatible with my i7 8gb ram 256ssd right now? Does it have to be a samsung ssd or are there other options. Fairly new to computer repair here so would love some experienced advice thanks !
I would prefer a 1TB if possible but would settle for a 512 also.
@bthorne As long as it's the same connection (not sure, but maybe you should look for NVMe M.2 SSD) it should work without problems. You should run a quick search on the internet to check if anyone has found some sort of "blacklisted" parts (some vendors such as Lenovo used to place some code in their firmware which would prevent the computer from booting with a "unauthorized" wireless card for example.).
However I think this is not the case with the Surface Pro 4 or the world would be at rage right now. Just look for any size NVMe M.2 SSD you think it would be fit (if you can afford, look for performance models such as Samsung PRO, there's a huge difference from the cheaper ones.). Hope it helps!
Nmindz -
That's a great instruction. BUT you need to make sure, that the glue is cut thoroughly at the upper edge. Between the glue strip and the aluminum body, there are some antennas, that will break as you lift up the glass. If the unit is shot anyway and you need to rescue the SSD, it's not a problem.
Arent we voiding the guarantee by opening the device this way?
how can i put it back after swaping ssd? espcially screen? do i need to buy some kinda specific glue? to put it back? or just put it pack and heat it once again make it attatched?
jackie kim - 返信
Of course. But then if you're reading this and considering doing it, this won't bother you.
I was using my SP4, it froze and on reboot OS drive is not recognized. Pretty much same questions as others. When reassembling
do you use more adhesive or simply reheat existing adhesive.
Soooo? For those who did replace the SSD/Screen, did you put new glue back on, and if not, any troubles so far regarding the screen?
I cleaned off the glue and applied Tesa 61395 tape and it seems to sit flush and work fine with the exception of the pen. Not sure what I did wrong.
EDIT: The problem with the pen was the pen itself, not the digitizer. I twisted the pen a bit and it works now.
Used 2 sided tape made for just this purpose. Make sure you get all the old tape/glue off. Put the tape on the back of your screen and not the body of the computer. You will not put any by the sensors or the camera's. Amazon sells the tape.
Is there a way to pull the drive out and read it with an external adapter? My SP4 is dead and I want to get some data off the drive. Any recommendations on external adapters I can plug this into and then use a USB3 connection to read the data off of it?
Terry Gore - 返信
There is no USB Adapter for NVME SSDs yet, so you’ve to use an PCI-E Card to read it on a computer.
Dub -
Hi. Found this for you… https://www.amazon.com/dp/B01M8IF0FF/ref...
of course there are USB Adapters… here is one sample:
https://www.amazon.com/ZTC-Enclosure-Ada...
When I buy upgrades for the macbook air, they include the usb adapter.
Nope, that USB-Adapter is not compatible with that drive. It's a M-Keyed NMVE M.2 SSD which are not supported for those/that adapter. It's mentioned in the discription, too.
Robert -
Hi, I think Dub is correct. You need a PCI - E card in a desktop PC to read it. I looked and did not find anything except the PCI - E adapter card. Be very careful. The interface information that you find on the internet about these interfaces is very confusing for the semi technical (me). You must research carefully about the interface and make sure you buy the correct adapter.
The toolkit you offered to fix this was a waste. It didn't even include a T4 screwdriver which is needed for the hard drive screw. Luckily I had one... Also, I found your microwavable heater pop to be useless..... The only way I could heat the glue enough to get the screen off was with a heat gun. Getting the screen off is arguably the hardest part and you don't show any videos (SP3 included) on how to do this.
Terry Gore - 返信
Hi Terry! Thanks for your feedback. This guide was written by one of our awesome community members who documented their repair process to help others learn and have an idea of what to expect when they attempt their own repairs. As such, it's possible for some steps along the way to be missing information that might be critical for others, or some recommended tools might be missing from the list. Our guides are Wiki based, however, so you are able to submit changes to a guide if you feel that it is lacking or incorrect. We've gone ahead and added the Torx T4 screwdriver to the list of tools useful for the repairs.
As a suggestion for the future, instead of leaving a comment at the bottom of the guide, you can add your own comments onto the specific step you're referring to (particularly ones you feel are difficult or worth adding additional caution to). This will give other users the ability to check each step of the guide for additional information that other users find pertinent.
What is the heating settings of the heat gun (please specify in °C or °F) you suggest?
The iFixit guitar picks slid through the glue easily enough once I held the display edges at around 100 C for a few minutes, but I still needed to use some force to actually get the display off. You might actually need to get it hotter - I wasn’t able to get an iSclack working at all, and I ended up tearing one of the antennas, though WiFi seems to be working fine still.
Can somebody reply on the kind of tape we need? Many asked and only one reply but in a too vague way. Any link to an Amazon page?
@tpcware Tesa 61395 should work fine—it’s strong, thin, and very widely used for electronics applications like this. Custom-cut strips in the correct shape would be better, but I’m not sure whether any are available. Be sure to remove all the old adhesive and clean the surface with a bit of isopropyl alcohol before you apply the new tape.
The iSclack and iOpener method didn’t work too well for me - the iOpener was not able to get the glue hot enough for the iSclack to create any gap. I had much better luck with a heat gun and guitar picks starting from the speaker grilles. At the end of the process, the SSD works but for some reason the pen doesn’t. Any suggestions on what I should try to get the pen working again?
Update: the issue with the pen was the pen itself! I twisted the cap a bit and now everything works great.
I want to upgrade storage capacity of surface pro; Can someone in India do this for me, please suggest me a contact.
What model is the stock SSD? And frankly, any device that does not allow for easy ram / SSD memory storage should be soundly criticised. There’s no excuse for simply not designing an easy access panel on the base for these components. It shows contempt for customers and people are too accepting of this seedy marketing ploy.
I have buy sdd, but the surface pro doesn’t work and the logo doesn’t show only blank? What does it mean? How to upload windows 10???
I purchased a WD Blue SN500 500GB Doesn’t work going to buy a samsung evo and i’ll report back.
I bought a Samsung 970 EVO Plus 500GB M.2 NVMe drive for this, but once connected isn’t even showing in DiskPart. Any suggestions?
Once you have replaced the SSD how do you re-seal the screen if you have used a heat gun to remove it?
Hi have surface pro. I took out screen as instructed on your site no problems and no damage.
I replaced the SSD drive only to find thst when I tried to load windows the drive wasn't Showing.
After several hours ove a period of time I could not find a driver to install the hard drive.
I posted the problem on the MS forum and had A reply saying that MS do not support the replacement of an SSD and it should be returned to them for a refurb.
This seams like a nice way to con people out of cash I never heard of any laptop that you could not replace or upgrade a hard drive to.
If anyone knows a way round this I would be grateful to hear it.
All the best.
Have a nice day.
John
After you change the SSD and before closing the back lid do you have to glue the back lid like a mobile?
aren't you missing the steps, or reference to how to open the SP4 so you can replace the ssd?